Chemical Peels for Hyperpigmentation: Proven Results Unveiled

Understanding Hyperpigmentation

Causes

Hyperpigmentation happens when the skin produces too much melanin. Melanin gives skin its color. Sun exposure is a major cause. UV rays trigger melanin production, leading to dark spots.

Hormonal changes also contribute. Pregnancy, birth control pills, and menopause can cause melasma. This condition results in discoloration, brown or gray patches, dark spots, acne hyperpigmentation, and dermal pigmentation on the face.

Certain medications can lead to hyperpigmentation. Drugs like antibiotics and chemotherapy agents sometimes cause pigmentation and dark spots as side effects.

Types

There are several types of hyperpigmentation:

  • Melasma: Often occurs during pregnancy. It appears as large patches on the face.
  • Sunspots: Also known as solar lentigines. These are small, darkened areas caused by sun damage.
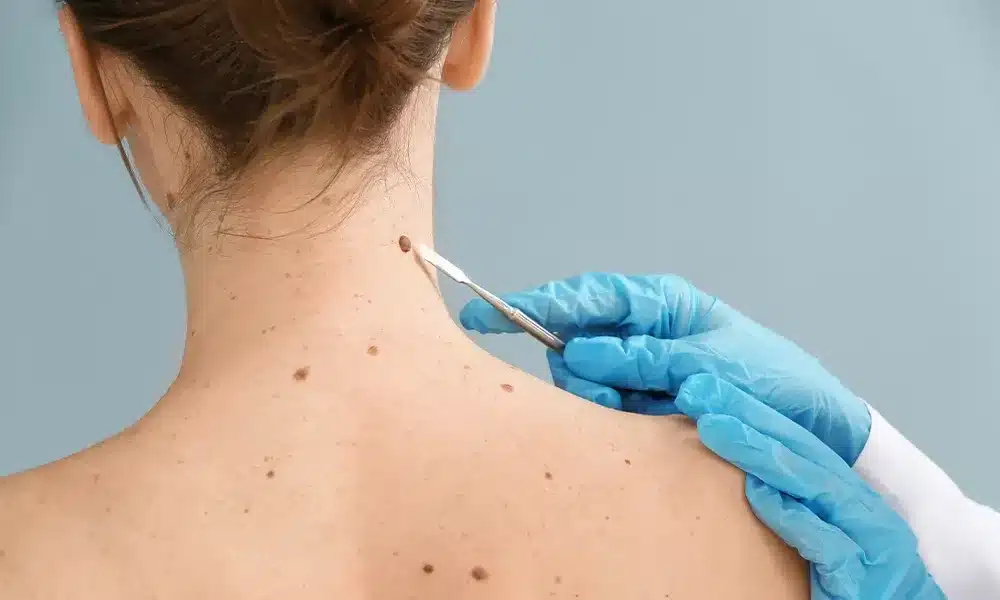
  • Post-inflammatory hyperpigmentation (PIH): Develops after an injury or inflammation, often resulting in a dark spot that may require treatment such as a light chemical peel. Common after acne or eczema.

Treatment Options

Several treatments help reduce hyperpigmentation. Chemical peels are effective. They remove the top layer of skin with a light chemical peel treatment, promoting new skin growth and reducing pigmentation spots.

Laser therapy is another option. It targets pigmentation in the deeper layers of the skin as a treatment similar to a chemical peel. Microdermabrasion also works by exfoliating the skin’s surface.

Topical treatments include hydroquinone and retinoids. These creams lighten dark spots over time.

Chemical Peels

Chemical peels use acids to exfoliate the skin. Glycolic acid is popular for treating hyperpigmentation. It penetrates deeply and removes dead skin cells.

Salicylic acid is another option. It’s effective for oily and acne-prone skin. Lactic acid works well for sensitive skin types.

Peels come in different strengths:

  • Superficial peels: Mild and require little downtime.
  • Medium peels: Penetrate deeper, address pigmentation, and may need a few days to heal after treatment.
  • Deep peels: Very strong and require significant recovery time.

Real-Life Examples

People with hyperpigmentation often feel self-conscious. A woman named Maria struggled with melasma for years. She tried many treatments without success.

Maria finally opted for a series of chemical peels. Over a few months, her dark patches faded significantly. She felt more confident and happy with her appearance.

Another example is John, who had sunspots and pigmentation from years of outdoor work and considered a chemical peel. He chose laser therapy combined with chemical peels. His skin tone evened out, and he noticed fewer dark spots after the chemical peel improved his pigment.

Types of Chemical Peels

Superficial Peels

Superficial peels are the mildest type. They treat the outermost layer of skin. These peels use alpha-hydroxy acids (AHAs) like glycolic acid to target pigment. They are often called “lunchtime peels” because they require little downtime.

Medium Peels

Medium peels penetrate deeper into the skin. They use trichloroacetic acid (TCA). This type is effective for treating moderate hyperpigmentation. Patients may experience redness and peeling for a week.

Deep Peels

Deep peels are the most intense. They use phenol for a chemical peel to reach the deeper layers of skin. These peels can treat severe hyperpigmentation. Recovery time is longer, often taking several weeks.

Enzyme Peels

Enzyme peels are gentler than chemical peels. They use natural enzymes from fruits like papaya or pineapple for a chemical peel. These peels exfoliate without harsh chemicals. They are suitable for sensitive skin types.

Retinol Peels

Retinol peels use vitamin A derivatives. These help in cell turnover and collagen production. Retinol peels are good for treating fine lines and pigmentation issues.

Jessner’s Peel

Jessner’s peel is a combination peel. It uses salicylic acid, lactic acid, and resorcinol. This peel treats sun damage and uneven skin tone effectively.

TCA Cross Technique

The TCA Cross technique targets specific areas. It uses high concentration TCA on scars or spots. This method is precise and minimizes damage to surrounding skin, unlike a chemical peel.

Glycolic Acid Peel Benefits

Exfoliation Power

Glycolic acid peels are known for their strong exfoliation. They remove dead skin cells effectively. This process helps reveal new, fresh skin underneath. The exfoliating action also unclogs pores.

Collagen Production

These peels boost collagen production. Collagen is vital for firm and youthful skin. Increased collagen reduces fine lines and wrinkles. This makes the skin look smoother and more elastic.

Hyperpigmentation Reduction

Glycolic acid peels target hyperpigmentation. They help fade dark spots and uneven skin tone. This is especially beneficial for those with sun damage or acne scars, particularly when used in conjunction with a chemical peel. Over time, the skin becomes more even-toned.

Acne Treatment

Glycolic acid peels also help with acne. They clear out clogged pores and reduce oiliness. This can prevent future breakouts. Existing acne scars can also become less visible.

Improved Skin Texture

Regular use of glycolic acid peels improves skin texture. The skin feels softer and smoother. Rough patches and dry areas diminish. This results in a more refined appearance.

Quick Recovery Time

One advantage is the quick recovery time. Unlike deeper peels, glycolic acid peels have minimal downtime. Redness and irritation usually subside within a few days. This makes them convenient for busy individuals.

Suitable for Various Skin Types

Glycolic acid peels suit many skin types. They are effective for both oily and dry skin. However, people with sensitive skin should proceed cautiously. It’s best to consult a dermatologist first.

Salicylic Acid Peel Uses

Treating Acne

Salicylic acid peels are effective for treating acne. They penetrate the skin deeply. This helps unclog pores and reduce inflammation. The peels also remove dead skin cells, which can prevent future breakouts.

Reducing Oiliness

Salicylic acid is oil-soluble. It can penetrate oily skin better than water-based acids in a chemical peel. This makes it ideal for reducing oiliness on the face after a chemical peel. By controlling excess oil, it helps prevent acne and keeps the skin looking fresh.

Exfoliating Skin

Salicylic acid acts as an exfoliant. It removes the outer layer of dead skin cells. This promotes new cell growth and improves skin texture. Regular use can make the skin smoother and more radiant.

Minimizing Pores

Large pores can be a cosmetic concern for many people. Salicylic acid peels help in minimizing pore size. They clean out the pores and tighten the skin around them. This makes the pores appear smaller over time.

Fading Hyperpigmentation

Salicylic acid peels are useful for fading hyperpigmentation. They lighten dark spots and even out skin tone. Consistent use over several weeks shows noticeable improvements.

Preventing Fine Lines

While not as strong as glycolic acid, salicylic acid can help with fine lines. It stimulates collagen production, which keeps the skin firm and elastic. Over time, this reduces the appearance of fine lines.

Managing Rosacea

People with rosacea often have sensitive skin. Salicylic acid peels can help manage this condition without causing irritation. They reduce redness and inflammation associated with rosacea.

Enhancing Product Absorption

Using a salicylic acid peel enhances product absorption. After peeling, the skin is more receptive to other skincare products. This maximizes their effectiveness.

TCA Peel for Skin Tone

What is TCA

TCA stands for trichloroacetic acid. It’s a chemical that dermatologists use for peels. It helps treat hyperpigmentation.

How TCA Works

TCA removes the outer layer of skin. This process reveals new skin underneath. The peel can be light, medium, or deep. The depth depends on how much TCA is used.

Application Process

A dermatologist applies the TCA solution to the skin. The solution stays on for a few minutes. Then, it is neutralized and washed off. Patients might feel a burning sensation during this time.

Recovery Time

Recovery varies by peel depth. Light peels heal in about a week. Medium peels take one to two weeks. Deep peels may need several weeks to heal completely.

Benefits of TCA Peels

TCA peels offer many benefits:

  • They reduce dark spots.
  • They even out skin tone.
  • They improve skin texture.

Side Effects

Possible side effects include redness and swelling. Some people experience peeling and crusting. These effects usually fade within a few days to weeks.

Real-Life Example

Jane, a 35-year-old woman, had severe hyperpigmentation on her cheeks. She tried many treatments without success. Her dermatologist recommended a medium-depth TCA peel. After two weeks of recovery, Jane’s skin looked much clearer and more even.

Lactic Acid for Renewal

Benefits

Lactic acid is a popular choice for treating hyperpigmentation. It is derived from milk and is an alpha hydroxy acid (AHA). This means it can exfoliate the skin effectively.

This acid helps remove dead skin cells. By doing so, it reveals fresher, more even-toned skin underneath. It also improves skin texture and reduces fine lines.

Application

Lactic acid peels are easy to apply at home. They come in various concentrations, typically ranging from 10% to 30%. For beginners, starting with a lower concentration is safer.

Apply the peel on clean, dry skin. Leave it on for the recommended time, usually between 3 to 10 minutes. Then rinse off with cool water.

Frequency

Using lactic acid peels too frequently can irritate the skin. Start by using it once a week. Gradually increase the frequency based on your skin’s tolerance.

Overuse can lead to redness and peeling. It’s important to listen to your skin’s response and adjust accordingly.

Precautions

Lactic acid can make your skin more sensitive to the sun. Always use sunscreen after applying a peel. This prevents further hyperpigmentation and protects your renewed skin.

Avoid using other strong skincare products on the same day. This includes retinoids and other acids. Combining these can cause irritation.

Real-Life Example

Sarah had struggled with dark spots for years. She decided to try a lactic acid peel after reading about its benefits. After six weeks of weekly use, her skin appeared brighter and more even-toned.

She noticed fewer dark spots and an overall improvement in her complexion. Her experience highlights the effectiveness of lactic acid peels for hyperpigmentation.

Mandelic Acid Peel Advantages

Gentle Exfoliation

Mandelic acid peels offer gentle exfoliation. They work well for sensitive skin types. The large molecular size of mandelic acid penetrates the skin slowly. This reduces irritation and redness.

Effective for Hyperpigmentation

Mandelic acid peels are effective in treating hyperpigmentation. They break down melanin, the pigment responsible for dark spots. Regular use can lighten sunspots, age spots, and acne scars. Visible results often appear within a few weeks.

Anti-Aging Benefits

Mandelic acid also provides anti-aging benefits. It stimulates collagen production, which helps reduce fine lines and wrinkles. The skin becomes firmer and more youthful-looking over time.

Suitable for Acne-Prone Skin

People with acne-prone skin benefit from mandelic acid peels. They have antibacterial properties that help reduce acne-causing bacteria. This can lead to fewer breakouts and clearer skin.

Minimal Downtime

Mandelic acid peels require minimal downtime. Unlike stronger chemical peels, they don’t cause significant peeling or redness. Most people can resume their normal activities immediately after treatment.

Safe for All Skin Tones

Mandelic acid is safe for all skin tones. It carries a lower risk of post-inflammatory hyperpigmentation compared to other acids. This makes it a good option for darker skin tones.

Easy to Use at Home

Many mandelic acid peel products are available for home use. They come in various concentrations, making it easy to find one that suits your needs. Always follow the instructions carefully to avoid over-exfoliation.

Kojic Acid for Even Tone

What is Kojic Acid?

Kojic acid is a natural compound. It is derived from fungi. It is often used in skincare products. Kojic acid helps lighten skin.

How Kojic Acid Works

Kojic acid works by inhibiting melanin production. Melanin gives skin its color. By reducing melanin, kojic acid can help fade dark spots. This makes the skin look more even.

Benefits of Kojic Acid

There are several benefits to using kojic acid:

  • Reduces dark spots: It helps lighten areas of hyperpigmentation.
  • Evens skin tone: It creates a more uniform complexion.
  • Antioxidant properties: Protects the skin from damage.

Usage and Application

Apply kojic acid products once or twice daily. Cleanse the skin first. Then apply a small amount of the product to the affected area. Follow with a moisturizer and sunscreen.

Possible Side Effects

Kojic acid can cause some side effects. These include redness, irritation, and itching. Always do a patch test before full application. If irritation occurs, discontinue use.

Combining with Other Treatments

Kojic acid can be combined with other treatments for better results. For example, use it with mandelic acid peels. This combination can enhance the overall effect on hyperpigmentation.

Vitamin C Peel Effects

Skin Brightening

Vitamin C peels help brighten the skin. They work by removing dead skin cells. This reveals a fresher layer of skin underneath. Vitamin C is known for its ability to reduce melanin production. Melanin causes dark spots and uneven skin tone.

Using a vitamin C peel can make your skin look more radiant. It can also improve overall texture. Many people notice a difference after just one treatment. Regular use can lead to even better results.

Collagen Production

Vitamin C stimulates collagen production. Collagen is a protein that keeps skin firm and youthful. As we age, collagen levels decrease. This leads to wrinkles and sagging skin.

A vitamin C peel boosts collagen levels. This helps reduce fine lines and improves skin elasticity. Over time, your skin may appear smoother and more toned.

Antioxidant Properties

Vitamin C is a powerful antioxidant. It protects the skin from damage caused by free radicals. Free radicals are unstable molecules that harm skin cells.

Antioxidants neutralize these harmful molecules. This reduces signs of aging and prevents further damage. A vitamin C peel provides these protective benefits directly to your skin.

Hyperpigmentation Reduction

Hyperpigmentation occurs when certain areas of the skin become darker than others. This can be due to sun exposure, acne scars, or hormonal changes.

Vitamin C peels are effective in treating hyperpigmentation. The peel lightens dark spots and evens out the skin tone. Consistent use can significantly reduce the appearance of hyperpigmentation.

Safe for Most Skin Types

Vitamin C peels are generally safe for most skin types. They are less likely to cause irritation compared to stronger chemical peels like glycolic acid or salicylic acid.

However, it’s important to do a patch test before full application. Some people may experience mild redness or tingling after using the peel.

Post-Peel Care

After using a vitamin C peel, proper care is essential. Your skin will be more sensitive to sunlight. Always apply sunscreen with at least SPF 30.

Moisturize regularly to keep your skin hydrated. Avoid using other strong skincare products for a few days after the peel.

Precautions and Aftercare

Patch Test

A patch test is essential before using a chemical peel. Apply a small amount of the peel on a hidden skin area. Wait for 24 hours to check for reactions. This helps prevent severe allergic responses.

Avoid Sun Exposure

Avoid direct sun exposure after a chemical peel. The skin becomes more sensitive to UV rays. Use broad-spectrum sunscreen with SPF 30 or higher. Wear protective clothing and hats when outside.

Moisturize Regularly

Keeping the skin hydrated is crucial after a peel. Use gentle, fragrance-free moisturizers. This helps in reducing peeling and dryness. Hydrated skin heals faster and looks healthier.

Avoid Harsh Products

Refrain from using harsh skincare products post-peel. Products with retinoids, exfoliants, or alcohol can irritate the skin. Stick to mild cleansers and soothing creams.

Monitor for Side Effects

Watch for any signs of infection or adverse reactions. Redness, swelling, or pus may indicate complications. Consult a dermatologist if these symptoms appear.

Follow Professional Advice

Always follow the advice of your dermatologist. They can provide personalized care instructions. This ensures optimal results and minimizes risks.

Final Remarks

Chemical peels offer a powerful solution for tackling hyperpigmentation. From glycolic acid to vitamin C, each peel brings unique benefits to rejuvenate your skin and even out your complexion. With the right peel, you can achieve brighter, smoother skin.

Ready to take the plunge? Consult with a dermatologist to find the best chemical peel for your skin type. Follow the recommended precautions and aftercare to maximize results. Start your journey to radiant skin today!

Frequently Asked Questions

What is hyperpigmentation?

Hyperpigmentation is the darkening of skin patches. It occurs due to excess melanin production. Common causes include sun exposure, inflammation, and hormonal changes.

How do chemical peels help with hyperpigmentation?

Chemical peels exfoliate the skin. They remove dead cells and promote new skin growth. This process reduces dark spots and evens skin tone.

Which chemical peel is best for sensitive skin?

Lactic acid peels are gentle. They are ideal for sensitive skin. They exfoliate without causing irritation.

Can I use a glycolic acid peel at home?

Yes, but choose a low concentration (10-20%). Follow instructions carefully. Consult a dermatologist if unsure.

How often should I get a TCA peel?

TCA peels are strong. Use them every 4-6 weeks for best results. Always follow professional advice.

Are there any side effects of chemical peels?

Common side effects include redness, peeling, and sensitivity. These are usually temporary. Follow aftercare instructions to minimize risks.

What precautions should I take after a chemical peel?

Avoid sun exposure. Use sunscreen daily. Keep your skin moisturized. Avoid harsh skincare products for a few days.

Mole Removal Scar Revision: Techniques & Prevention Tips

Understanding Mole Removal

What Are Moles

Moles are small, dark spots on the skin. They can be brown, black, or flesh-colored. Some moles are flat, while others are raised. Moles form when skin cells grow in clusters.

Reasons for Removal

There are several reasons to remove moles. Cosmetic concerns often lead people to seek removal. For instance, a mole on the face might be seen as unattractive, similar to a noticeable scar or significant scarring. Health risks also play a role. Some moles can develop into melanoma, a type of skin cancer.

Consulting a Dermatologist

Before removing a mole, consult a dermatologist. They will assess the mole’s appearance and characteristics. This step is crucial to determine if the mole is benign or malignant. A dermatologist uses tools like dermatoscopes for detailed examination.

Potential for Scarring

Scarring is a natural outcome of mole removal procedures. The extent of scarring depends on the method used and the mole’s size and depth. Surgical excision for mole removals usually leaves more noticeable scars compared to methods like laser removal.

Mole Removal Techniques

Shave Excision

Shave excision is a common mole removal procedure. It involves shaving the mole off the surface of the skin. This technique is suitable for benign moles that are raised above the skin. The doctor uses a small blade to remove the mole. No stitches are needed after this procedure.

Shave excision leaves a flat scar. Over time, the scar fades and becomes less noticeable. This method for performing mole removal is quick and usually done in one visit. It is less invasive compared to surgical excision.

Surgical Excision

Surgical excision is more invasive than shave excision. It involves cutting out the mole and some surrounding tissue. This method is used for larger or suspicious moles. The doctor stitches the wound closed after removing the mole.

This procedure can leave a more significant scar. However, it ensures complete removal of the mole. Surgical excision is often recommended for moles that may be cancerous. The removed tissue can be sent for further testing.

Laser Removal

Laser removal is a nonsurgical option for mole removals. It uses focused light beams to break down mole cells. This method works well for small and flat moles. It causes minimal damage to surrounding skin.

Laser treatment requires multiple sessions. Each session targets deeper layers of the mole until it is fully removed. The recovery time is shorter compared to surgical methods. There is also less risk of scarring in the mole removal area with laser treatments.

Electrodessication

Electrodessication uses electric currents to dry out and remove moles. This method is effective for small, benign moles on the surface of the skin. The procedure involves numbing the area with local anesthesia first for mole removal scar.

The doctor then applies an electric probe to destroy the mole tissue. Electrodessication results in a small mole removal scar that heals over time. It is a quick procedure with minimal discomfort.

Role of Anesthesia

Anesthesia plays a crucial role in mole removal procedures. Local anesthesia numbs the mole removal area, making the process painless for patients. For shave excisions and electrodessication, local anesthesia alone suffices.

In more invasive procedures like surgical excision, local anesthesia ensures patient comfort throughout the surgery. Sometimes, doctors use sedation along with local anesthesia for larger or more complex removals.

Scarring after Mole Removal

Typical Appearance

Scars following mole removal can vary. Initially, they may appear thick and red. This is due to the body’s healing process. The surgical scar might look raised and feel firm.

e people notice a pink or reddish color at first. This is common and usually fades over time. The size of the scar depends on the size of the mole removed.

Gradual Improvement

Over time, scars from mole removal often improve. They become less noticeable. The thickness reduces, and the color fades. This process can take several months.

By six months, many scars are significantly less visible. Some scars may continue to improve even after a year. Patience is important during this healing phase.

Variability in Healing

Not everyone heals the same way. Some individuals may experience abnormal scarring. Keloid scars are one example. These are raised, thick scars that extend beyond the original wound.

People with darker skin tones are more prone to keloid scars. Genetics also play a role. If family members have keloids, there is a higher chance of developing them.

Factors Influencing Scarring

Age

Age plays a crucial role in scar formation. Younger skin tends to heal faster but may result in more noticeable scars. Older skin heals slower and may produce less prominent scars. The elasticity of the skin also decreases with age, affecting how well it recovers from mole removal.

Mole Location

The location of the mole significantly impacts scarring. Areas with high tension, like the shoulders or chest, are prone to more visible scars. Facial moles often leave smaller scars due to better blood supply and healing capabilities. Body regions with thicker skin might develop more pronounced scars.

Removal Method

The method used for mole removal affects the scar’s appearance. Surgical excision often leaves a linear scar but allows precise removal. Shaving or laser treatments may result in less visible scars but might not remove deeper tissue. Each method has its pros and cons regarding scarring.

Postoperative Care

Proper postoperative care is essential for minimizing scars. Keeping the wound clean prevents infection, which can worsen scarring. Moisturizing and protecting the area from sun exposure also help improve healing. Following medical advice on wound care is crucial for the best results.

Genetic Predispositions

Genetics play a role in how one’s skin heals. Some individuals are prone to hypertrophic or keloid scars due to their genetic makeup. These types of scars are raised and can be more noticeable. Knowing one’s family history can help predict potential scarring issues.

Emotional Impact

Scars can have an emotional impact on individuals. Visible scars may affect self-esteem and confidence. Choosing the right removal method and following proper care can reduce this impact. Understanding these factors helps manage expectations and outcomes better.

Scar Visibility Timeline

Initial Stages

Scars from mole removal start forming immediately. The first few days show a dense and rough texture. This is the body’s natural healing process. The wound will look red or pink.

First Few Weeks

In the first weeks, scars might feel raised. They can appear darker than the surrounding skin. This stage lasts about 4 to 6 weeks. The scar tissue begins to remodel itself.

Three Months Mark

By three months, the scar starts to flatten. The color may begin to fade slightly. It still remains visible but shows signs of improvement. Regular care helps in this phase.

Six Months Mark

At six months, scars are much less noticeable. The texture becomes smoother. The color continues to lighten. Sun exposure should be minimized during this period to prevent darkening.

One Year Mark

After one year, the scar reaches its final appearance. It becomes softer and less pigmented. Most scars blend well with the surrounding skin by this time.

Preventing and Reducing Scars

Wound Care

Keep the wound clean and moisturized. This helps prevent infection and promotes healing. Use a gentle cleanser to clean the area daily. Apply an antibiotic ointment to keep it moist. Cover with a sterile bandage to protect from dirt.

Avoid exposing the wound to the sun. UV rays can darken scars, making them more noticeable. Use sunscreen with SPF 30 or higher when going outside.

Avoid Stretching

Do not stretch the scar area. Stretching can cause severe scars to become larger or disfigured. Be mindful of movements that pull on the skin around the wound.

For example, if the scar is on a joint, limit activities that bend the joint excessively. Wearing supportive clothing can also help minimize stretching.

Laser Treatments

Laser treatments are effective for reducing visible scarring. They work by removing damaged skin layers and stimulating collagen production.

There are different types of laser treatments:

  • Ablative lasers: Remove thin layers of skin.
  • Non-ablative lasers: Stimulate collagen without removing skin layers.

Consult a dermatologist to determine which treatment is suitable for your scar type.

Scar Revision Surgery

Scar revision surgery can improve the appearance of noticeable scars. This procedure involves removing the old scar and repositioning the new wound for better healing.

Surgeons may use techniques like Z-plasty or skin grafts. These techniques help blend scars into surrounding skin, making them less visible.

Microneedling

Microneedling is another option for scar reduction. It involves using tiny needles to create micro-injuries in the skin. These injuries trigger the body’s healing response, producing new collagen.

This treatment can reduce minor scars and improve skin texture. Multiple sessions may be needed for optimal results.

Topical Treatments

Topical treatments like silicone gels and creams can help with scar healing. Silicone gels create a protective barrier over the scar, keeping it hydrated and reducing redness.

Creams containing ingredients like vitamin E or onion extract can also aid in reducing scars. Apply these products as directed by a healthcare professional.

Scar Revision Methods

Surgical Techniques

Scar revision surgery involves removing the old scar and closing the wound with fine stitches. This technique is effective for large or deep scars. Simple scar revision surgery can significantly reduce the size of a scar. The surgeon may use local anesthesia during the procedure. Recovery time varies but usually takes a few weeks.

Non-Surgical Techniques

Non-surgical methods include topical treatments and injections. Topical treatments like silicone gel sheets help flatten scars over time. Steroid injections can reduce inflammation and improve scar appearance. These methods work best for smaller, less severe scars.

Laser Treatments

Laser treatments resurface the skin to improve scar appearance. They are effective for various scar types, including acne scars and surgical scars. The laser removes the outer layer of skin, allowing new skin to form. Multiple sessions may be needed for optimal results. Laser treatments offer minimal downtime compared to surgery.

Microneedling

Microneedling uses tiny needles to create micro-injuries in the skin. This process stimulates collagen production, which helps reduce scar visibility. It is effective for treating acne scars and stretch marks. Microneedling can be combined with other treatments like platelet-rich plasma (PRP) for better results.

Chemical Peels

Chemical peels involve applying a chemical solution to the skin, causing it to peel off. This method removes the top layer of skin, revealing smoother skin underneath. It is useful for treating superficial scars. Peels vary in strength; stronger peels require more recovery time.

Dermabrasion

Dermabrasion sands down the top layers of skin using a rotating brush. This technique smooths out uneven surfaces caused by scars. It is effective for raised scars and deep acne scars. The procedure requires local anesthesia and has a longer recovery period than other non-surgical methods.

Fillers

Fillers are injectable substances used to raise depressed scars to the level of surrounding skin. They provide immediate results but are not permanent solutions. Fillers need periodic reapplication to maintain effectiveness.

Addressing Keloid Formation

Keloids vs. Hypertrophic Scars

Keloids are thick, raised scars that grow beyond the original wound. Unlike hypertrophic scars, keloids extend into surrounding tissues. They often appear red or purple and can be itchy or painful.

Hypertrophic scars also rise above the skin but stay within the wound’s boundaries. They usually improve over time. Keloids, however, do not regress naturally.

Steroid Injections

Steroid injections are a common treatment for keloids. These injections reduce inflammation and flatten the scar. Doctors typically use corticosteroids like triamcinolone.

Patients may need multiple injections over several months. This method is effective but can cause side effects like skin thinning.

Laser Therapy

Laser therapy uses focused light to remove scar tissue. It reduces redness and flattens keloids. Different types of lasers target various aspects of the scar.

Pulsed dye lasers (PDL) are popular for treating keloids. They work by targeting blood vessels in the scar tissue. Laser therapy often requires multiple sessions for optimal results.

Surgical Removal

Surgical removal involves cutting out the keloid. Surgeons must be careful, as removing a keloid can lead to another forming. Combining surgery with other treatments improves outcomes.

Post-surgery, doctors may use steroid injections or radiation therapy to prevent recurrence. This combination reduces the chance of new keloid formation significantly.

Early Intervention

Early intervention is crucial for managing keloids. Treating keloids early prevents them from becoming more difficult to manage. Smaller keloids respond better to treatments than larger ones.

Ignoring a developing keloid can result in extensive growth. Early action helps minimize discomfort and cosmetic concerns.

Choosing a Dermatologist

Board-Certified Dermatologists

Selecting a board-certified dermatologist is crucial. These professionals have extensive training and certification. They understand mole removal and scar revision techniques deeply.

Board certification means they passed rigorous exams. It ensures they follow high standards of care. Patients should prioritize this qualification.

Experience Matters

Experience in mole removal and scar revision matters significantly. Dermatologists with years of practice handle complications better. They know how to minimize scarring.

Patients should ask about the dermatologist’s experience. Inquire about the number of procedures performed. Check if they have dealt with similar skin types and concerns.

Consulting Multiple Professionals

Consulting multiple dermatologists is beneficial. Each professional might have different approaches. Some may use lasers, while others prefer surgical methods.

Patients can compare these options. They should ask for patient testimonials. This helps in understanding the effectiveness of different techniques.

Checking Credentials

Credentials are essential when selecting a dermatologist. Verify their board certification status online. Look for any additional certifications or specializations.

Research any publications or contributions to dermatology journals. This can indicate their expertise in specific areas like mole removal or scar revision.

Patient Reviews and Testimonials

Patient reviews provide insights into a dermatologist’s work quality. Look for reviews on trusted medical websites. Pay attention to comments about mole removal and scar healing.

Reading testimonials can reveal how well the dermatologist communicates. It also shows their success rate in managing scars post-procedure.

Techniques and Technologies

Different dermatologists use various techniques for mole removal and scar revision. Some may use advanced laser technology. Others might rely on traditional surgical methods.

Patients should understand these techniques. Ask how each method works and its benefits. Knowing this helps in making an informed decision.

Personalized Care

Each patient’s skin is unique. A good dermatologist offers personalized care plans. They consider the patient’s skin type, history, and specific concerns.

Discussing these details during consultations is vital. It ensures the treatment plan suits individual needs effectively.

Closing Thoughts

Dealing with mole removal scars can feel like a never-ending battle. But with the right techniques and a skilled dermatologist, you can significantly minimize scarring. Understanding the factors that influence scar visibility and taking preventive measures will set you on the right path.

Don’t let scars hold you back. Explore scar revision methods and address keloid formation early. Consult a trusted dermatologist to get personalized advice and treatment options. Take control of your skin’s health today. Your journey to smoother, scar-free skin starts now!

Frequently Asked Questions

What are common mole removal techniques?

Common techniques include surgical excision, shave excision, and laser removal. Each method has its benefits and potential for scarring.

How long does it take for a mole removal scar to heal?

Scars typically heal within 4-6 weeks. However, full scar maturation can take up to a year.

Can I prevent scarring after mole removal?

Yes. Keep the wound clean, moisturized, and protected from the sun. Follow your dermatologist’s aftercare instructions closely.

What factors influence scarring after mole removal?

Factors include the mole’s size and location, your skin type, and how well you follow post-procedure care.

Are there effective methods for scar revision?

Yes. Options include laser therapy, microneedling, chemical peels, and surgical revision. Consult a dermatologist to choose the best method.

How can I reduce the visibility of a mole removal scar?

Use silicone gel sheets, topical treatments like vitamin E or silicone gel, and protect the area from sunlight.

When should I consult a dermatologist about keloid formation?

If you notice raised, thickened scars that extend beyond the original wound site, consult a dermatologist promptly. Early intervention is key.

Electrolysis Hair Removal: Process, Costs, and What to Expect

Understanding Electrolysis

Science Behind Electrolysis

Electrolysis targets the hair follicle’s growth center. It uses chemical or heat energy. This process destroys the hair follicle and root. Permanent hair removal is achieved by preventing new hair from growing through electrolysis treatments and the electric tweezer method.

Thermolysis Method

Thermolysis uses high-frequency current. This creates heat to destroy the follicle. It works well for fine to medium hair. The process is quick, but multiple sessions may be needed for this temporary method of skilled hair removal procedures.

Galvanic Method

Galvanic electrolysis uses a direct electrical current. This causes a chemical reaction in the follicle. The reaction produces lye, which destroys the follicle. Galvanic method is slower but effective for coarse hair.

Blend Method

The blend method combines thermolysis and galvanic techniques. It uses both heat and chemical reactions. This method is versatile and can treat all hair types using galvanic electrolysis. It provides thorough and permanent results.

Proper Electrolysis

Proper electrolysis requires skilled technicians. They ensure the right technique for each hair type. Sessions are customized based on individual needs. Maintaining consistent appointments leads to better outcomes.

Extensive Electrolysis

Extensive electrolysis involves multiple sessions over time. Each session targets different growth cycles of hair. This ensures that all hairs are treated permanently. Patience and persistence are key for success.

Electrolysis vs. Laser

FDA Approval

Electrolysis is the only method approved by the FDA for permanent hair removal. It uses a temporary method with a fine probe inserted into each hair follicle. An electric current destroys the growth center of the hair. Laser hair removal is FDA-approved for hair reduction, not permanent removal.

Treatment Specificity

Electrolysis targets one hair follicle at a time. This makes it precise but time-consuming. Each session can last 15 minutes to an hour. Electrolysis sessions might be needed multiple times for complete results.

Laser hair removal targets pigmented cells in hair follicles. It covers larger areas quickly. This makes it faster than electrolysis but less precise.

Effectiveness Across Skin and Hair Types

Electrolysis works on all skin and hair types. It does not rely on pigment, so it is effective for everyone. This includes people with light or gray hair, which laser cannot treat effectively.

Laser hair removal works best on light skin with dark hair. The contrast between skin and hair allows the laser to target follicles more effectively. Darker skin or lighter hair can make laser treatments less effective.

Number of Sessions Required

Many electrolysis sessions are often required for complete results. Each hair must be treated individually. This can take months or even years, depending on the area being treated.

Laser treatments usually require fewer sessions. Initial laser hair removal session can cover a large area quickly. Follow-up sessions are spaced out over weeks or months.

Costs Comparison

Electrolysis costs vary based on the number of sessions needed. Each session’s cost can add up over time due to the precision required.

Laser hair removal costs also vary but tend to be lower per session compared to electrolysis. However, multiple sessions are still needed for best results.

Medical Devices Used

Electrolysis devices include medical-grade probes and electric tweezers. These tools ensure precision in targeting each follicle.

Professional laser hair removal uses advanced lasers designed for cosmetic use. These devices are optimized for safety and effectiveness on larger areas.

Causes of Unwanted Hair

Genetics

Genetics play a significant role in unwanted hair growth. If your parents or grandparents had extra hair growth, you might also experience it. This trait can be passed down through generations. Different ethnic groups have varying tendencies for hair growth. For example, individuals of Mediterranean descent often have more body hair.

Hormonal Imbalances

Hormonal imbalances are another common cause. Conditions like polycystic ovary syndrome (PCOS) can lead to excessive hair growth. PCOS affects hormone levels, causing an increase in androgens. Androgens are male hormones that both men and women have. Higher levels of these hormones can trigger new hair growth in areas where women typically do not grow much hair, such as the face and chest.

Medications

Certain medications can cause unwanted hair growth as a side effect. Drugs like anabolic steroids, some antidepressants, and certain types of birth control pills can affect hormone levels. These changes can stimulate hair follicles, leading to increased hair growth.

Medical Conditions

Various medical conditions can lead to unwanted hair. Cushing’s syndrome is one such condition. It results from high cortisol levels, which can cause extra hair growth. Another example is acromegaly, a condition where the body produces too much growth hormone. This excess hormone can lead to thicker and more abundant body hair.

Electrolysis as a Solution

Electrolysis offers a permanent solution for those struggling with unwanted hair due to these factors. It works by destroying the hair follicle using electric current. Unlike temporary methods like shaving or waxing, electrolysis provides long-term results.

Hair Follicle Destruction

The process involves inserting a fine probe into the hair follicle. An electric current passes through the probe to destroy the follicle. This prevents the follicle from producing new hairs. It is effective for all skin types and hair colors.

Permanent Hair Removal

Electrolysis is one of the few methods approved by the FDA for permanent hair removal. It targets each hair individually, making it highly effective for small areas like the upper lip or chin. For larger areas, multiple sessions may be required.

Home Hair Removal Methods vs Professional Electrolysis

Home hair removal methods are often temporary and less effective. Shaving only cuts the hair at the surface level, requiring frequent maintenance. Waxing pulls the hair from the root but does not destroy the follicle, so hairs eventually grow back.

Professional electrolysis offers a more successful hair removal experience compared to home methods. The precision and expertise involved ensure better results.

Ideal Candidates

Wide Range

Electrolysis suits a wide range of people. It works on any skin type and hair color. Unlike laser hair removal, electrolysis does not depend on hair pigment. This makes it ideal for people with light or gray hair.

People with sensitive skin can also benefit. Electrolysis is safe and effective for all skin tones. It offers a solution where other methods might fail.

Permanent Removal

Many seek electrolysis for permanent hair removal. It appeals to those wanting smooth skin without constant shaving or waxing. Personal comfort is a key reason many choose this method.

Aesthetic reasons also drive people to electrolysis. They want to remove unwanted hair from visible areas like the face or arms. Electrolysis provides a lasting solution.

Gender Transition

Electrolysis is crucial for some undergoing gender transition. Removing facial and body hair helps align their appearance with their gender identity. This process can be emotionally significant.

Transgender individuals often need permanent solutions. Shaving or waxing may not offer the desired results. Electrolysis provides the permanence they seek.

Hirsutism Solution

Hirsutism causes excessive hair growth in women. This condition can be distressing and impact self-esteem. Electrolysis offers a permanent solution for those affected.

Women with hirsutism find electrolysis effective. It targets individual hairs, ensuring thorough removal. The results are long-lasting, reducing the need for frequent treatments.

Treatable Body Parts

Face

Electrolysis can treat various facial areas. It targets upper lips, chins, and cheeks. Eyebrows are another area electrolysis can handle with precision. This method ensures the removal of unwanted hair without causing scarring.

Arms

Both upper and lower arms are treatable with electrolysis. It provides a permanent solution compared to temporary methods like shaving or waxing. Sessions may vary depending on the density of hair.

Legs

Electrolysis is effective for large areas like legs. It offers a comprehensive solution for those seeking smooth skin. The treatment might require multiple sessions due to the larger area.

Bikini Line

The bikini line is a sensitive zone that electrolysis can treat safely. Unlike other methods, it minimizes the risk of irritation and ingrown hairs. This makes it ideal for intimate areas.

Back

Electrolysis can also treat the back, another large area. It’s particularly useful for those with dense hair growth in this region. Multiple sessions ensure thorough hair removal.

Chest

Both men and women can benefit from electrolysis on the chest. The procedure is safe and effective, providing long-lasting results. It’s a great alternative to other temporary methods.

Underarms

Underarms are another common area treated by electrolysis. The procedure ensures smooth skin without the need for frequent shaving. This reduces the risk of irritation and razor burns.

Abdomen

The abdomen is also treatable with electrolysis. It’s suitable for removing fine or coarse hair in this area. Sessions might be shorter due to the smaller surface area compared to legs or back.

Treatment Process

Consultation

The electrolysis process begins with a consultation. During this session, the technician examines the area to be treated. They assess hair type and skin sensitivity. This step helps in creating a tailored treatment plan.

Preparation

Before starting, the skin is cleaned. Any makeup or lotion is removed. A numbing cream may be applied to minimize discomfort. This preparation ensures better results and reduces pain.

Hair Removal Session

During the session, a fine probe is inserted into the hair follicle. An electric current passes through the probe. This current destroys the hair root. The treated hair is then removed with tweezers.

Multiple Sessions

Electrolysis requires multiple sessions for permanent results. Hair grows in cycles: anagen, catagen, and telogen. Not all hairs are in the same cycle at once. Multiple treatments target hairs in their growth phase (anagen).

Treatment Duration

The duration of each session varies. Small areas like the upper lip may take 15 minutes. Larger areas like legs can take up to an hour. The number of sessions needed depends on the area and individual hair growth patterns.

Post-Treatment Care

After each session, proper care is crucial. Avoid sun exposure and harsh chemicals on treated areas. Applying soothing creams can help reduce redness and swelling.

Timeline for Results

A general timeline for seeing results spans several months. For small areas, it might take 6-12 months. Larger areas can take up to 18 months. Patience is key for achieving permanent hair removal.

Side Effects and Costs

Common Side Effects

Electrolysis hair removal can cause some side effects. Temporary redness and swelling are the most common. These usually appear right after treatment. They typically go away within a few hours to a day.

etimes, people may experience slight scabbing or skin dryness. These effects are usually mild. Proper aftercare can help reduce them. Rarely, more serious side effects like infection or scarring occur. This is why choosing a certified professional is important.

Discomfort During Treatment

Discomfort or pain during electrolysis varies. Some describe it as a tingling sensation. Others feel a slight sting. The level of discomfort depends on individual pain tolerance.

Using numbing creams can help reduce pain. Applying ice packs before and after treatment can also minimize discomfort. Discuss any concerns with your technician beforehand.

Long-Term Cost-Effectiveness

Electrolysis is often seen as expensive initially. Sessions can range from $30 to $100 per hour. However, it offers permanent hair removal. This makes it cost-effective in the long run.

Temporary methods like shaving or waxing require regular upkeep. The costs add up over time. Electrolysis eliminates these recurring costs. Over several years, the savings become significant.

Preparing for Treatment

Proper preparation helps minimize side effects and maximize results. Here are some steps:

  1. Avoid sun exposure before your session.
  2. Stay hydrated to keep your skin healthy.
  3. Do not wax or pluck hairs before treatment.
  4. Shave the area 1-2 days prior to your appointment.
  5. Inform your technician about any medications you take.

Following these steps can improve the outcome of your electrolysis treatment.

Post-Treatment Care

Taking care of your skin after treatment is crucial. Apply an antibiotic ointment to prevent infection. Avoid touching or scratching treated areas.

Use gentle skincare products to cleanse the area. Avoid tanning beds and direct sunlight for at least 48 hours post-treatment. Moisturize the skin regularly to aid healing.

Debunking Myths

Pain Levels

Many believe electrolysis is extremely painful. This is not true for everyone. Most people feel only a slight discomfort. The sensation varies based on individual pain tolerance and the area treated. Modern electrolysis machines have settings to minimize discomfort. Some clinics use numbing creams to reduce pain further.

Effectiveness on Hair Types

A common myth is that electrolysis doesn’t work on all hair types. In reality, it is effective on any hair color and type. Unlike laser treatments, which may struggle with light or fine hair, electrolysis targets each hair follicle directly. This makes it a versatile option for everyone.

Risks of Scarring

People often worry about scarring from electrolysis. Properly performed electrolysis rarely causes scars. Certified electrologists are trained to avoid skin damage. Following aftercare instructions also reduces risks. Redness and swelling are normal but temporary side effects.

Permanency of Electrolysis

e think electrolysis only reduces hair growth temporarily. This is false. Electrolysis is the only FDA-approved method for permanent hair removal. It destroys the hair follicle, preventing regrowth. Multiple sessions are needed because hair grows in cycles, but once complete, the results are permanent.

Outdated Procedure

Another myth is that electrolysis is outdated compared to newer methods like laser hair removal. While lasers are popular, electrolysis remains highly effective. Technological advancements have improved the procedure over time. Modern equipment is more precise and comfortable than older versions.

Time Commitment

Many assume electrolysis takes too long to see results. It’s true that multiple sessions are required, typically spaced a week apart. However, each session targets new follicles in the growth phase. Over time, fewer sessions are needed as the number of active follicles decreases.

Cost Comparison

e think electrolysis is more expensive than other methods. While the upfront cost may seem high, it can be more economical long-term. Unlike temporary methods requiring regular upkeep, electrolysis offers permanent results, eliminating ongoing expenses for other treatments.

Choosing an Electrologist

Certified Experts

Selecting a certified electrologist is crucial. Certification ensures that the professional has undergone proper training. Look for credentials from recognized bodies like the American Electrology Association (AEA). These certifications guarantee adherence to safety and hygiene standards.

Experience Matters

Experience in electrolysis is vital. An experienced electrologist will have handled various skin types and hair conditions. This expertise can lead to more effective treatments. Ask how many years they have been practicing and their success rates.

Check Reviews

Reviews provide insight into an electrologist’s reputation. Look for reviews on independent websites. Positive feedback from former clients can indicate reliability. Also, check for any recurring issues mentioned in negative reviews.

Consultation Process

A thorough consultation process is a good sign. The initial consultation should cover your medical history and hair removal goals. The electrologist should explain the procedure, methods used, and potential side effects. This step ensures that you are well-informed before starting treatments.

Questions to Ask

Ask specific questions during the consultation:

  • What certifications do you hold?
  • How many years of experience do you have?
  • What type of equipment do you use?
  • How many sessions will I need?

These questions help gauge their expertise and compatibility with your needs.

Hygiene Standards

Hygiene is critical in electrolysis appointments. Ensure that the electrologist follows strict sterilization practices. Equipment should be cleaned after each use, and disposable needles should be used.

Personalized Treatment Plans

A good electrologist will offer personalized treatment plans. These plans should consider your skin type, hair growth patterns, and pain tolerance. Customization ensures better results and a more comfortable experience.

Final Remarks

Electrolysis offers a permanent solution for unwanted hair, making it a top choice for many. Compared to other methods, it’s versatile and effective on all skin and hair types. Understanding the process and potential side effects helps you make an informed decision.

Ready to take the plunge? Find a qualified electrologist and start your journey to smooth, hair-free skin. Don’t let myths hold you back—embrace the benefits of electrolysis today. Your confidence and comfort are worth it!

Frequently Asked Questions

What is electrolysis hair removal?

Electrolysis is a method of permanent hair removal. It uses electric currents to destroy hair follicles, preventing future growth.

How does electrolysis differ from laser hair removal?

Electrolysis targets each hair follicle individually with electric currents. Laser hair removal uses light to target multiple hairs at once.

Who are ideal candidates for electrolysis?

Ideal candidates have unwanted hair and seek a permanent solution. It works on all skin tones and hair types.

Which body parts can be treated with electrolysis?

Electrolysis can treat nearly any body part, including the face, arms, legs, and bikini line.

What should I expect during an electrolysis session?

Expect a small probe inserted into each hair follicle. The session may cause mild discomfort but is generally well-tolerated.

Are there any side effects of electrolysis?

Common side effects include redness and swelling. These usually subside within a few hours after treatment.

How do I choose a qualified electrologist?

Look for certified professionals with good reviews. Verify their credentials and ask about their experience in the field.

Liposculture Abs: Ab Etching vs. Traditional Lipo

Did you know that over 50% of people are unhappy with their abdominal area, seeking a toned abdomen, liposuction abs, subcutaneous fat reduction, or fat removal surgery? Liposculpture abs can change that. This advanced cosmetic procedure sculpts your midsection using a special liposuction technique, targeting subcutaneous fat and abdominal folds, giving you a defined, toned look. Unlike traditional liposuction, the abdominal etching procedure in liposculpture targets specific fat pockets and contours your abs for a natural appearance, especially popular among men.

Perfect for men struggling to achieve their dream abs through diet and exercise alone, high def liposuction and liposculpture offer quick results with minimal risk and downtime. By using precise techniques like liposculpture procedure, liposuction abs, ab etching, and def liposuction, surgeons can highlight your muscles and create a chiseled look. Whether you’re aiming for a six-pack or just a flatter stomach, this procedure, including liposuction abs, high def liposuction, and ab etching, can help you reach your goals.

Ready to learn more about how liposculpture abs can transform your body? Keep reading to discover the benefits of the liposculpture procedure and what to expect.

Key Takeaways

  • Understand Abdominal Etching: Abdominal etching is a specialized liposculpture procedure and liposuction technique designed to create the appearance of a six-pack by precisely removing fat around the abdominal muscles.
  • Know Your Options: Comparing different techniques, such as traditional liposuction and VASER liposuction, is crucial to finding the best liposculpture procedure for your body and goals.
  • Evaluate Candidate Suitability: Ideal candidates for liposculpture abs are typically close to their ideal weight, have good skin elasticity, and are looking for enhanced muscle definition rather than significant fat reduction.
  • Familiarize with the Procedure: The procedure involves marking the desired muscle lines, making small incisions, and using a cannula to remove targeted fat, sculpting the abs into a defined shape.
  • Weigh Risks and Benefits: Like any surgical procedure, liposculpture or liposuction abs carries risks such as infection, uneven results, or scarring. Ensuring you choose a qualified surgeon for a liposculpture procedure can mitigate these risks.
  • Plan for Recovery: Recovery typically involves wearing compression garments, managing swelling and bruising, and following specific post-operative care instructions to ensure optimal results.

Defining Abdominal Etching

Primary Goal

The primary goal of abdominal etching is to enhance the visual appearance of abs. This is done by sculpting the waistline. Surgeons use precise techniques to create a more defined abdominal area. The procedure targets fat deposits around the muscles.

Precision vs. Traditional Liposuction

Abdominal etching procedures differ from traditional liposuction. Traditional liposuction removes larger amounts of fat. Abdominal etching, however, focuses on precision. Surgeons remove small amounts of fat to highlight the natural contours of the abs. This results in a more detailed and dramatic etching effect.

Consultation Importance

It’s important to consult with a licensed provider experienced in abdominal etching. Not all surgeons have the skills for this precise work. An experienced provider can ensure optimal results and minimize risks. They can also show abdominal etching photos from previous patients as examples.

Health Considerations

Patients must be in good health before undergoing the procedure. Surgeons will evaluate medical history and current physical condition. This ensures that the patient is a suitable candidate for ab etching.

Recovery Process

The recovery process can vary among abdominal etching patients. Most people can return home the same day. However, full recovery may take several weeks. Following post-op instructions is crucial for proper healing and achieving desired results.

Long-term Maintenance

Maintaining results requires a healthy lifestyle. Regular exercise and a balanced diet are key. Patients should continue to care for their bodies even after surgery.

Comparing Techniques

Traditional Liposuction

Traditional liposuction removes fat from specific areas. It involves inserting a cannula under the skin to suction out fat. This technique is effective for reducing fat but lacks precision. Recovery time can be long, often several weeks. Risks include infection, scarring, and uneven results.

Abdominal Etching

Abdominal etching is a specialized liposuction technique. It targets fat around the abdominal muscles to create a more defined appearance. This technique uses smaller cannulas and requires a skilled surgeon. The recovery time is shorter than traditional liposuction, usually around two weeks. Risks are lower due to advanced technology, making it safer and more predictable.

Non-Invasive Body Contouring

Non-invasive body contouring includes methods like CoolSculpting and laser treatments. These procedures do not require surgery. They use cold or heat to destroy fat cells. Recovery time is minimal, often just a few days. However, results are less dramatic compared to surgical options. Risks are low but may include temporary redness or swelling.

Technological Advancements

Technological advancements have improved abdominal etching significantly. Modern tools allow for precise fat removal around the abs. Laser-assisted liposuction and ultrasound techniques enhance safety and effectiveness. These technologies reduce recovery time and minimize risks like infection or uneven results.

Preference for Defined Abs

Individuals seeking highly defined abs often prefer abdominal etching. This method offers more control over fat removal, creating a sculpted look. Traditional liposuction can’t achieve the same level of detail. Non-invasive methods lack the ability to define muscles as precisely.

Ideal Candidate Profile

Body Weight

An ideal candidate for liposculpture abs should be close to their ideal body weight. This means having a Body Mass Index (BMI) within the normal range. Being at this weight helps ensure the procedure targets stubborn fat areas.

Muscle Tone

Good muscle tone is another important characteristic. Muscle definition aids in achieving the desired sculpted look. People who regularly exercise and maintain muscle strength are better suited for this procedure.

Realistic Expectations

Candidates must have realistic expectations. Liposculpture abs can enhance body contours but won’t replace healthy habits. Understanding that results require maintenance through diet and exercise is crucial.

Lifestyle Choices

A commitment to maintaining results is vital. This includes:

  • Regular physical activity
  • Balanced diet
  • Adequate hydration

These habits help preserve the sculpted appearance post-procedure.

Non-Smokers

Individuals who smoke are generally excluded from being good candidates. Smoking can impair healing and increase risks during and after surgery. Quitting smoking is advised before considering the procedure.

Health Conditions

People with life-threatening health conditions are not suitable candidates. Conditions like heart disease or diabetes pose significant risks. A thorough medical evaluation is necessary to ensure safety.

Procedure Walkthrough

Office Consultation

The first step is the office consultation. Patients meet with a board-certified doctor to discuss their goals. The doctor evaluates the patient’s health and abdominal area. They explain the procedure and answer questions.

Pre-Surgery Preparation

Before surgery, patients receive specific instructions. These include fasting guidelines and avoiding certain medications. The doctor may take photos for reference during the surgery.

Surgical Procedure

The surgical procedure begins with marking the abdominal area. This helps guide the strategic removal of fat deposits. The patient is then given anesthesia, usually local with sedation.

Small incisions are made around the abdomen. A thin tube called a cannula is inserted through these incisions. The doctor uses the cannula to remove excess fat.

Fat Removal Technique

The doctor removes fat in a way that sculpts the abdominal muscles. This process highlights the natural muscle lines, creating a more defined appearance. Special attention is given to areas around the six-pack muscles.

Duration and Nature

This specific procedure is typically an outpatient one. It usually lasts about one hour. Patients can go home the same day but need someone to drive them.

Post-Surgery Care

After surgery, patients receive post-operative care instructions. These include wearing compression garments and managing pain with prescribed medications. Follow-up visits are scheduled to monitor recovery.

Recovery Time

Most patients return to work within a week. Full recovery may take several weeks. Exercise and heavy lifting should be avoided during this time.

Sculpting Six-Pack Abs

Artistic Approach

Surgeons aim to create natural-looking six-pack abs through liposculpture. They focus on the abdominals and carefully remove subcutaneous fat. This process, known as abdominal etching, highlights the natural lines of the muscles. The goal is to enhance the appearance of the abdominal muscle lines without making them look artificial.

The liposuction procedure involves small incisions. Surgeons use thin tubes to suction out fat. They target specific areas around the abdominal muscles to create definition. This technique requires precision and skill to achieve dramatic ab etching results.

Individualized Treatment

An individualized treatment plan is crucial for successful liposculpture abs. Each person’s body is different, so the approach must be tailored. Surgeons assess factors like body type, existing muscle tone, and the amount of abdominal fat.

A personalized plan ensures that the results look natural and proportionate. It also helps in setting realistic expectations for the outcome. Surgeons may use imaging technology to visualize the final result before starting the liposculpture procedure.

Post-Procedure Care

Proper post-procedure care is essential for maintaining the sculpted abs. Patients need to follow specific guidelines to ensure optimal healing and results. This includes wearing compression garments to reduce swelling and support the new contours.

Rest is important during the initial recovery period. Avoiding strenuous activities helps prevent complications. Following a balanced diet and staying hydrated aids in faster recovery.

Recommended Exercises

To maintain and enhance sculpted abs, regular exercise is vital. Focused workouts help in keeping the abdominal muscles toned and defined. Some effective exercises include:

  • Planks
  • Crunches
  • Leg raises
  • Bicycle crunches

These exercises target different parts of the abdominal area. Consistency in performing these workouts will help sustain the results of stomach fat removal.

Risks and Safety

Side Effects

Liposculpture abs can have side effects. Some people may experience uneven contouring. This happens when fat removal is not even. Excessive swelling is another possible side effect. It usually goes away after a few weeks. Infection is rare but possible.

Complications

Complications from liposculpture are uncommon. However, they can occur. Blood clots can form, especially if you don’t move around enough after surgery. Anesthesia reactions might happen too. Surgeons take steps to avoid these issues.

Costs

The cost of liposculpture varies. It depends on the surgeon and location. On average, it ranges from $3,000 to $8,000. This does not include extra fees for medications or follow-up care. Insurance usually does not cover cosmetic procedures.

Care

Proper care is essential after liposculpture. Follow all post-op instructions given by your surgeon. Take prescribed medications to reduce pain and prevent infection. Wear compression garments as advised to minimize swelling.

Medication

Medications play a crucial role in recovery. Painkillers help manage discomfort. Antibiotics prevent infections. Anti-inflammatory drugs reduce swelling and bruising. Always follow the dosage instructions carefully.

Anesthesia

Anesthesia is used during the procedure to ensure comfort. Local anesthesia numbs the area being treated. General anesthesia puts you to sleep during the surgery. The type of anesthesia depends on the extent of the procedure and patient preference.

Swelling

Swelling is common after liposculpture abs. It peaks within 48 hours post-surgery and gradually decreases over weeks or months. Compression garments help control swelling and support healing tissues.

Surgeons

Choosing an experienced surgeon is critical for safety and results. Look for board-certified professionals with years of experience in liposculpture abs. Check reviews and before-and-after photos of previous patients.

Infection

Infections are rare but serious complications. Signs include increased redness, warmth, pain, or discharge at the incision site. Immediate medical attention is necessary if infection symptoms appear.

Recovery Insights

Typical Timeline

Recovery from liposculpture abs varies. Most people need about one to two weeks of downtime. Swelling and bruising peak within the first few days. These symptoms gradually lessen.

By the end of the first week, many can resume light activities. Normal routines often restart after two weeks. Full recovery can take up to six months.

Smooth Recovery Tips

Wearing compression garments helps reduce swelling. It also supports the healing area. These should be worn for several weeks.

Avoid strenuous exercise initially. Light walking is fine. This helps prevent blood clots and improves circulation.

Stay hydrated and eat a balanced diet. Proper nutrition aids in faster healing. Follow your doctor’s post-operative instructions closely.

Managing Pain

Pain is common after surgery. Over-the-counter pain relievers are usually enough. Sometimes, doctors prescribe stronger medication.

Elevate your upper body while resting. Use pillows to prop yourself up. This reduces swelling and discomfort.

Dealing with Swelling

Swelling is normal and expected. It peaks within the first 48 hours but gradually subsides over weeks. Compression garments help manage this.

Apply cold compresses during the first 48 hours. Do not place ice directly on the skin. Wrap it in a cloth or towel.

Common Concerns

Fear of complications is normal. Watch for signs of infection like redness, warmth, or unusual discharge. Contact your doctor if these occur.

e may worry about their results immediately post-surgery. Final results can take months to appear due to swelling.

Results and Expectations

Permanent Results

Liposculpture abs can offer permanent results. The fat cells removed do not grow back. However, this doesn’t mean new fat can’t form in other areas. Maintaining a stable weight is crucial for lasting results.

Satisfaction Rates

Many people report high satisfaction rates after liposculpture abs. According to a 2018 study, around 80 percent of patients felt satisfied with their appearance post-procedure. Yet, individual results may vary based on body type and health.

Longevity of Effects

The longevity of the effects depends on several factors. Weight fluctuations can affect the outcome. Aging also plays a role as skin loses elasticity over time. Regular exercise and a balanced diet help maintain the desired look.

Preparation Steps

Proper preparation is essential for optimal results. Consulting a qualified provider ensures you get personalized advice. They will assess your health and body composition to set realistic expectations.

Costs Involved

The cost of liposculpture abs varies widely. Factors include the provider’s experience and location. On average, prices range from $3,000 to $10,000. It’s important to consider this investment when planning the procedure.

Realistic Expectations

Setting realistic expectations is key to satisfaction. Understand that while liposculpture can enhance appearance, it’s not a substitute for a healthy lifestyle. Discussing goals with your provider helps align expectations with achievable outcomes.

Final Remarks

Liposculpture for abs can be a game-changer. It’s about getting that sculpted look you crave. You now know the ins and outs, from defining abdominal etching to understanding the risks and recovery.

Ready to take the plunge? Consult with a qualified specialist to see if you’re a good fit. Your dream six-pack might be closer than you think. Stay informed, stay safe, and take that step toward your ideal body. Curious? Dive deeper and explore your options today!

Frequently Asked Questions

What is abdominal etching?

Abdominal etching is a cosmetic procedure that sculpts the abs to create a defined six-pack appearance.

How does liposculpture differ from traditional liposuction?

Liposculpture focuses on contouring and defining muscles, while traditional liposuction primarily removes fat.

Who is an ideal candidate for abdominal etching?

Ideal candidates are those in good health, close to their target weight, and have some muscle definition but struggle with stubborn fat.

What can I expect during the procedure?

The procedure involves small incisions and precise fat removal around the abdominal muscles to enhance their appearance.

Are there any risks involved with abdominal etching?

Yes, risks include infection, uneven results, and scarring. Always consult with a qualified surgeon.

How long is the recovery period after abdominal etching?

Recovery typically takes 1-2 weeks, with most patients returning to normal activities within a month.

When will I see the final results of my abdominal etching?

Final results generally appear within 3-6 months as swelling subsides and the body heals.

Maintaining a Healthy BMI: Tips for Success

Key Takeaways

  • Understand BMI Importance: Maintaining a healthy BMI through weight management and achieving ideal body weight is crucial for reducing the risk of chronic diseases like heart disease, diabetes, and certain cancers.
  • Identify Influencing Factors: Recognize that genetics, lifestyle choices, nutritional intake, environmental factors, adult overweight, and body fatness all play a role in achieving and maintaining a healthy weight.
  • Balance Energy: Focus on the balance between calorie intake and expenditure to manage weight effectively as part of a healthy eating plan and lifestyle, supporting healthy growth and body fatness.
  • Adopt Healthy Habits: Implement strategies such as regular physical activity and balanced nutritional intake to achieve and sustain a healthy BMI for weight management and safe weight loss.
  • Measure Accurately: Use reliable methods to measure and interpret your weight status, body fatness, and healthy growth to track progress accurately within a healthy eating plan.
  • Sustain Long-Term Success: Maintain your weight loss achievements by continuing healthy eating habits and regular exercise routines.

Why Maintaining a Healthy BMI Matters

Chronic Diseases

A healthy BMI reduces the risk of chronic diseases. Heart disease and diabetes are closely linked to BMI. A high BMI increases the risk of these conditions. Excess body fat can lead to high blood pressure and cholesterol levels; weight management and safe weight loss are crucial. Both are major risk factors for heart disease.

People with a normal BMI, weight management, and safe weight loss have a lower risk of developing type 2 diabetes, according to the healthy weight booklet. This is because their bodies use insulin more effectively. Insulin resistance is less common in individuals with a healthy weight. Thus, maintaining a normal BMI helps prevent diabetes.

Energy Levels

Maintaining a healthy BMI boosts energy levels. People with a normal BMI often feel more energetic. They can engage in physical activities for weight management without getting tired quickly. This is because their bodies are not overburdened by excess weight, allowing for more energy in.

Regular physical activity also becomes easier with a healthy BMI. Exercise helps maintain muscle mass and strength. It also improves cardiovascular health, making daily tasks less exhausting.

Self-Esteem

A healthy BMI positively impacts self-esteem. People with a normal BMI often feel better about their appearance. This can improve mental health and overall well-being.

Low self-esteem is common in those with high or low BMI. Being overweight or underweight can lead to body image issues. Maintaining a healthy weight helps improve confidence and self-worth.

Longevity

Maintaining a healthy BMI contributes to a longer life. Studies show that people with a normal BMI live longer than those with high or low BMI. Excess weight strains the heart and other organs, leading to premature aging.

A balanced diet and regular exercise help maintain a healthy BMI. These habits support overall health and longevity. Avoiding extreme diets and focusing on sustainable changes is key.

Historical Context

The concept of BMI has evolved over time. It was first introduced by Adolphe Quetelet in the 19th century. He developed the formula to assess weight relative to height. Since then, it has become a standard tool for evaluating health risks.

BMI categories include underweight, normal weight, overweight, and obese. Each category helps identify potential health risks associated with different weight ranges.

Understanding Overweight and Obesity

Defining BMI

BMI stands for Body Mass Index. It is a number calculated using a person’s weight and height. The formula is weight in kilograms divided by height in meters squared (kg/m²). BMI helps categorize individuals into different weight statuses. These categories include underweight, normal weight, overweight, and obesity.

Categorizing Obesity

Obesity is further divided into classes. Obesity Class I is a BMI of 30-34.9. Obesity Class II ranges from 35-39.9. Obesity Class III is a BMI of 40 or above. Each class indicates increasing levels of body fatness and health risks.

Health Risks

Being overweight or obese increases the risk of many health problems. Heart disease is one major concern. Extra body weight strains the heart and blood vessels. This can lead to high blood pressure and heart attacks.

Type 2 diabetes is another risk. High body fatness affects insulin use in the body. This leads to elevated blood sugar levels.

Certain cancers are more common among those with excessive body fat. These include breast, colon, and kidney cancer.

Muscle Mass vs. Fat

Not all extra weight means poor health. Some people have higher BMI due to muscle mass, not fat. Athletes often fall into this category.

Muscle mass does not carry the same health risks as extra body fat. It is important to understand if high BMI is due to muscle or adiposity.

Emotional Impact

Being overweight or obese can also affect mental health. People may face stigma and discrimination. This can lead to low self-esteem and depression.

Factors Influencing a Healthy Weight

Genetics and Family History

Genetics can influence weight. If parents are overweight, children may have a higher risk. Family history plays a role in predisposing individuals to being overweight. However, lifestyle choices are crucial. Eating habits and physical activity levels can counteract genetic tendencies.

Metabolism

Metabolism affects weight management. It is the process by which the body converts food into energy. Some people have a fast metabolism and burn calories quickly. Others have a slow metabolism and burn fewer calories at rest. Metabolic rate varies among individuals, influencing how easily they gain or lose weight.

Environment and Habits

Environment significantly impacts weight. Access to healthy foods and safe places for physical activity matter. Habits like diet and exercise play a major role. A diet high in fruits, vegetables, and lean proteins supports a healthy weight. Regular physical activity helps maintain it too.

The Basics of Energy Balance

Energy Balance Concept

Energy balance is the relationship between the calories consumed and the calories expended. This balance determines whether a person gains, loses, or maintains weight. If the energy intake equals energy expenditure, weight remains stable.

Energy In

Energy in refers to the calories taken in through food and drinks. Each type of food has a specific calorie count. For example, one gram of carbohydrates or proteins provides four calories. Fats provide nine calories per gram. Monitoring energy intake helps manage weight.

Energy Out

Energy out is the calories burned through physical activity and bodily functions. Basal metabolic rate (BMR) accounts for most of the energy out. BMR is the energy used for basic functions like breathing and digestion. Physical activities like walking and running also increase energy expenditure.

Weight Gain

Consuming more calories than expended leads to weight gain. Excess energy is stored as fat in the body. For example, eating an extra 500 calories a day can lead to gaining one pound per week. Over time, this can result in significant weight gain.

Weight Loss

Using more calories than consumed results in weight loss. The body uses stored fat for energy when there is a calorie deficit. Reducing daily intake by 500 calories can lead to losing one pound per week. This method helps achieve a healthy BMI over time.

Physical Activity’s Role

Physical activity plays a crucial role in maintaining energy balance. Activities like jogging, swimming, and cycling increase calorie expenditure. Regular exercise helps prevent weight gain and supports weight loss efforts.

Strategies for Achieving a Healthy BMI

Realistic Goals

Set realistic weight loss goals for long-term success. Aim to lose 1-2 pounds per week. This is a safe and achievable rate. Rapid weight loss can lead to muscle loss and nutritional deficiencies.

Use the BMI index chart to determine your target weight range. For adults, a BMI between 18.5 and 24.9 is considered healthy. Teens can use a teen BMI calculator to find their healthy range.

Physical Activities

Incorporate various physical activities into your routine. This helps prevent boredom and promotes adherence. Aim for at least 150 minutes of moderate-intensity exercise each week.

Mix activities like walking, swimming, and cycling. Strength training twice a week helps build muscle mass. Muscle burns more calories than fat, even at rest.

Balanced Diet

Adopt a balanced diet rich in fruits, vegetables, whole grains, and lean proteins. These foods provide essential nutrients without many empty calories.

Avoid processed foods high in sugar and unhealthy fats. They can cause weight gain and other health issues. Drink plenty of water to stay hydrated and help control hunger.

Monitor Progress

Regularly monitor your progress using the BMI formula: BMI = weight (kg) / height (m)^2. Tracking your BMI helps you stay on course.

Keep a food diary or use an app to track what you eat. This can help identify patterns or areas for improvement. Celebrate small milestones to stay motivated.

Seek Support

Seek support from friends, family, or a professional. They can provide encouragement and accountability. Join a group or online community focused on healthy living.

A registered dietitian can offer personalized advice based on your needs. They can help create a meal plan that fits your lifestyle and preferences.

How to Measure and Interpret Weight Status

Measure BMI

To measure BMI, you need your height and weight. Use a scale to find your weight in kilograms. Measure your height in meters using a tape measure. The formula for BMI is:

[ \text{BMI} = \frac{\text{weight (kg)}}{\text{height (m)}^2} ]

For example, if you weigh 70 kg and are 1.75 meters tall, your BMI would be:

[ \text{BMI} = \frac{70}{1.75^2} \approx 22.86 ]

This number helps determine your weight status.

BMI Categories

BMI categories help interpret your body weight. They include:

  • Underweight: BMI less than 18.5
  • Normal weight: BMI 18.5 to 24.9
  • Overweight: BMI 25 to 29.9
  • Obese: BMI 30 or higher

Each category has health implications. Underweight individuals may face nutrient deficiencies. Those in the normal range usually have fewer health risks. Overweight and obese individuals are at higher risk for heart disease and diabetes.

Health Implications

Different BMI categories affect health differently:

  • Underweight: Risk of malnutrition, osteoporosis, and anemia.
  • Normal weight: Lower risk of chronic diseases.
  • Overweight: Increased risk of high blood pressure and cholesterol.
  • Obese: Higher chance of type 2 diabetes, heart disease, and certain cancers.

Maintaining a healthy body mass index can reduce these risks.

Professional Guidance

BMI is a useful tool but not perfect. Athletes or those with high muscle mass may have misleading results. For accurate assessment, seek professional guidance.

Doctors can use other methods like skinfold thickness measurements or bioelectrical impedance analysis. These methods provide more detailed information about body composition.

Tips for Healthy Eating and Exercise

Planning Meals

Plan meals and snacks ahead. This helps avoid unhealthy choices. Use a healthy eating plan to guide you. Include a variety of foods from all food groups. Prepare balanced meals with fruits, vegetables, lean proteins, and whole grains.

Incorporating Exercise

Aim for at least 150 minutes of moderate-intensity aerobic activity per week. This can be achieved by walking, cycling, or swimming. Spread the exercise throughout the week. Regular physical activity supports maintaining a healthy BMI.

Gradual Lifestyle Changes

Make gradual lifestyle changes instead of temporary diets. Small changes are easier to stick with long-term. Replace sugary drinks with water. Add more vegetables to your meals. Over time, these changes lead to sustainable weight management.

Healthy Eating Habits

Develop healthy eating habits to support your goals. Eat regular meals and snacks to keep your energy levels stable. Avoid skipping meals, which can lead to overeating later. Focus on nutritional intake rather than calorie counting.

Sample Meal Plan

A sample meal plan can help get started:

  • Breakfast: Oatmeal with fruit
  • Snack: Greek yogurt with nuts
  • Lunch: Grilled chicken salad
  • Snack: Carrot sticks with hummus
  • Dinner: Baked fish with quinoa and vegetables

This plan includes balanced portions from different food groups.

Controlling Portions

Control portion sizes to avoid overeating. Use smaller plates and bowls. Pay attention to hunger cues and stop eating when full. Portion control is key in maintaining a healthy weight.

Staying Hydrated

Drink plenty of water throughout the day. Water helps regulate body functions and keeps you hydrated. Avoid sugary drinks that add extra calories without nutritional value.

Seeking Information

Refer to credible sources for information on healthy lifestyles. The Healthy Weight Booklet provides guidelines on maintaining a healthy BMI. Consult health professionals for personalized advice.

Maintaining Motivation

Stay motivated by setting realistic goals. Track progress and celebrate small achievements. Surround yourself with supportive people who encourage your healthy habits.

Steps to Take for Weight Loss

Set Modest Goals

Start with a modest weight loss goal. Aim for 5-10% of your body weight. This can lead to significant health improvements. For example, if you weigh 200 pounds, aim to lose 10-20 pounds. Studies show that even small reductions can improve blood pressure, cholesterol levels, and blood sugar.

Reduce Calorie Intake

Focus on reducing calorie intake in a healthy way. Choose nutrient-dense foods like fruits, vegetables, lean proteins, and whole grains. Avoid empty calories from sugary drinks and snacks. Portion control is crucial. Use smaller plates to help manage portions better.

Keep a Food Journal

Maintain a food journal to track what you eat. Write down everything you consume daily. This helps identify patterns and areas for improvement. Be honest and detailed. Note the time of day and how you felt when eating.

Increase Physical Activity

Incorporate physical activity into your daily routine. Aim for at least 150 minutes of moderate exercise each week. Activities like walking, cycling, or swimming are excellent choices. Exercise helps burn calories and boosts overall health.

Stay Hydrated

Drink plenty of water throughout the day. Sometimes thirst is mistaken for hunger. Staying hydrated can prevent unnecessary snacking. Aim for at least 8 glasses of water daily.

Get Adequate Sleep

Ensure you get enough sleep each night. Lack of sleep can affect hormones that regulate hunger. Aim for 7-9 hours of sleep per night. Good sleep supports weight loss efforts.

Seek Support

Join a support group or find a weight loss buddy. Sharing your journey with others can provide motivation and accountability. Support groups offer encouragement and practical tips.

Monitor Progress

Regularly monitor your progress towards your weight loss goals. Weigh yourself weekly and track changes in your food journal. Adjust your plan as needed based on your progress.

Maintaining Your Achievements

Healthy Habits

Healthy habits are crucial. Continue eating balanced meals and exercising regularly. These actions help prevent weight regain.

Set specific goals for your diet. Include fruits, vegetables, lean proteins, and whole grains. Avoid sugary drinks and snacks.

Exercise is equally important. Aim for at least 150 minutes of moderate activity per week. Activities like walking, cycling, or swimming are great choices.

Setting Goals

New fitness goals keep you motivated. They provide a clear path to follow.

Start with small, achievable goals. For example, aim to walk 10,000 steps a day. Gradually increase your target as you progress.

Track your progress. Use apps or journals to record your activities and achievements. Seeing improvements can boost your confidence and determination.

Support System

A strong support system helps maintain healthy changes. Friends, family, or health professionals can offer encouragement and accountability.

Share your goals with them. Their support can make a difference during challenging times.

Join groups or classes that focus on fitness and healthy living. Being part of a community with similar goals can be motivating.

Family History

Consider your family history when maintaining a healthy BMI. Genetics play a role in weight management.

If obesity runs in your family, stay extra vigilant. Adopt habits that counteract genetic risks.

Regular check-ups with a healthcare provider can help monitor your progress. They can also advise on personalized strategies based on your family history.

Breathing Exercises

Breathing exercises improve overall health. They reduce stress and enhance mental well-being.

Incorporate deep breathing into your daily routine. Practice it during moments of stress or before bed.

Yoga and meditation often include breathing techniques. These practices promote relaxation and mindfulness.

Risk Management

Managing health risks is essential for maintaining a healthy BMI. Regular screenings help identify potential problems early.

Monitor cholesterol levels, blood pressure, and blood sugar regularly. These factors impact overall health and weight management.

Adopt preventive measures to reduce risks:

  • Maintain a balanced diet
  • Exercise regularly
  • Avoid smoking and excessive alcohol consumption

Summary

Maintaining a healthy BMI is crucial for your overall well-being. By understanding the factors that influence your weight, you can make informed decisions about your health. From energy balance to practical strategies for achieving and maintaining a healthy BMI, every step you take matters.

Now it’s up to you. Implement these tips for healthy eating and exercise, and take proactive steps toward weight loss if needed. Your health is in your hands. Start today and embrace a healthier lifestyle. Share your journey with friends and family—they might need this too!

Frequently Asked Questions

Why is maintaining a healthy BMI important?

A healthy BMI reduces the risk of chronic diseases like diabetes, heart disease, and hypertension. It also improves overall well-being and longevity.

What factors influence a healthy weight?

Factors include genetics, diet, physical activity, metabolism, and lifestyle choices. Managing these can help maintain a healthy weight.

How can I achieve a healthy BMI?

Combine balanced nutrition with regular exercise. Monitor your progress and make adjustments as needed. Consistency is key.

What is energy balance?

Energy balance means consuming the same amount of calories that your body uses. It’s crucial for maintaining a stable weight.

How do I measure my BMI?

Use an online BMI calculator or the formula: weight (kg) / height (m)^2. Compare your result to standard BMI categories.

What are some tips for healthy eating?

Focus on whole foods, like fruits, vegetables, lean proteins, and whole grains. Avoid processed foods and sugary drinks.

What steps should I take for weight loss?

Set realistic goals, track your progress, and stay consistent with diet and exercise. Consult a healthcare provider for personalized advice.

Buttock Lift Surgery: Procedure, Candidates & Recovery

Key Takeaways

  • Understand the Procedure: A buttock lift can enhance the shape and contour of the buttocks, waist, and abdomen through an incision, improving sitting comfort. Knowing the difference between a BBL (Brazilian Butt Lift) with buttock implants and a traditional lift with cuts and an incision is crucial for making an informed decision.
  • Ideal Candidates: The best candidates for a buttock lift are those with significant skin laxity, fat cells, and excess tissue, often due to weight loss or aging.
  • Preparation is Key: Proper preparation, including medical evaluations, lifestyle adjustments, and incision planning, is essential for a safe and successful surgery.
  • Post-Surgery Care: Following post-procedure care instructions, such as avoiding sitting directly on your buttocks, wearing compression garments, and caring for the incision, can significantly impact recovery and results.
  • Results Timeline: While initial results may be visible soon after surgery, optimal outcomes typically take several months as swelling decreases and tissues settle; view case with your doctor for butt procedures.
  • Awareness of Risks: Be aware of potential risks and complications, such as infection, scarring, or asymmetry, and discuss these thoroughly with your doctor and surgeon.

Understanding Buttock Lifts

Definition and Differentiation

A buttock lift is a cosmetic surgical procedure. It improves the appearance of the buttocks by removing excess skin and fat, as performed by a doctor. This results in a smoother, more youthful look.

Unlike other body contouring procedures like liposuction or tummy tucks, a doctor performing a buttock lift focuses solely on the buttocks. Liposuction removes fat deposits from various parts of the body, including the butt. A tummy tuck tightens the abdominal area. Each procedure has unique goals and techniques.

Main Goal

The primary aim of a buttock lift is to achieve a more toned and lifted appearance of the buttocks. This involves tightening the skin and underlying tissues. The process enhances the natural contours of the lower body, including the butt.

Patients often seek this procedure after significant weight loss or aging, including butt enhancement. Both factors can lead to loose, sagging skin. A buttock lift helps restore firmness and shape.

Comprehensive Body Contouring

A buttock lift can be part of a broader body contouring strategy. Body contouring refers to various procedures that reshape different areas of the body, including the butt.

One example is a lower body lift, which includes:

  • Buttock lift
  • Thigh lift
  • Abdominal contouring

Combining these procedures provides balanced results. Patients see improvements in multiple areas at once.

Role in Lower Body Lift

In a lower body lift, the surgeon addresses several regions together, including the butt. They remove excess skin from the abdomen, thighs, and buttocks in one surgery session.

This approach offers several benefits:

  1. Balanced results: Achieve harmony between different parts.
  2. Single recovery period: Recover from all procedures simultaneously.
  3. Cost-effectiveness: Save on overall surgical costs.

By including a buttock lift in this comprehensive plan, patients gain an overall improved silhouette.

Ideal Candidates for the Procedure

Excess Skin

People with excess skin after significant weight loss, including the butt, are good candidates. This is common after losing a large amount of weight. The skin may not retract fully, leaving sagging areas. A buttock lift can remove this excess skin and improve the overall figure.

Aging Effects

Aging affects skin elasticity. Over time, the skin loses its firmness. This can cause the buttocks to sag. Individuals experiencing these aging effects may benefit from a buttock lift. Plastic surgeons often recommend this procedure to restore a youthful appearance.

Realistic Expectations

Having realistic expectations is crucial. A buttock lift can enhance your figure but won’t create perfection. People should understand what the surgery can and cannot achieve. Discussing goals with plastic surgeons helps set realistic expectations.

Good Health

Candidates must be in good general health. Surgery involves risks, and being healthy reduces complications. Conditions like diabetes or heart problems might affect eligibility. A thorough medical evaluation ensures safety during and after the procedure.

Stable Weight

Maintaining a stable weight is essential before surgery. Significant weight fluctuations can affect results negatively. Gaining or losing weight post-surgery can alter the improved contour. Surgeons advise patients to reach their target weight first.

Non-Smokers

Non-smokers are better candidates for a buttock lift. Smoking impairs healing and increases risks of complications. It’s advised to quit smoking well before surgery if you smoke.

Preparing for Surgery

Medical Review

Patients must undergo a thorough medical review before surgery. Doctors will check overall health and medical history. They will ensure no underlying conditions affect the procedure. A physical exam is also necessary to assess the skin and muscles around the buttock area.

Quit Smoking

Quitting smoking is crucial. Smoking can hinder healing after surgery. It affects blood flow and oxygen levels. Doctors recommend stopping at least six weeks before surgery.

Avoid Certain Medications

Avoiding certain medications is important. Some drugs can increase bleeding risks during surgery. Patients should stop taking aspirin, anti-inflammatory drugs, and herbal supplements two weeks prior.

Arrange Assistance

Arrange assistance for the recovery period. Sitting comfortably may be challenging after a buttock lift. Patients need help with daily tasks like cooking and cleaning. Having someone nearby ensures safety and support.

Anesthesia Discussion

Discuss anesthesia options with your doctor. General anesthesia is often used for a buttock lift. This means patients are asleep during the procedure. Understanding anesthesia helps ease anxiety about surgery.

Pre-Surgery Instructions

Follow pre-surgery instructions carefully. These may include fasting guidelines or special skin preparations. Doctors will provide detailed steps to follow before arriving at the office or hospital.

Weight Stability

Maintain stable weight before surgery. Fluctuating weight can affect results negatively. Aim to keep weight consistent for several months leading up to the procedure.

Mental Preparation

Prepare mentally for surgery and recovery. Understand that healing takes time and patience is required. Being mentally ready helps manage expectations and stress.

The Buttock Lift Procedure

Surgical Process

The buttock lift involves several steps. Surgeons start by making incisions in the buttock area. These are usually placed in the natural creases to minimize visible scarring. Excess skin and fat are then removed to create a smoother, more contoured appearance.

Fat grafting can also be part of the procedure. This involves taking fat from other parts of the body, like the waist, and injecting it into the buttocks for added volume.

Incision Placement

Incisions are strategically placed. They often go along the top of the buttocks or under the butt crease. This helps hide scars once they heal. The surgeon removes excess skin and tightens the remaining tissue.

Buttock implants may be used if more volume is needed. These implants are inserted through these incisions.

Antibiotics Use

Antibiotics play a crucial role during surgery. They help prevent infections that could complicate healing. Surgeons administer antibiotics both before and during the operation.

Post-surgery, patients may continue taking antibiotics to ensure no infections develop as they recover.

Surgical Dressing and Drains

After surgery, surgical dressings cover the incision sites. These protect wounds from infection and aid in healing. Drains might be placed under the skin to remove any fluid buildup.

Drains help reduce swelling and promote faster recovery.

Duration of Surgery

A buttock lift typically takes 2-4 hours to complete. The exact time depends on whether additional procedures like fat grafting or implants are included.

Patients spend some time in a recovery room post-surgery for initial monitoring before being allowed to go home.

Post-Operative Care

Immediate post-operative care is essential for a successful recovery. Pain management is a primary focus right after surgery. Doctors prescribe pain medications to help manage discomfort.

Patients must follow specific guidelines:

  • Avoid sitting directly on their buttocks for at least two weeks.
  • Wear compression garments to reduce swelling.
  • Attend follow-up appointments to monitor healing progress.

BBL vs Traditional Lift

Volume Addition

The Brazilian Butt Lift (BBL) and the traditional buttock lift differ significantly in volume addition. A BBL enhances volume by transferring fat from other parts of the body to the buttocks. This method uses liposuction to harvest fat, which is then purified and injected into the buttocks.

In contrast, a traditional lift does not add volume. It focuses on removing excess skin and tightening the area. There is no fat transfer involved in this procedure.

Skin Removal

A traditional buttock lift primarily involves removing excess skin. This approach tightens and lifts sagging skin, providing a more sculpted appearance. The surgeon makes incisions along the lower back or upper buttocks to remove loose skin.

For a BBL, the focus is not on removing skin but on reshaping and adding volume. The procedure relies on fat grafting rather than cutting away skin.

Patient Goals

Patient goals play a crucial role in choosing between these procedures. Those seeking a fuller, rounder shape may prefer a BBL due to its emphasis on volume enhancement. It provides natural-looking results by using the patient’s own fat.

Patients aiming for a tighter appearance with less sagging might opt for a traditional lift. This method suits individuals who have lost significant weight or experienced aging effects that cause loose skin.

Suitability

Suitability depends on individual needs and body conditions:

  • BBL: Suitable for patients with enough fat in other areas for liposuction.
  • Traditional Lift: Ideal for those with excess skin but insufficient fat for transfer.

Both procedures require careful consideration of patient health and aesthetic goals.

Post-Procedure Care

Early Ambulation

Getting up and moving soon after surgery is vital. Early ambulation helps prevent blood clots, a serious risk after any surgical procedure. Patients should start walking as soon as they are able, usually within 24 hours. This reduces the chances of complications and promotes better blood flow.

Drain Removal Timeline

Drains are often placed to remove excess fluids. These are typically removed within one to two weeks post-surgery. The exact timeline can vary depending on the patient’s condition and the surgeon’s protocol. Keeping track of fluid output helps determine when it’s safe for removal.

Managing Pain

Pain management is crucial for a smooth recovery. Most patients receive prescriptions for pain medication. Taking these as directed ensures comfort and aids in healing. Over-the-counter options like acetaminophen can also be used but should be discussed with your provider.

Caring for Incisions

Proper care of incisions minimizes scarring and prevents infection. Keep the area clean and dry, following all instructions from your surgeon. Avoid submerging in water until cleared by your doctor. Patience is key; rushing this process can lead to complications.

Sleep Position

Sleeping position significantly impacts recovery. It’s advised to sleep on your stomach or side to avoid pressure on the buttocks. Using pillows to support your body can help maintain a comfortable position throughout the night.

Following Instructions

Strictly adhering to your surgeon’s aftercare instructions is essential for optimal recovery. These guidelines are designed based on individual needs and specific surgical details. Ignoring them can delay healing or cause complications.

Patient Community Support

Joining a patient community offers emotional support and practical advice from those who have undergone similar procedures. Sharing experiences helps manage expectations and provides tips for a smoother recovery journey.

Expected Results and Timeline

Appearance of Scars

Scars are a natural part of any surgical procedure. After a buttock lift, scars will be visible initially. They usually appear red and raised. Over time, these scars fade. It can take up to a year for scars to become less noticeable.

Proper care is essential for minimizing scar appearance. Follow the surgeon’s instructions carefully. Use recommended creams or treatments to aid healing.

Longevity of Results

The results of a buttock lift can last many years. However, certain factors can affect longevity. Weight fluctuations are a significant factor. Gaining or losing weight can alter the shape and firmness of the lifted area.

Maintaining a stable weight helps preserve the results longer. Regular exercise also contributes positively. Healthy lifestyle choices play an important role in sustaining the effects.

Final Results Timeline

Seeing final results takes time. Initial swelling and bruising will subside within weeks. The area will continue to improve over several months.

Typically, patients see the final outcome about six months post-surgery. By this time, most swelling has resolved, and tissues have settled into their new position.

Activity Restrictions

Activity levels should be limited during recovery. Avoid strenuous activities for at least six weeks post-surgery. Gradually resume normal activities as advised by your doctor.

Listen to your body and avoid pushing too hard too soon. This precaution ensures proper healing and better long-term results.

Potential Risks and Complications

Common Risks

A buttock lift, like any surgical procedure, carries certain risks. Seroma is a common issue where fluid accumulates under the skin. This can cause swelling and discomfort. Poor wound healing is another risk. This can lead to infections or require additional surgeries. Lastly, scarring can occur. Some people may develop thick or raised scars.

Serious Risks

Combining a buttock lift with augmentation increases the complexity of the surgery. Adverse reactions to anesthesia are a serious risk in such cases. These reactions can range from mild allergic responses to severe complications like respiratory issues. Blood clots are also a concern during lengthy procedures.

Infection Risk

Infections are a significant concern post-surgery. The incision areas must be kept clean to prevent this. Symptoms of infection include redness, warmth, and discharge at the incision site. Fever may also indicate an infection.

Volume Considerations

The volume of tissue removed or added during surgery impacts the outcome and recovery time. Removing too much tissue can lead to an unnatural appearance and long-term discomfort. Adding excessive volume through implants or fat transfer can strain the skin and underlying tissues.

Factors Influencing Risks

Several factors influence the risks associated with a buttock lift:

  • Patient’s overall health
  • Smoking habits
  • Previous surgical history
  • Quality of skin elasticity

Patients should discuss these factors with their surgeon to understand how they might affect their specific case.

Importance of Discussion

Discussing all potential risks with your surgeon is crucial for making an informed decision. Surgeons provide detailed explanations about what to expect before, during, and after the surgery. They also guide patients on how to prepare for surgery and minimize risks.

Final Remarks

You’ve now got a solid understanding of buttock lifts. This procedure can enhance your confidence and body contour. Knowing what to expect and how to prepare, you’re set for a smooth journey. The choice between BBL and traditional lifts is yours, based on your goals.

Ready to take the next step? Consult with a qualified surgeon to discuss your options. Your dream body is within reach. Stay informed, stay confident, and embrace the new you. Reach out today and start your transformation!

Frequently Asked Questions

What is a buttock lift?

A buttock lift is a surgical procedure to enhance the shape and contour of the buttocks. It removes excess skin and fat, resulting in a more lifted and youthful appearance.

Who are ideal candidates for a buttock lift?

Ideal candidates are individuals with loose or sagging skin around the buttocks due to aging, weight loss, or genetics. They should be in good health and have realistic expectations.

How should I prepare for a buttock lift surgery?

Preparation involves medical evaluations, stopping smoking, avoiding certain medications, and arranging for post-surgery care. Your surgeon will give you specific guidelines to follow.

What is the difference between a BBL and a traditional buttock lift?

A Brazilian Butt Lift (BBL) uses fat transfer to enhance volume, while a traditional lift focuses on removing excess skin and lifting the area. Both aim to improve contour but use different techniques.

What can I expect during recovery from a buttock lift?

Expect some swelling, bruising, and discomfort initially. Follow your surgeon’s instructions for care and avoid strenuous activities. Full recovery typically takes several weeks.

When will I see the final results of my buttock lift?

Initial improvements are visible immediately after surgery. However, final results may take several months as swelling subsides and tissues settle into place.

What are potential risks of a buttock lift?

Risks include infection, scarring, asymmetry, changes in sensation, and anesthesia complications. Discuss these with your surgeon to understand how they apply to you specifically.

Microdermabrasion Black Skin: Top Benefits You Should Know

Key Takeaways

  • Microdermabrasion is Safe for Dark Skin: When performed correctly, microdermabrasion can be a safe and effective treatment for individuals with dark skin, offering benefits like improved texture and tone while minimizing risks of transient hyperpigmentation and addressing acne scars.
  • Consult a Professional: Always seek a qualified dermatologist or licensed aesthetician experienced with dark skin to minimize risks of permanent depigmentation, acne scars, mottled hypopigmentation, and ensure optimal results from laser treatment.
  • Pre-Treatment Preparation is Key: Follow pre-treatment guidelines such as avoiding sun exposure and certain skincare products to prepare your skin for procedures like laser irradiation, chemical peeling, and permanent depigmentation, enhancing the effectiveness of the treatment.
  • Post-Treatment Care is Crucial: Adhering to post-treatment care, including moisturizing and avoiding harsh products, helps in the healing process, prevents skin irritation, and maximizes the benefits of microdermabrasion.
  • Sun Protection is Essential: Consistently use sunscreen after treatment to protect your skin from UV damage and prevent hyperpigmentation, hypopigmentation, and acne scar.
  • Regular Treatments for Best Results: For sustained improvements and to address acne, consider scheduling regular microdermabrasion sessions for the epidermis as recommended by your skincare professional.

Understanding Microdermabrasion

What is Microdermabrasion

Microdermabrasion is a popular skin treatment. It rejuvenates the skin by removing dead cells. This process helps in promoting new cell growth. Microdermabrasion uses a special device to exfoliate the stratum corneum of the epidermal layer of the skin.

Safe for Dark Skin

Microdermabrasion can be safe for dark skin when done correctly, preventing hypopigmentation and protecting melanin in the dermis. It’s crucial to use the right technique and equipment. Incorrect application may cause epidermal injury or hyperpigmentation. Consulting a qualified dermatologist is essential.

Skin Structure Differences

Dark and fair-skinned individuals have different skin structures. Melanocytes, which produce melanin, are more active in darker epidermal skin, affecting pigmentary levels. This higher activity affects how treatments like microdermabrasion work. Darker skin types need careful handling to avoid complications.

Mechanical Process

The mechanical process involves using a handheld device. The device sprays tiny crystals onto the skin surface. These crystals gently abrade the stratum corneum, which is the outermost layer of dead epidermal skin cells. After abrasion, suction removes these particles along with dead cells and tissue.

Promoting New Cell Growth

By removing dead cells, microdermabrasion promotes new cell growth. This leads to smoother and brighter skin over time. The procedure also enhances blood circulation in treated areas, aiding in overall epidermal skin health and reducing erythema in skinned patients.

Benefits for Dark Skin

Reducing Hyperpigmentation

Microdermabrasion helps reduce hyperpigmentation in dark skin. It removes the outer layer of dead skin cells. This process can fade dark spots, reduce hypopigmentation, and even out the skin tone. Dark skin patients often struggle with hyperpigmentation and hypopigmentation due to higher melanin content, leading to pigmentary issues. Microdermabrasion is effective because it targets these pigmented areas.

Evening Out Skin Tone

This treatment is beneficial for evening out the skin tone in individuals with a darker complexion, addressing hypopigmentation and pigmentary issues. By removing the top layer of skin, skinned patients see new and healthier skin emerge with reduced hypopigmentation depth and improved light reflection. This results in a more uniform appearance. Ethnic skinned patients can achieve a smoother and more balanced look after several pigmentary sessions with energy.

Increasing Collagen Production

Microdermabrasion stimulates collagen production. Collagen is essential for maintaining firm and youthful-looking skin, according to the study on skinned patients. Increased collagen can improve the texture of dark-skinned patients’ skin, making it feel smoother and appear more vibrant.

Improving Skin Texture

The treatment also enhances overall skin texture. It reduces the appearance of acne scars and fine lines in fair skin patients and individuals with dark skin tone. For those with dark skin tone, improved texture means fewer visible imperfections and a more polished look for skinned patients.

Choosing a Knowledgeable Professional

Selecting an experienced professional is crucial for patients of color undergoing microdermabrasion. A skilled practitioner knows how to handle different skin types, color, and energy safely in skinned patients. They minimize risks like post-inflammatory hyperpigmentation and skin irritation, which can occur in both fair skin patients and dark skin patients if not done correctly.

Pre-Treatment Tips

Skin Assessment

A thorough skin assessment is essential. A professional can tailor the treatment to individual skin types, effects, and color. This helps in identifying any specific needs or concerns.

Different skin types react differently to microdermabrasion. Understanding these reactions can minimize risks and enhance results.

Discontinue Sensitizing Products

Stop using products that may sensitize the skin. These include retinoids, exfoliants, and certain acne treatments.

Discontinuing these products at least one week before treatment can avoid adverse reactions in fair skin patients and dark skin patients. This reduces the risk of irritation for fair skin individuals and ensures better outcomes.

Use Priming Agents

Priming agents prepare the skin for microdermabrasion. Hydroquinone or tretinoin cream are commonly recommended.

These agents help reduce hyperpigmentation risks. They also promote even healing and improve overall results.

Possible Side Effects

Microdermabrasion has possible side effects. These include redness, swelling, and minor bruising.

In rare cases, more severe reactions like skin irritation, scarring, or infection can occur depending on the skin type. Proper pre-treatment care minimizes these risks.

Types of Treatments

There are different types of microdermabrasion treatments available. Crystal microdermabrasion uses fine crystals to exfoliate the skin.

Diamond-tip microdermabrasion uses a diamond-tipped wand to remove dead skin cells in skinned patients, et al. Each type has its benefits and considerations.

Treatment Process

Cleansing

The microdermabrasion treatment begins with cleansing the skin. This step removes dirt, oil, and makeup. It prepares the skin for the procedure. A gentle cleanser is often used to avoid irritation.

Microdermabrasion Procedure

During the microdermabrasion procedure, a device sprays tiny crystals onto the skinned patients’ skin’s surface for the study of color. These crystals exfoliate dead skin cells. The device then vacuums up the crystals and dead cells, reducing skin irritation in skinned patients. This process can take 30 to 60 minutes.

Sensations Experienced

Patients might feel mild tingling during the treatment. Some describe it as a light scratching sensation. There is usually no pain involved.

Customization for Dark Skin

For black skin, customization of the treatment is crucial. The technician adjusts the settings to prevent excessive irritation or damage for fair skin patients based on their skin type study. Lower suction levels are often used to avoid causing thermal injury or hyperpigmentation in fair skin patients.

Post-Treatment Care

After microdermabrasion, soothing products are applied to the skin. These may include moisturizers and sunscreens. They help calm the skin and protect it from UV rays in patients, according to the study, regardless of color.

Post-Treatment Care

Hydration and Skincare

Hydration is crucial after microdermabrasion. Drinking plenty of water helps skin heal faster. Use gentle skincare products to avoid irritation. Opt for a mild cleanser and a fragrance-free, color moisturizer, et al skin patients study.

Skinned patients should avoid harsh chemicals. Products with hyaluronic acid can help retain moisture. This keeps the skin soft and supple.

Sun Protection

Avoid direct sun exposure after treatment. Newly sensitized skin is more prone to damage. Using a broad-spectrum sunscreen is essential. Choose one with at least SPF 30.

Apply sunscreen every two hours when outdoors. Wear protective clothing like hats and long sleeves for added protection, et al.

Follow Professional Advice

Following a professional’s specific aftercare instructions is vital. They know your skin type and its needs best. Ignoring these guidelines can lead to complications.

Professionals may advise on products to use or avoid. They might recommend patients avoiding certain activities that could irritate the skin, et al.

Managing Side Effects

e side effects like redness or swelling are normal. These usually subside within a few days. If symptoms persist, consult your dermatologist.

Avoid picking or scratching the treated area to prevent scarring, skin patients, et al. Keep the area clean to avoid infections.

Identifying Risks

Common Risks

Microdermabrasion can cause temporary redness and swelling. These effects usually last a few hours to a day in skin patients, according to the study. Some people may experience minor discomfort during the procedure. Rarely, microdermabrasion can lead to scarring.

The risk of scarring is higher if the treatment is too aggressive, study et al found in patients. This is especially true for those with sensitive skin. Always inform your dermatologist about any skin conditions beforehand.

Hyperpigmentation

Post-inflammatory hyperpigmentation (PIH) is a significant concern for patients with darker skin tones, as noted in the study by et al. PIH occurs when the skin darkens after an injury or inflammation, as noted in the study by et al involving patients. Microdermabrasion can sometimes trigger this condition.

To mitigate PIH, follow these steps:

  1. Use sunscreen daily.
  2. Apply topical treatments recommended by your dermatologist.
  3. Avoid sun exposure as much as possible.
  4. Follow post-treatment care instructions closely.

These steps help patients reduce the risk of developing hyperpigmentation after microdermabrasion, according to the study by et al.

Signs of Improper Treatment

Improper treatment can cause excessive skin irritation or burns. Watch for signs like severe redness, blistering, or intense pain during or after the procedure, et al., in patients.

If you notice these symptoms, take immediate action:

  • Stop using any harsh skincare products.
  • Apply a cool compress to soothe the area.
  • Contact your dermatologist immediately for advice.

Early intervention can prevent further complications and promote faster healing in patients.

Energy Levels Used

The energy levels used in microdermabrasion vary depending on patients’ skin type and condition, et al. For darker skin tones, lower energy levels are often safer for patients, et al. High energy levels increase the risk of adverse events such as burns or excessive irritation in patients, et al.

Always ensure that your practitioner uses appropriate settings tailored to your skin type and patients. This minimizes risks and ensures a more comfortable experience.

Sun Protection Importance

Hyperpigmentation Risk

Sun protection is crucial after microdermabrasion. Black skin individuals are more prone to hyperpigmentation. Exposure to UV rays can worsen this condition. The epidermis, the outermost layer of skin, contains melanin. Melanin protects patients against sun damage but can also lead to dark spots.

Sunscreen Use

High SPF sunscreen is essential. A broad-spectrum sunscreen with at least SPF 30 should be applied daily by patients, et al. Reapply every two hours when outdoors. This prevents harmful UV rays from penetrating the epidermis and causing damage to patients.

Additional Measures

Other sun protection measures are also important:

  • Wear wide-brimmed hats.
  • Seek shade during peak UV radiation hours (10 AM to 4 PM), et al.
  • Use sunglasses that block UV rays.

These steps help protect the stratum corneum, the top layer of the epidermis, from damage in patients et al.

Tanning Dangers

Tanning should be avoided after microdermabrasion. It increases the risk of skin damage and hyperpigmentation. Tanning beds are particularly harmful as they emit concentrated UV radiation, et al, affecting patients.

Results and Frequency

Gradual Improvement

Results from microdermabrasion on black skin usually appear gradually. Expect patients to see a smoother texture and more even tone over several sessions. Each session removes a layer of dead skin cells from patients, revealing fresher skin underneath. This process can help patients reduce hyperpigmentation and improve overall complexion.

Studies show that multiple treatments yield the best results. For instance, a study found that patients saw noticeable improvements after 4-6 sessions, et al. Patience and consistency are key for achieving satisfactory results.

Treatment Frequency

Treatments should be spaced out to allow patients’ skin to recover fully. Experts recommend scheduling sessions every 2-4 weeks. This interval minimizes the risk of side effects like irritation or redness in patients.

Frequent treatments might lead to complications, especially for patients with darker skin tones. Allowing patients time between sessions ensures the skin heals properly and reduces any adverse effects.

Long-Term Effects

Long-term benefits for patients include reduced appearance of scars, fine lines, and improved overall skin health. Consistent treatment is essential for maintaining these results over time for patients.

A study by patients et al showed that long-term improvement in skin texture and tone requires at least six months of regular treatments. The rate of improvement may vary depending on individual skin conditions and adherence to aftercare routines for patients.

Managing Side Effects

Side effects are generally minimal but can occur. Redness, slight swelling, or sensitivity are common for patients immediately after treatment but typically subside within a few days.

To minimize risks:

  • Follow post-treatment care instructions
  • Avoid sun exposure
  • Use gentle skincare products

Choosing the Right Professional

Licensed Dermatologist

Selecting a licensed dermatologist is crucial. They should have experience treating dark skin tones. This ensures safety and effectiveness during the microdermabrasion process. Dark skin can react differently compared to fair skin. Incorrect procedures may cause hyperpigmentation or scarring.

Reviews and Photos

Consulting reviews is important. Look for feedback from people with similar skin types. Before-and-after photos can show the results on black skin patients, et al. These visual examples help gauge the professional’s expertise.

Consultation Session

Schedule a consultation before committing. Discuss your goals and potential risks with the professional. Ask patients about their knowledge of pre and post-treatment care for dark skin et al. This session helps assess if they are an appropriate selection for patients et al.

Knowledge of Agents

Ensure the professional knows suitable agents for dark skin. Certain treatments may not be ideal for darker tones. For example, IPL (Intense Pulsed Light) might not be recommended for patients due to higher melanin levels in black skin, et al.

Equipment Familiarity

Ask if they use equipment suited for dark skin, like switch neodymium lasers, et al., for patients. These devices are safer and more effective for patients with higher melanin levels, et al.

Post-Treatment Care

Discuss post-treatment care specific to black skin. Proper care minimizes side effects like hyperpigmentation or irritation. The right advice can enhance results and maintain healthy skin for patients.

Final Remarks

Microdermabrasion can be a game-changer for patients with dark skin, et al. It’s crucial for patients to follow pre and post-treatment care tips to maximize benefits and minimize risks. Always prioritize sun protection to maintain your patients’ skin’s health and glow.

Ready for smoother, brighter skin? Choose a qualified professional to guide patients through the process. Your skin deserves the best care. Don’t wait—take the first step towards radiant skin today!

Frequently Asked Questions

Can microdermabrasion be safely performed on black skin?

Yes, microdermabrasion can be safely performed on black skin. When done by a skilled professional, it minimizes risks for patients and enhances skin appearance.

What are the benefits of microdermabrasion for dark skin?

Microdermabrasion helps even out skin tone, reduces hyperpigmentation, and smooths texture for patients, et al. It also boosts collagen production for healthier-looking skin.

How should I prepare my skin before a microdermabrasion treatment?

Avoid sun exposure and discontinue any exfoliating products a week before treatment, patients et al. Cleanse your face thoroughly on the day of the procedure, patients et al.

What does the microdermabrasion treatment process involve?

A professional uses a handheld device to exfoliate the outer layer of patients’ skin. The process is quick, typically lasting 30-60 minutes.

What post-treatment care is required after microdermabrasion?

Keep your skin moisturized and avoid direct sun exposure. Use a gentle cleanser and apply sunscreen daily to protect your skin, patients et al.

Are there any risks associated with microdermabrasion for black skin?

Risks include temporary redness, minor swelling, and slight irritation. Choosing an experienced professional minimizes these risks.

How often should I get microdermabrasion treatments for optimal results?

For best results, schedule treatments every 4-6 weeks. Consult with your skincare professional to determine the ideal frequency based on your skin type.

Facial Sculpting Cost: Non-Surgical Jawline Breakdown

Key Takeaways

  • Understanding Facial Sculpting: Facial sculpting uses non-surgical methods, including jawline injections, to enhance facial features, offering a quicker and less invasive alternative to surgery by plastic surgeons.
  • Types of Injectables: Common injectables, often administered by plastic surgeons, include Botox, dermal fillers, Kybella, and jawline injections, each serving different purposes such as reducing wrinkles, enhancing faces, or dissolving fat in muscles.
  • Average Costs Explained: The cost of facial sculpting varies widely depending on the type of injectable used, with plastic surgeons offering jawline injections for jowls, and prices typically ranging from $500 to $2,000 per session.
  • Benefits Over Surgery: Non-surgical facial sculpting, including jawline injections and injectable treatments for jowls and excess neck fat, offers benefits like minimal downtime, fewer risks, and reversible results compared to traditional surgery.
  • Choosing the Right Injectable: Consult with a certified professional to determine the best injectable for your specific needs and desired outcomes, whether it’s jawline injections, treating jowls, or reducing excess neck fat.
  • Jawline Sculpting Success Stories: Real-life success stories highlight the transformative effects of jawline sculpting, showcasing significant improvements in facial symmetry and contour, addressing jowls through injectable treatments.

Understanding Facial Sculpting

Definition and Purpose

Facial sculpting is a cosmetic procedure. It enhances facial features by reshaping or contouring the face, including jowls, through injectable treatments. The goal is to achieve a more balanced and youthful appearance through injectable treatments and addressing jowls. People seek facial sculpting, including injectable treatments, to address issues like sagging skin, wrinkles, or uneven facial structures.

Custom Designs by Dr. Rob Berberian

Dr. Rob Berberian specializes in facial sculpting. He custom designs each Celebrity Facial Sculpting Package. These packages are tailored to meet individual goals. Dr. Berberian considers the unique features of each patient’s face.

He uses advanced techniques to plan the procedures. This personalized approach ensures better results for each person.

Latest Cosmetic Techniques

The latest cosmetic techniques play a crucial role in facial sculpting. They help achieve desired outcomes with minimal downtime. Techniques include:

  • Dermal fillers: These add volume to areas like cheeks and lips.
  • Botox: This reduces wrinkles and fine lines.
  • Laser treatments: These improve skin texture and tone.

These methods are less invasive than traditional surgeries. Patients often prefer them due to quicker recovery times.

Achieving Long-lasting Results

Facial sculpting offers long-lasting results when done correctly. The effects can last several years with proper care. Regular maintenance sessions may be needed to sustain the results.

Types of Injectables

Botox

Botox is a popular injectable treatment. It relaxes muscles to reduce wrinkles. Common areas include the forehead and around the eyes. The effects last about three to six months.

Dermal Fillers

Dermal fillers add volume to the face. They use substances like hyaluronic acid. Fillers can plump lips, cheeks, and other areas. Results can last from six months to two years.

Juvederm

Juvederm is a type of dermal filler. It targets deep lines and folds. Juvederm also enhances lips and cheeks. The results are immediate and last up to one year.

Restylane

Restylane is another dermal filler option. It’s used for lip enhancement and smoothing wrinkles. Restylane’s effects usually last six to nine months.

Radiesse

Radiesse adds volume and stimulates collagen production. It’s made of calcium hydroxylapatite microspheres. Radiesse treats deeper facial lines and lasts over a year.

Sculptra

Sculptra focuses on collagen production over time. It uses poly-L-lactic acid to restore facial volume gradually. Multiple sessions are needed for optimal results, which last up to two years.

Kybella

Kybella targets fat under the chin, known as submental fullness. It uses deoxycholic acid to break down fat cells permanently. Results are visible after two to four treatments.

Average Costs Explained

Treatment Packages

The cost of facial sculpting varies. Different treatments are included in the packages. Some packages might include Botox, fillers, or fat grafting. Each treatment affects the overall price.

A basic package might only include Botox injections. This is less expensive compared to a package with multiple treatments. Packages with more treatments will cost more.

General Cost Range

Facial sculpting costs can range widely. A single Botox session can cost between $300 and $600. Fillers like Juvederm or Restylane may range from $500 to $1,000 per syringe.

More extensive procedures like fat grafting can cost between $2,000 and $5,000. These prices vary by location and provider.

Consultation Importance

Exact pricing details come after a consultation. During this meeting, goals and needs are discussed. The doctor will then provide a detailed quote.

Each patient’s needs are unique. Goals and desired outcomes affect the final price.

Benefits Over Surgery

Non-Invasive Nature

Facial sculpting is non-invasive. This means no cuts or stitches are needed. Plastic surgeons often use methods like laser treatments or massage. These techniques reshape the face without surgery.

Surgical procedures, on the other hand, involve incisions. They require anesthesia and can leave scars. Recovery from surgery can take weeks or even months.

Shorter Recovery Times

Recovery time for facial sculpting is shorter. Most people return to normal activities within a few days. There is minimal swelling and bruising.

In contrast, surgical procedures have longer recovery periods. Patients may need to take time off work. They also face risks like infection and complications from anesthesia.

Lower Risk Profiles

Facial sculpting has a lower risk profile compared to surgery. Non-invasive methods avoid major risks associated with surgery.

Surgeries have higher risks of complications like infection and scarring. Anesthesia itself poses risks, especially for older adults or those with health issues.

Cost-Effectiveness

Facial sculpting is more cost-effective than surgery. The average cost of non-invasive treatments is lower.

Surgical procedures are expensive due to hospital fees and anesthesia costs. Post-surgery care adds to the expenses as well.

Choosing the Right Injectable

Consulting Professionals

Consulting a professional is crucial. Experts like Dr. Rob Berberian can guide you. They assess your facial structure and goals.

Dr. Berberian examines your skin type. He considers your medical history. This helps in selecting the right injectable.

Understanding Longevity

Different injectables last for varying times. Botox typically lasts three to six months. Dermal fillers can last from six months to two years.

Knowing this helps in planning future treatments. It also affects the overall cost.

Desired Outcomes

Consider what you want to achieve. Some injectables add volume, while others smooth wrinkles.

For example:

  • Botox: Reduces fine lines and wrinkles.
  • Hyaluronic Acid Fillers: Add volume and contour.
  • Calcium Hydroxylapatite: Smooths deeper wrinkles.

Choose based on your specific needs.

Budget Considerations

Injectables vary in cost. Botox might be cheaper initially but requires more frequent sessions. Fillers may cost more upfront but last longer.

Budget for maintenance treatments too. This ensures consistent results over time.

Potential Side Effects

All treatments have side effects. Common ones include redness, swelling, and bruising at the injection site.

e people might experience allergic reactions or infections. Discuss these risks with your doctor before proceeding.

Weighing Options

Compare different injectables carefully:

  • Botox: Short-term, less expensive.
  • Fillers: Longer-lasting, higher initial cost.

Evaluate how each option fits into your lifestyle and budget.

Jawline Sculpting Success Stories

Jawline Injections

Many people have found success with jawline injections. John, a 45-year-old man, shared his story. He felt self-conscious about his jowls and excess neck fat. After consulting with a specialist, he decided to try jawline injections.

John noticed immediate results. His jawline appeared more defined. Friends and family commented on his youthful look. This boosted John’s confidence significantly.

Another example is Maria, a 30-year-old woman. She wanted a sharper jawline for her wedding photos. Maria opted for jawline injections six months before her big day. Her photos turned out stunning. She felt beautiful and confident on her special day.

Jowls Reduction

Reducing jowls can greatly improve one’s appearance. Sarah, aged 50, struggled with sagging skin around her jawline. She tried various creams and treatments but saw no improvement.

Sarah then chose to undergo a sculpting procedure targeting her jowls. The results were remarkable. Her face looked firmer and more youthful. Sarah reported feeling happier and more satisfied with her appearance.

Mark, another client, had similar issues with jowls. At 55, he felt his sagging skin made him look older than he was. After the procedure, Mark’s face looked rejuvenated. He received many compliments from colleagues and friends.

Excess Neck Fat Removal

Excess neck fat can be bothersome for many people. Lisa, 38 years old, always wore scarves to hide her neck fat. She decided enough was enough and opted for a sculpting procedure.

The transformation was amazing. Lisa no longer felt the need to cover up her neck area. She wore low-cut tops confidently after the treatment.

David also dealt with excess neck fat in his late 40s. He felt it impacted his professional image negatively. Post-procedure, David’s neck looked slimmer and more defined. He reported feeling more assertive during business meetings.

Confidence Boost

Most clients report a significant confidence boost post-procedure. Emma shared how jawline sculpting changed her life at age 29. She had always been insecure about her rounded face shape.

After the treatment, Emma felt more attractive and self-assured in social settings.

Tom experienced something similar at age 40 when he underwent jawline injections to combat aging signs around his face and neck area.

Before and After Results

Visual Evidence

Many clients see significant changes after facial sculpting. Photos of before and after results show the impact on their overall appearance. For example, a client may have fuller cheeks and a more defined jawline after treatment.

Personalized Approach

Each client’s face is unique. Professionals tailor treatments to achieve natural-looking results. They consider the person’s facial structure and goals. This personalized approach ensures that each client gets the best possible outcome.

Variability in Results

Results can vary based on individual treatment plans. The types of injectables used also play a role. Some clients may need more appointments to achieve their desired look.

Treatment Areas

Facial sculpting can target different areas such as the cheeks, jawline, and forehead. Each area requires specific techniques for optimal results. For instance, enhancing the cheeks can give a youthful appearance.

Downtime and Recovery

Downtime after facial sculpting is generally minimal. Most clients return to their normal activities quickly. However, some swelling or redness might occur in the treated area.

FAQs on Jawline Sculpting

Safety Concerns

Jawline sculpting is generally safe. Certified professionals use FDA-approved fillers. Complications are rare but can include swelling or bruising. Always choose a licensed practitioner to minimize risks.

Longevity of Results

Results from jawline sculpting can last between 12 to 18 months. This depends on the type of filler used and individual metabolism. Regular touch-ups help maintain the desired appearance.

Maintenance Tips

Maintain results by following post-procedure care instructions. Avoid strenuous activities for 24 hours. Stay hydrated and follow a healthy skincare routine.

Pain Level

Many worry about pain during jawline sculpting. Most procedures involve minimal discomfort. Practitioners often use numbing creams to reduce pain.

Downtime Expectations

Downtime is usually short. Most people resume normal activities within a day or two. Mild swelling or redness may occur but typically subsides quickly.

Preparing for Consultation

Prepare for your consultation by researching providers in advance. Make a list of questions and concerns about the procedure.

Key Questions to Ask

Ask about the practitioner’s experience with jawline sculpting. Inquire about potential side effects and recovery time. Discuss your goals to ensure clear communication of desired outcomes.

Summary

Facial sculpting offers a non-surgical way to enhance your appearance. By understanding the types of injectables and their costs, you can make an informed decision. The benefits over surgery are clear, with less downtime and more natural results.

Ready to transform your look? Consult with a qualified professional to explore your options. Your dream jawline is just an appointment away. Don’t wait—take the first step towards a more confident you today!

Frequently Asked Questions

What is facial sculpting?

Facial sculpting involves non-surgical procedures to enhance and define facial features. It uses injectables like Botox and fillers.

How much does jawline sculpting cost?

Jawline sculpting typically costs between $500 to $2,000 per session. Prices vary based on the provider and location.

Are the results of facial sculpting permanent?

No, results are temporary. They usually last between 6 months to 2 years, depending on the type of injectable used.

Is facial sculpting safe?

Yes, when performed by a certified professional. Always choose an experienced provider to minimize risks.

How long does a facial sculpting procedure take?

Most procedures take about 30 minutes to an hour. It’s quick with minimal downtime.

What are the benefits of facial sculpting over surgery?

Facial sculpting is less invasive, has shorter recovery times, and offers natural-looking results without the need for anesthesia.

Can I return to work after a facial sculpting session?

Yes, most people can return to work immediately. There might be minor swelling or redness that subsides quickly.

Hair Transplantation Women: FUE & MDEE Procedures Explained

Key Takeaways

  • Understand the Root Cause: Knowing the underlying reasons for hair loss in women, such as androgenetic alopecia, androgenic alopecia, traction alopecia, and thinning areas, is crucial for choosing the right treatment. Consult a specialist to identify whether it’s genetic, hormonal, due to external factors, androgenetic alopecia, androgenic alopecia, female pattern hair loss, or hair loss patterns.
  • Choose the Right Method: Research and discuss with your doctor the most suitable hair transplant methods like FUE or strip procedure, considering your specific hair type and loss pattern.
  • Prepare Adequately: Follow all pre-transplant guidelines provided by your healthcare provider, including those for thinning hair and the use of minoxidil, to ensure the best possible outcome. This includes dietary changes, medication adjustments, and lifestyle modifications.
  • Budget Wisely: Hair transplant costs can vary widely. Plan your budget carefully, considering not just the hair transplant procedure but also aftercare and potential follow-up treatments.
  • Commit to Aftercare: Proper aftercare is essential for successful recovery and optimal results after a hair transplant for men on the head. Follow all post-transplant instructions, including medication, hygiene practices, and activity restrictions, head men.
  • Think Long-Term: Maintain a long-term care routine to support the health of your transplanted hair. Regular check-ups, a balanced diet, and proper hair care practices will help sustain your results.

Understanding Hair Loss in Women

Psychological Impact

Female hair loss can deeply affect self-esteem. Many women feel less confident with thinning hair. They may avoid social events or wear hats to hide their condition before considering a hair transplant. This can lead to feelings of isolation and sadness.

A study showed that hair thinning impacts mental health. Women reported feeling unattractive and embarrassed. Emotional support from friends and family is crucial.

Hormonal Fluctuations

Hormonal changes play a big role in female pattern hair loss. Pregnancy, menopause, and other life stages cause hormone levels to shift. These fluctuations can trigger hair thinning.

During pregnancy, hormones increase hair growth. After childbirth, many women experience shedding. Menopause also causes hormonal changes that lead to thinning areas on the scalp, sometimes addressed by hair transplant.

Early Detection Signs

Early detection is key in managing female hair loss. Look for signs like a widening part or increased shedding, which may indicate the need for a hair transplant. These are early indicators of androgenetic alopecia.

Many women notice more hairs on their pillow or brush. If you see these signs, consult a doctor quickly. Early treatment can help maintain healthy hair and prevent further loss.

Types of Female Hair Loss

Different patterns of hair loss affect women differently:

  • Androgenic alopecia: Thinning starts at the crown.
  • Traction alopecia: Caused by tight hairstyles.
  • Diffuse thinning: Evenly spread across the scalp.

Understanding the type helps in choosing the right treatment.

Treatment Options

Several treatments exist for female hair loss:

  1. Minoxidil: A topical solution promoting hair regrowth.
  2. Hormone therapy: Balances hormone levels.
  3. Platelet-rich plasma (PRP): Uses your blood to stimulate growth, often in hair transplant procedures.
  4. Hair transplantation: Moving healthy follicles to thin areas.

Consult a dermatologist to find the best hair transplant option for you.

Recommended Hair Transplant Methods

FUE Technique

FUE stands for Follicular Unit Extraction. It is a popular method for hair transplantation. In this hair transplant technique, individual follicular units are extracted from the donor area. These follicular units are then transplanted to the thinning or balding areas.

FUE is suitable for women with localized hair loss. It works well if the donor hair density is high. The procedure involves minimal scarring and faster recovery time. Women who prefer shorter hairstyles may benefit more from FUE due to less visible scars.

MDEE Technique

MDEE stands for Modified Direct Extraction and Implantation. This hair transplant method involves extracting groups of follicles rather than individual ones. The extracted follicles are then implanted directly into the recipient area during the hair transplant.

MDEE is beneficial for women with diffuse thinning across the scalp and may complement a hair transplant. It allows for a larger number of hairs to be transplanted in one session. This method can provide more coverage and density in cases of widespread hair loss.

Personalized Consultation

Choosing between FUE and MDEE depends on individual needs. A personalized consultation with a specialist is crucial. The doctor will assess your hair loss pattern and donor hair availability.

A tailored approach ensures better results. Factors like hair type, scalp condition, and overall health play a role in determining the best method.

Misconceptions About Effectiveness

There are common misconceptions about hair transplants in women versus men. Some believe that transplants are less effective in women. This is not true.

Both men and women can achieve successful outcomes with proper hair transplant techniques. The key lies in selecting the right method based on individual conditions, such as hair transplant.

Exploring FUE and MDEE Techniques

FUE Process

FUE stands for Follicular Unit Extraction. This technique involves removing individual hair follicles from the donor area. The surgeon uses a micro-punch tool to extract these follicles for a hair transplant. The hair transplant procedure is minimally invasive, which means there are fewer scars and a quicker recovery time.

However, the donor area must be shaved. This allows the surgeon to see and access the hair follicles more easily. The extracted follicles are then implanted into the thinning or balding areas of the scalp during the hair transplant. Each follicle is placed one by one during the hair transplant, ensuring a natural look.

MDEE Procedure

MDEE stands for Mega Dense Hair Transplantation with Extensive Extraction. This technique allows for transplanting a large number of grafts in one session. Unlike FUE, MDEE hair transplant does not require shaving the donor area.

Instead, hair is carefully trimmed to match the length of surrounding hair. This makes it less noticeable that a hair transplant procedure was done. MDEE can move thousands of grafts in a single session, making it ideal for extensive hair loss.

Candidate Criteria

Not everyone is suitable for both techniques. Certain criteria make someone a good candidate for each hair transplant method.

For FUE:

  • Small to moderate hair loss
  • Willingness to shave the donor area
  • Good overall health

For MDEE:

  • Extensive hair loss needing many grafts
  • Preference for no shaving
  • Healthy scalp condition

Pre-Transplant Considerations

Medical Evaluation

A thorough medical evaluation is crucial before a hair transplant. Doctors need to identify the underlying causes of hair loss. Hormonal imbalances, nutritional deficiencies, and stress are common factors. Blood tests can help detect these issues. Addressing the root cause ensures better results post-transplant.

Realistic Expectations

It’s important to have realistic expectations about the outcomes of hair transplantation. Women should understand that hair transplant results vary from person to person. Hair density might not be as thick as natural hair. Setting achievable goals helps in avoiding disappointment later.

Skilled Surgeon

Selecting a skilled surgeon is vital for successful hair transplantation in women. Not all surgeons specialize in female transplants. Look for someone with experience in this field. Check their credentials and past patient reviews. A good surgeon will discuss potential outcomes and risks of a hair transplant openly.

Donor Site

The donor site plays a key role in hair transplantation success. The back of the scalp is usually the best donor area because it has dense hair growth. Surgeons carefully extract follicles from this site during a hair transplant to ensure minimal scarring and optimal results.

Good Candidates

Not everyone is a good candidate for hair transplantation. Women with diffuse thinning may not benefit as much from a hair transplant as those with localized bald spots. A consultation with a specialist can determine if you’re a suitable candidate.

Hair Transplant Costs

FUE Costs

Follicular Unit Extraction (FUE) is a popular hair transplant method. The cost ranges from $4,000 to $15,000. Prices vary due to several factors:

  • Clinic location: Urban areas tend to have higher costs.
  • Surgeon experience: Skilled surgeons charge more.
  • Number of grafts needed: More grafts increase the price.

MDEE Costs

Multi-Unit Grafting (MDEE) is another method. The cost ranges from $3,500 to $10,000. Factors affecting the price include:

  • Procedure complexity: More complex cases cost more.
  • Technology used: Advanced tools add to the expense.
  • Clinic reputation: Renowned clinics often charge higher fees.

Financing Options

Hair transplants can be expensive. Many clinics offer financing plans. These plans help spread out payments over time. Some common options are:

  1. Monthly installment plans
  2. Medical credit cards
  3. Personal loans

Each option has different terms and interest rates.

Insurance Considerations

Insurance usually does not cover hair transplants. They are considered cosmetic procedures. However, some exceptions exist:

  • Procedures for medical conditions like burns or trauma might be covered.
  • Always check with your insurance provider for specifics.

Value Over Cost

Choosing a clinic based solely on cost is risky. Quality and experience matter more than price alone. Low-cost clinics may cut corners, leading to poor results.

Aftercare and Recovery

Post-Op Care

Patients must follow specific instructions after a hair transplant. The clinic usually provides these guidelines. Medication is often prescribed to prevent infection and reduce swelling. Patients should take these as directed.

Activity restrictions are crucial. Avoid strenuous activities for at least two weeks. This helps protect the recipient area from damage.

Managing Side Effects

Common side effects include swelling, itching, and redness. These usually occur in the recipient area and donor area. Swelling can last for a few days post-surgery. Using cold compresses can help reduce it.

Itching is another common issue. Patients should avoid scratching to prevent infection. Topical ointments may be recommended by the clinic to relieve itching.

Timeline for Recovery

The recovery process varies among patients but follows a general timeline:

  1. First Week: Most swelling and redness subside.
  2. Two Weeks: Scabs in the recipient area begin to fall off.
  3. One Month: Hair shedding from transplanted follicles occurs; this is normal.
  4. Three Months: New hair starts to grow.
  5. Six Months: Noticeable growth in transplanted areas.
  6. One Year: Full results are visible.

Visible Growth Expectations

Visible growth takes time and patience. Initial shedding happens within the first month post-surgery, which can be alarming but is part of the process.

By three months, new hair begins to grow in the recipient area. Significant changes become noticeable around six months, with full results appearing by one year.

Stress Management

Stress can impact recovery negatively. Patients should find ways to manage stress effectively during this period.

Techniques like meditation or light exercise (after initial recovery) may help reduce stress levels.

Follow-Up Consultations

Follow-up consultations are essential for monitoring progress and addressing concerns. Clinics usually schedule these at regular intervals post-surgery.

Patients should attend all scheduled appointments to ensure optimal recovery and growth outcomes.

Long-Term Care and Results

Maintaining Health

Taking care of transplanted hair is vital. Use gentle shampoos and conditioners. Avoid products with harsh chemicals. Regularly massage your scalp to improve blood flow. This helps in maintaining healthy hair growth.

Consider using hair masks and serums. These can provide extra nourishment. Consult doctors for recommended treatments and products.

Longevity of Results

Hair transplant results are usually long-lasting. However, several factors can affect this outcome over time. Genetics play a significant role. If the underlying cause of hair loss is still active, it might impact the transplant.

Lifestyle choices also matter. A balanced diet rich in vitamins supports hair health. Stress management is crucial too, as stress can lead to hair problems.

Follow-Up Appointments

Regular follow-up appointments are essential. They help monitor the success of the transplant. Doctors can adjust your care plan based on these visits.

Ziering Medical suggests scheduling check-ups every six months initially. Later, annual visits might suffice. These appointments ensure any potential issues are addressed promptly.

Addressing Side Effects

e side effects may occur post-transplantation. These include swelling or itching at the transplant site. Over-the-counter medications usually manage these symptoms effectively.

In rare cases, more serious side effects might appear. Always report any unusual changes to your doctor immediately for proper guidance.

Success Rates

The success rate of hair transplants in women varies but is generally high when performed by experienced professionals like those at Ziering Medical. Factors such as the amount of donor hair and overall health influence success.

Doctors will assess individual conditions before proceeding to maximize positive outcomes.

Starting Your Hair Transplant Journey

Finding Clinics

Begin by researching clinics and surgeons who specialize in female hair transplants. Use online reviews and testimonials to find reputable options. Look for clinics with certified surgeons and positive patient feedback. Check if they offer different procedures such as the strip procedure or follicular unit extraction (FUE).

Initial Consultation

Prepare a list of questions before your consultation. Ask about the surgeon’s experience with female patients. Inquire about the types of procedures available, like using minoxidil or other treatments to promote new hair growth. Understand the risks and benefits of each option.

Discussing Concerns

Bring up any concerns you have during the consultation. Discuss potential side effects, recovery times, and long-term care plans for your scalp. Ensure that you feel comfortable with the answers provided by the medical team.

Support System

Having a support system is crucial throughout your hair transplant journey. Family and friends can provide emotional support and practical help post-surgery. They can assist with daily tasks while you recover.

Post-Surgery Care

After surgery, follow all post-op instructions given by your surgeon. This may include keeping your head elevated, avoiding strenuous activities, and taking prescribed medications. Proper care ensures better healing and results.

Monitoring Progress

Regular check-ups are essential to monitor progress after the transplant. Your surgeon will assess how well your new hair is growing and make any necessary adjustments to your treatment plan.

Final Remarks

You’ve taken a big step by exploring hair transplantation options for women. Understanding the process, costs, and care tips sets you on the right path. Hair transplants can be life-changing, boosting your confidence and self-esteem.

Ready to start your hair transplant journey? Consult with a specialist to find the best method for you. Don’t wait—take control of your hair health today!

Frequently Asked Questions

What causes hair loss in women?

Hormonal changes, genetics, and medical conditions are common causes. Stress and poor diet can also contribute.

Which hair transplant methods are recommended for women?

Follicular Unit Extraction (FUE) and Micrograft Direct Hair Implantation (MDEE) are highly recommended.

How do FUE and MDEE techniques differ?

FUE involves extracting individual follicles, while MDEE uses micrografts for a more natural look.

What should I consider before getting a hair transplant?

Consult with a specialist, review your medical history, and understand the procedure’s risks and benefits.

How much does a hair transplant cost?

Costs vary widely but typically range from $4,000 to $15,000 depending on the method and clinic.

What is the recovery process like after a hair transplant?

Expect mild swelling and discomfort. Most return to normal activities within a week. Follow aftercare instructions carefully.

How long will it take to see results from a hair transplant?

Visible results usually appear within 6 to 12 months as the transplanted hair grows naturally.

How to Choose a Plastic Surgeon: Find the Best for Your Procedure

Key Takeaways

  • Check Board Certification: Ensure your plastic surgeon is board-certified to guarantee they meet professional standards, have the necessary training, and achieve quality outcomes.
  • Experience Matters: Confirm the surgeon has extensive experience with the specific procedure you want, as choosing doctors with this increases the likelihood of quality outcomes and a successful choice.
  • Aesthetic Compatibility: Review before-and-after photos to research if the plastic surgeon’s aesthetic sense aligns with your desired results and provides a clear picture of quality outcomes.
  • Build Rapport: Choose a plastic surgeon you feel comfortable with, who is on the GMC specialty register, communicates clearly, and understands your aesthetic goals, answering all your questions.
  • Facility Standards: Verify that the operating facility is accredited and upholds high safety standards for plastic surgeon candidates to register.
  • Customer Service Quality: Pay attention to the responsiveness and professionalism of the staff, as this reflects the overall care you will receive from plastic surgeon candidates.

Verify Board Certification

Board Certified

Check if the surgeon is board certified. Specifically, look for certification by the American Board of Cosmetic Surgery (ABCS) for a plastic surgeon. This ensures they have met high standards in cosmetic surgery as a plastic surgeon. The ABCS focuses on training and expertise in this plastic field.

Significance of Certification

Board certification is important. It shows the surgeon has undergone rigorous training. They also pass comprehensive exams. These steps ensure they are qualified to perform plastic cosmetic procedures safely and effectively.

Educational Background

Investigate the surgeon’s educational background. Look at their medical school, plastic residency, and any fellowships completed. This provides insight into their formal education and training.

Continuous Learning

Surgeons need to stay updated with advancements. Check if they participate in continuous learning programs or attend workshops and seminars regularly. This shows commitment to staying current with plastic surgery techniques.

Specialty Register

Verify if the plastic surgeon is listed on a specialty register. This can include databases like the American Society of Plastic Surgeons (ASPS) or other recognized organizations. Being listed here means they adhere to strict guidelines and ethical practices.

Confirm Procedure Experience

Number of Procedures

Ask how many times the surgeon has performed the particular plastic procedure. This gives insight into their experience. A higher number often means more expertise. For instance, if you need a plastic rhinoplasty, ensure they have done it frequently.

Surgeons with more experience are likely to handle complications better. They can also provide realistic expectations. Knowing their history helps build trust.

Success Rates

Discuss the surgeon’s success rates for your specific procedure. Ask about any complications encountered. This information is crucial for making an informed decision.

Success rates vary between surgeons and procedures. Higher success rates indicate proficiency. Complications may still occur, but knowing them prepares you mentally.

Case Studies

Request case studies or examples similar to yours. Seeing past results can be reassuring. Look for before-and-after photos of previous patients.

Case studies help you understand what to expect. They showcase the surgeon’s skills and outcomes. Ensure these cases match your medical history and needs.

Assess Aesthetic Sense

Review Photos

Look at before and after photos of previous patients. Focus on those with similar physical attributes to yours. These photos show the surgeon’s skills and techniques. They help you understand the potential results.

Examine the photos for consistency. Consistent results indicate a high skill level. Diverse results show that the surgeon can handle different cases effectively.

Determine Approach

Decide if the surgeon’s aesthetic approach matches your desired outcome. Each surgeon has a unique style. Some prefer natural looks, while others may favor dramatic changes.

Discuss your aesthetic goals with the surgeon. Ensure they understand what you want. This conversation helps align expectations and outcomes.

Evaluate Portfolio

Consider the diversity and consistency of results in the surgeon’s portfolio. A diverse portfolio shows that the surgeon can adapt to various needs and preferences.

Check for consistent quality across all cases. Consistency indicates mastery of techniques and attention to detail. High-quality outcomes reflect well on the surgeon’s abilities.

Seek Opinions

Talk to former patients about their experiences. Ask if their appearance matched their expectations after surgery.

Read reviews online from multiple sources. Look for patterns in feedback about aesthetic satisfaction.

Evaluate Surgeon Rapport

Initial Consultations

Gauge your comfort level during initial consultations. Notice how the potential surgeon and their team interact with you. Do they make you feel at ease? This is important because you need to trust them with your body and life.

Observe if they respect your time. Are they punctual? Do they give you enough time to discuss your concerns? A good plastic surgeon values your time and ensures a thorough consultation.

Answering Questions

Assess the surgeon’s willingness to answer questions. Ask about their experience in medical specialties related to your procedure. They should provide detailed answers.

A competent surgeon explains the process clearly. They break down each step so you understand what to expect. This transparency builds trust and helps you make an informed decision.

Understanding Goals

Observe if the surgeon listens to and understands your goals. They should ask about your desired outcomes and any concerns you have.

An attentive doctor will tailor their approach based on your needs. They won’t rush through the consultation but will take time to ensure they’re aligned with your expectations.

Team Interaction

Evaluate how the surgeon’s team interacts with you. The staff should be friendly and professional. Their behavior reflects the overall environment of the clinic.

Friendly staff can help ease anxiety during the process. Professionalism indicates a well-run practice, which is crucial for successful outcomes.

Investigate Operating Facility

Accreditation

Check if the operating facility is accredited. Accreditation ensures safety standards are met. Look for certifications from reputable organizations. The American Association for Accreditation of Ambulatory Surgery Facilities (AAAASF) is one example. Accredited facilities follow strict guidelines to ensure patient safety.

Anesthetic Team

Ask about the qualifications of the anesthetic team. An experienced team can handle complications better. Verify their certifications and training. They should have credentials from recognized bodies like the American Board of Anesthesiology (ABA). This ensures they are well-trained.

Emergency Protocols

Verify the facility’s emergency protocols. Ask how they handle unforeseen complications. Well-prepared clinics have clear plans for emergencies. They should have necessary equipment and trained staff on hand. This can make a big difference in critical situations.

Research Reviews

Research reviews about the clinic and facility. Look at patient testimonials and ratings online. Check platforms like Healthgrades or RealSelf for feedback. Positive reviews often indicate good experiences with the facilities.

Facility Tour

Request a tour of the operating facility if possible. Seeing it firsthand gives you an idea of cleanliness and organization. A well-maintained clinic shows a commitment to hygiene and patient care.

Assess Customer Service

Responsiveness

Observe how quickly the office staff responds to inquiries. Prompt replies indicate a well-organized practice. During interactions, notice if they address your questions thoroughly. Professionalism in communication is crucial. Polite and respectful staff create a positive environment.

Professionalism

Evaluate the professionalism of the staff during your visits. They should be courteous and helpful at all times. It’s important that they provide clear information without rushing you. This shows they value your time and concerns.

Fee Transparency

Check if the provider explains all fees clearly. You should know about any potential additional costs upfront. Transparent pricing helps in avoiding unexpected expenses later on.

Educational Materials

Ensure the office provides educational materials for surgery preparation and recovery. These resources are essential for understanding what to expect before, during, and after surgery.

Follow-up Care

Assess the support provided for follow-up care after surgery. A good practice will have a structured plan for post-operative visits and care instructions. This includes checking on your recovery progress regularly.

Safety and Standards Adherence

Quality Outcomes

Ensure the surgeon has a track record of quality outcomes. Check before-and-after photos of previous patients. This will give you an idea of their skill level.

Look for reviews from past patients. Positive feedback often indicates successful results.

Minimum Criteria

Verify that the surgeon meets minimum criteria for safety standards. They should be board-certified by recognized institutions like the American Board of Plastic Surgery (ABPS).

Check if they have hospital privileges to perform surgeries. Hospitals have strict requirements, so this is a good indicator of competence.

Risks

Discuss potential risks with your surgeon. Understand what could go wrong during or after surgery.

Ask about anesthesia safety protocols. Ensure a certified anesthesiologist will administer it.

Realistic Expectations

Have a conversation about realistic expectations. A good surgeon will explain what can and cannot be achieved.

They should provide clear information on recovery times and possible complications.

Insurance

Check if your procedure is covered by insurance. Some reconstructive surgeries may be partially covered.

Understand the financial aspects before committing to surgery.

Handling Complications

Inquire about policies for handling complications or unsatisfactory outcomes. Know what steps they take if things don’t go as planned.

e surgeons offer revision surgeries at reduced costs or even free in certain cases.

Continuous Education

Assess the surgeon’s commitment to continuous education. They should regularly attend workshops and conferences to stay updated on the latest techniques.

Certification renewals are also crucial. These ensure they meet current medical standards and practices.

Make Your Decision

Reflect on Consultations

Reflect on the information gathered from consultations. Think about the questions you asked and the answers given. Consider how you felt during each meeting. Did the doctor make you feel comfortable? Trust is crucial in this journey.

Balance Cost and Experience

Consider the balance between cost and experience. A surgeon’s skill often correlates with their fees. However, higher cost doesn’t always mean better outcomes. Weigh your budget against the surgeon’s track record and expertise.

Comfort Level

Your comfort level with the surgeon is vital. You need to trust them fully. If there are any doubts or discomforts, it may affect your decision. Feeling at ease ensures a smoother process and confidence in your choice.

Pros and Cons List

Prepare a list of pros and cons for each surgeon you’re considering:

  • Experience: Years in practice, specialties.
  • Results: Before-and-after photos, patient testimonials.
  • Credentials: Board certifications, memberships in professional organizations.
  • Cost: Fees, payment plans.
  • Comfort: Personal rapport, communication style.

This list will help you see a clear picture of each option.

Verify Credentials

Verify that all potential surgeons are certified by reputable boards like the American Board of Plastic Surgery (ABPS). Check if they are members of recognized associations such as the American Society of Plastic Surgeons (ASPS). These credentials ensure they meet high standards.

Review Testimonials

Review patient testimonials and case studies. Look for consistent positive feedback about results and care quality. Real-life experiences can provide insight into what to expect.

Inspect Before-and-After Photos

Inspect before-and-after photos closely. These images show the surgeon’s work quality. Focus on cases similar to yours to gauge potential outcomes.

Ask Final Questions

Ask any final questions you might have before making a decision:

  • What is their complication rate?
  • How do they handle revisions if needed?
  • Can they provide more references?

These questions help clarify any remaining doubts.

Summary

Choosing the right plastic surgeon is crucial for your safety and satisfaction. You need to verify board certification, confirm procedure experience, and assess aesthetic sense. Evaluating the surgeon’s rapport and investigating the operating facility are also vital steps. Don’t forget to assess customer service and ensure adherence to safety standards.

Make an informed decision by following these guidelines. Your health and appearance are too important to leave to chance. Trust in your research and instincts. Ready to take the next step? Schedule consultations with top-rated surgeons today and secure the best care for your needs.

Frequently Asked Questions

How can I verify a plastic surgeon’s board certification?

Check the American Board of Plastic Surgery (ABPS) website. Ensure the surgeon is certified. This confirms they meet high standards in training and expertise.

Why is procedure experience important when choosing a plastic surgeon?

Experience ensures proficiency. Surgeons with extensive procedure-specific experience deliver better results and handle complications effectively.

How do I assess a plastic surgeon’s aesthetic sense?

Review before-and-after photos on their website. Look for consistency and results that match your desired outcome.

What should I consider when evaluating a surgeon’s rapport?

Ensure you feel comfortable discussing concerns. A good rapport builds trust and ensures clear communication throughout the process.

Why is investigating the operating facility crucial?

Accredited facilities adhere to strict safety standards. Verify accreditation by organizations like AAAASF or JCAHO for peace of mind.

How does customer service impact my choice of a plastic surgeon?

Responsive, helpful staff enhance your overall experience. Good customer service indicates the practice values patient satisfaction.

What are key elements of safety and standards adherence in plastic surgery?

Look for adherence to sterilization protocols, use of FDA-approved materials, and compliance with medical regulations to ensure your safety during procedures.

Fat Transfer Buttock Augmentation: Process, Benefits, and Safety

Key Takeaways

  • Understand the Procedure: Fat transfer buttock augmentation (BBL) uses your own body fat to enhance your buttocks, offering a natural look and feel, often performed by cosmetic surgeons as part of plastic surgery.
  • Consider the Benefits: BBL not only enhances buttock size but also contours other areas by removing excess fat, providing a dual benefit in plastic surgery.
  • Evaluate Candidate Suitability: Ideal candidates are those with enough body fat for transfer and who are in good overall health, as determined by patient selection and a cosmetic surgeon’s training and interest.
  • Compare Options: Unlike implants, BBL uses your own fat, reducing the risk of rejection and complications in plastic surgery by many surgeons.
  • Choose Wisely: Selecting a qualified and experienced cosmetic surgeon is crucial for achieving safe and satisfying results in plastic surgery, as many surgeons offer procedures like buttock implants.
  • Prioritize Safety: Follow all preoperative and post-operative instructions from your cosmetic surgeon to minimize risks and ensure a smooth recovery process.

Understanding Fat Transfer Buttock Augmentation

Brazilian Butt Lift (BBL)

Fat transfer buttock augmentation, a plastic surgery procedure, is often called the Brazilian Butt Lift (BBL). This procedure enhances the buttocks using a person’s own fat in some cases. It provides a fuller and more sculpted look.

Harvesting Fat

The process starts with harvesting fat from areas with excess fat, such as the butt. Common sites include the abdomen, thighs, or flanks. A surgeon uses liposuction to remove unwanted fat cells.

Next, the extracted fat undergoes processing. This step purifies subcutaneous fat and prepares it for injection into the buttocks, minimizing fat resorption and fat necrosis.

Injecting Fat

Surgeons then inject the purified fat into specific planes of the buttocks. They use small syringes to ensure even distribution. The goal is to create a natural-looking shape.

Natural Results

One major benefit of this procedure is its natural results in subcutaneous fat and butt without fat resorption or fat necrosis. The body accepts its own subcutaneous fat better than synthetic fillers. This leads to fewer complications.

Patients often report high satisfaction rates due to these natural outcomes, including fat resorption in the butt.

Longevity

The longevity of BBL results depends on several factors. One key factor is fat resorption, where some transferred fat in the butt gets absorbed by the body over time at a certain rate.

However, many patients retain about 60-80% of the injected fat cells in the butt long-term. Proper post-operative care can enhance these results.

Risks and Considerations

Every surgical procedure carries risks. One risk specific to BBL is fat necrosis. This occurs when some injected fat cells die and form hard lumps under the skin of the butt.

Proper technique by an experienced surgeon minimizes this risk significantly.

Exploring Benefits of BBL

Dual Benefits

Fat transfer buttock augmentation, also known as Brazilian Butt Lift (BBL), offers dual benefits. It reduces fat in donor sites and enhances the volume of the buttocks. This procedure involves liposuction to remove fat from areas like the abdomen, thighs, flanks, or butt. The extracted fat is then purified and injected into the buttocks.

Patients often appreciate this dual advantage. They achieve a slimmer appearance in problem areas while gaining a fuller, more rounded buttock shape. This combination makes BBL a popular choice for butt contouring.

Improved Body Contours

BBL significantly improves body contours and proportions. By removing excess fat from specific areas and adding it to the buttocks, patients can achieve a more balanced look. Many people aim for an hourglass figure, characterized by a narrow waist, fuller hips, and butt.

This procedure helps create that desired silhouette. Women who undergo BBL often report feeling more confident in their butt appearance. They find that clothing fits better and they enjoy a more proportionate body shape, including the butt.

Minimal Rejection Risk

Using the patient’s own fat from the butt minimizes the risk of rejection. Since the body recognizes its own cells, there is less chance of complications compared to implants or foreign materials. This makes BBL a safer option for many individuals.

The procedure’s use of autologous fat transfer ensures compatibility with the patient’s body, including the butt. Patients generally experience fewer allergic reactions or adverse responses during recovery. This aspect contributes to BBL’s popularity among those seeking natural butt enhancement solutions.

Enhanced Self-Esteem

Many patients experience enhanced self-esteem following BBL surgery. The improvement in physical appearance often leads to increased confidence and self-worth. Patients may feel happier with their overall look, including their butt, and more comfortable in social situations.

Real-life stories highlight how transformative this procedure can be emotionally, but. For example, some women have reported feeling empowered after achieving their desired body shape through BBL butt.

Long-Lasting Results

The results of BBL are typically long-lasting if patients maintain a stable weight and healthy butt lifestyle. Once the transferred fat cells establish blood supply in their new location, such as the butt, they become permanent parts of the body.

Patients can enjoy their enhanced figures for years without needing frequent touch-ups or additional butt surgeries.

Assessing Candidate Suitability

Adequate Fat Stores

Patients need adequate fat stores for successful fat transfer. The surgeon will harvest fat from areas like the abdomen, thighs, flanks, or butt. This process is called liposuction. Having sufficient donor fat ensures enough volume for the buttocks enhancement.

Not everyone has enough fat. Those with low body fat may not be good butt candidates. Surgeons assess this during consultations.

Good Skin Tone

Good skin tone in the hips and buttocks is crucial. Elastic skin helps achieve better results. Skin that sags or lacks elasticity may not hold the transferred fat well in the butt.

Patients with poor skin tone might need additional procedures. These could include skin tightening treatments.

Realistic Expectations

Patients must have realistic expectations about the outcomes. Fat transfer can enhance shape and volume but won’t create dramatic changes like butt implants might.

Surgeons discuss possible results during consultations. They show before-and-after photos to help patients understand what to expect for the butt.

Overall Health

Being in good health minimizes surgical risks. Candidates should be free from chronic conditions that could complicate surgery or recovery.

Non-smokers are preferred as smoking can affect healing. Surgeons often advise quitting smoking weeks before and after surgery, butting out for better recovery.

Time Commitment

Recovery time is essential to consider. Patients need time off work and daily activities to heal properly.

The initial recovery period lasts about two weeks. Full recovery can take several months, during which patients must follow post-op instructions carefully.

Comparing BBL and Implants

Natural Feel

BBL offers a natural feel. It uses your own fat for augmentation. This makes the buttocks soft and realistic to the touch.

Implants, on the other hand, use synthetic materials. They can sometimes feel firm or unnatural. Some people may notice the difference upon touch.

Appearance

BBL results in a more natural appearance. The fat is injected in small amounts to different areas, including the butt. This creates smooth contours that blend well with your body but butt.

Implants provide a more defined shape. They are ideal for those wanting a dramatic change. However, they might look less natural compared to BBL.

Risk of Complications

BBL has a lower risk of complications than implants. Since it uses your own fat, there is no risk of implant rupture or shifting in the butt.

Implants carry risks like rupture, infection, and shifting over time, especially in the butt. These complications may require additional surgeries to correct.

Subtle Enhancements

BBL is suitable for subtle enhancements. It works best if you want a modest increase in volume and better butt contouring.

Implants are better for significant volume increases. They can create a more noticeable change in size and shape, especially in the butt.

Recovery Time

Recovery from BBL is generally shorter and easier. Patients often experience less pain and discomfort post-surgery.

Implant surgery requires a longer recovery period. There may be more swelling and bruising involved.

Long-Term Results

BBL results can last many years if you maintain your butt weight. The fat cells integrate into your butt naturally over time.

Implants may need replacement after 10-15 years due to wear and tear or complications.

Candidate Suitability

Not everyone is a candidate for BBL or implants. Those with enough excess fat are ideal for BBL butt procedures.

People with low body fat might consider butt implants instead as they lack sufficient donor fat for BBL.

Choosing a Cosmetic Surgeon

Specialized Training

A cosmetic surgeon must have specialized training. This is crucial for fat transfer buttock augmentation. Fat transfer techniques require precision and skill. Many surgeons may offer this procedure, but not all have the right expertise.

Look for surgeons with extensive experience in fat transfer. They should have completed specific training programs. These programs focus on transferring fat safely and effectively.

Verifying Credentials

Always verify the surgeon’s credentials. Check if they are board-certified. Board certification ensures the surgeon meets high standards of practice. The American Board of Plastic Surgery (ABPS) is a reliable certifying body.

Membership in professional societies is also important. Organizations like the American Society of Plastic Surgeons (ASPS) or the Aesthetic Surgery Journal provide additional credibility. These memberships indicate ongoing education and adherence to ethical standards.

Reviewing Photos

Reviewing before-and-after photos is essential. These photos show the surgeon’s aesthetic style and results. Look for consistency in their work.

Pay attention to details in these photos:

  • Symmetry of the buttocks
  • Smoothness of skin
  • Natural appearance

Photos can help you understand what to expect from your surgery.

Patient Selection Criteria

Surgeons should follow strict patient selection criteria. Not everyone is a good candidate for fat transfer buttock augmentation. Factors like overall health, skin quality, and body type matter.

Discuss candidacy openly with your surgeon. They should explain why you are suitable or not suitable for the procedure.

Importance of Consultations

Consultations are crucial before making a decision. During consultations, ask questions about their experience and techniques used.

Questions to consider:

  1. How many fat transfer procedures have you performed?
  2. What complications have you encountered?
  3. Can I see more before-and-after photos?

These questions help gauge their expertise and comfort level with the procedure.

Real-Life Experiences

Real-life experiences from other patients can be insightful. Read reviews on reputable websites or forums dedicated to plastic surgery discussions.

e patients share detailed accounts of their journey:

  • Initial consultation experiences
  • Recovery process
  • Satisfaction with results

These stories can provide a realistic picture of what to expect.

Focusing on Safety

Accredited Facilities

Choosing accredited facilities is crucial. These places meet high safety standards. They follow strict guidelines set by medical boards. Patient safety remains the top priority.

Accredited facilities have trained staff. They use advanced equipment. This minimizes risks during surgery. Always check for accreditation before deciding on a clinic.

Pre-Surgical Assessments

Thorough pre-surgical assessments are vital. Doctors evaluate your health status. They check for any underlying conditions.

These assessments include blood tests and imaging studies. The goal is to identify potential complications early. This allows the surgeon to plan the procedure better.

Transparent Communication

Transparent communication with your surgeon is essential. Discuss all risks involved in fat transfer buttock augmentation.

Ask about possible side effects and recovery time. Knowing what to expect helps you prepare mentally and physically.

Understanding Danger Zones

Surgeons must understand danger zones in the body. Injecting fat into these areas can be risky.

The task force on patient safety highlights specific zones to avoid. Surgeons should stay updated on these guidelines to ensure safe procedures.

Techniques and Planes

Different techniques exist for fat transfer procedures. Surgeons inject fat at various planes within tissue layers.

Using proper techniques reduces complications. It ensures even distribution of transferred fat, which improves results and safety.

Post-Surgery Care

Post-surgery care is important for recovery. Follow your doctor’s instructions closely.

This includes taking prescribed medications and attending follow-up appointments. Proper care prevents infections and other issues after surgery.

Preparing for the Procedure

Optimal Health

Achieving optimal health before a surgical procedure is crucial. Many patients should maintain a stable weight. This helps in achieving better results from fat transfer buttock augmentation. Quitting smoking is also essential. Smoking can impair healing and increase complications.

Home Preparation

Preparing the home for post-operative care is vital. Patients should arrange for assistance during recovery. Having someone to help with daily tasks can be very beneficial. Creating a comfortable recovery area is also important. Ensure that the space has:

  • Easy access to necessities
  • Comfortable seating arrangements
  • Adequate pillows for support

This will make the recovery process smoother.

Preoperative Instructions

Following the surgeon’s preoperative instructions closely is necessary. Surgeons often provide specific dietary restrictions before procedures. These may include fasting or avoiding certain foods. Adjusting medications as advised by the doctor is also important.

Patients might need to stop taking blood thinners or certain supplements before surgery to reduce bleeding risks.

Anesthesia Options

Understanding anesthesia options is part of preparation. Fat transfer buttock augmentation typically involves local anesthesia, intravenous sedation, or general anesthesia. Discussing these options with the surgeon helps in making an informed decision.

Local anesthesia numbs only the surgical area while intravenous sedation relaxes the patient without full unconsciousness. General anesthesia puts the patient completely asleep during the procedure.

Managing Expectations

Managing expectations is key for many patients undergoing augmentation procedures like this one. Knowing what to expect can reduce anxiety and improve satisfaction with results. Discussing goals and outcomes with the surgeon helps align expectations with achievable results.

Recovery Insights

Typical Timeline

Recovery from fat transfer buttock augmentation varies. The initial rest period is crucial. For the first 48 to 72 hours, patients should rest and limit movement. Gradual return to normal activities begins after this.

By the end of the first week, light activities can resume. Full recovery usually takes about four to six weeks. However, it depends on individual cases.

Post-Operative Care

Following post-operative care instructions is vital. Patients must wear compression garments for six to eight weeks. These help reduce swelling and support new contours.

Avoiding direct sitting on the buttocks is essential for at least two weeks. Using a special pillow or cushion can help when sitting becomes necessary.

Managing Expectations

Managing expectations during healing is important. Temporary swelling occurs and may last several weeks. This is normal and part of the process.

The final shape will evolve over time. Fat resorption can affect results, with an average resorption rate of 30% to 40% within six months.

Monitoring Results

Monitoring results is key for satisfaction. Regular follow-ups with the surgeon ensure proper healing and address any concerns early on.

Most patients see significant improvements in their hip ratio by three months post-surgery. Final results are typically visible by six months to one year.

Enjoying Life Post-BBL

Enhanced Confidence

A BBL can boost self-esteem. Many patients feel more confident in their bodies after the procedure. Enhanced body confidence often leads to improved social interactions and a better quality of life. Embrace these positive changes.

Maintaining Results

Regular exercise helps maintain your new shape. Focus on activities that strengthen the glutes and hips, such as squats and lunges. A balanced diet is also crucial. Avoid weight fluctuations to keep your results consistent.

Healthy Lifestyle

Adopt a healthy lifestyle to enjoy long-lasting satisfaction with your BBL. This includes:

  • Eating nutritious foods
  • Staying hydrated
  • Getting enough sleep

These habits support overall well-being and help maintain your ideal waist size.

Long-Lasting Satisfaction

BBL results can be long-lasting if maintained properly. Follow your surgeon’s advice for post-operative care. Enjoy the new contours of your body and the confidence that comes with them.

Summary

Fat transfer buttock augmentation offers a natural way to enhance your curves, providing aesthetic benefits while utilizing your own body fat. Understanding the procedure, its benefits, and candidate suitability ensures you make an informed decision. Comparing BBL with implants, choosing a skilled surgeon, and focusing on safety are paramount.

Prepare for the procedure and recovery to enjoy life post-BBL fully. Ready to transform your silhouette? Consult a qualified cosmetic surgeon today and take the first step towards achieving your dream body. Your journey to enhanced confidence starts now!

Frequently Asked Questions

What is fat transfer buttock augmentation?

Fat transfer buttock augmentation, also known as Brazilian Butt Lift (BBL), involves transferring fat from other body areas to the buttocks. This enhances shape and volume naturally.

What are the benefits of a BBL?

A BBL offers natural-looking results, improved body contour, and dual benefits of liposuction. It uses your own fat, reducing allergy risks.

Who is a good candidate for BBL?

Ideal candidates are in good health, have sufficient fat deposits for transfer, and desire a natural enhancement. A consultation with a cosmetic surgeon will determine suitability.

How does BBL compare to implants?

BBL uses your own fat for a natural feel and look. Implants can provide more dramatic results but carry higher risks like infection or displacement.

How do I choose the right cosmetic surgeon?

Look for board-certified surgeons with extensive experience in BBL procedures. Check reviews, before-and-after photos, and ensure they prioritize patient safety.

What should I expect during recovery?

Expect swelling and bruising post-procedure. Avoid sitting directly on your buttocks for at least two weeks. Follow all aftercare instructions for optimal results.

Is fat transfer buttock augmentation safe?

When performed by a qualified surgeon, BBL is generally safe. However, it carries risks like any surgery. Ensure your surgeon follows best practices to minimize complications.

Tumescent Liposuction on the Legs: Preparation, Procedure, and Recovery

Did you know that tumescent liposuction for legs has a 90% satisfaction rate among patients? This popular procedure isn’t just about aesthetics; it’s about boosting confidence and comfort. Tumescent liposuction uses a special solution to make fat removal easier and safer, giving your legs a toned appearance. Whether you’re dealing with stubborn fat or aiming for smoother contours, this technique offers precise results with minimal downtime.

If you’re considering ways to enhance your leg shape, understanding tumescent liposuction is essential. It’s a trusted method among experts and patients alike. Discover how this advanced procedure can help you achieve the look you desire while ensuring safety and efficiency.

Key Takeaways

  • Preparation is Crucial: Thoroughly prepare for your tumescent liposuction procedure by following pre-operative guidelines to ensure optimal results and minimize complications.
  • Understand Anesthesia: Tumescent anesthesia is a key component of this technique, offering localized pain relief and reducing the need for general anesthesia, making the procedure safer.
  • Follow the Steps: Familiarize yourself with the step-by-step process of tumescent liposuction to know what to expect during the procedure and alleviate any concerns.
  • Patient Selection Matters: Not everyone is a candidate for tumescent liposuction. Proper patient selection and counseling are essential for achieving satisfactory outcomes and ensuring patient safety.
  • Post-Procedure Care: Adhering to post-procedure care instructions, including proper dressing, is critical to recovery and minimizing the risk of infection or other complications.
  • Recovery Timeline: Have realistic expectations about the recovery timeline and follow recommended guidelines to ensure a smooth and effective healing process.

Preparing for Your Procedure

Medical History

A thorough review of your medical history is crucial. The plastic surgeon needs to know about past surgeries, allergies, and current medications. This information helps ensure patient safety during the procedure.

Physical Examination

A physical examination will be conducted. The surgeon checks areas like the inner thigh where suction will occur. Blood pressure and other vital signs are monitored to detect any potential risks.

Quitting Smoking

Quitting smoking is essential before surgery. Smoking can increase the risk of complications such as bleeding and poor wound healing. Doctors usually recommend stopping smoking at least two weeks before the procedure.

Stopping Medications

Certain medications must be stopped before surgery. Blood thinners and anti-inflammatory drugs can increase bleeding risks. Always follow your doctor’s instructions on which medicines to stop.

Dietary Restrictions

Dietary restrictions are often necessary before surgery. Avoid eating or drinking after midnight on the day of the procedure if general anesthesia will be used. Following these guidelines helps prevent complications during surgery.

Choosing Clothing

Wear loose, comfortable clothing on the day of your surgery. Opt for clothes that are easy to remove and put back on after the procedure. This makes it easier for you post-surgery when you may experience discomfort or swelling.

Understanding Risks

Understanding the risks involved in tumescent liposuction is important. Common risks include swelling, bleeding, and infection at incision sites. Discuss these with your surgeon beforehand to be fully aware.

Injection Sites

The surgeon will make small incisions for injecting a solution containing epinephrine and anesthetics into targeted areas like the inner thigh. This minimizes discomfort during suction.

Post-Surgery Care

Post-surgery care is critical for recovery. Follow all aftercare instructions provided by your surgeon closely to minimize complications and promote healing.

Understanding Tumescent Anesthesia

How It Works

Tumescent anesthesia helps minimize pain and reduce bleeding during liposuction. A large volume of a diluted solution is injected into the fatty tissue. This solution causes the targeted area to become firm and swollen, making it easier to remove fat.

Solution Composition

The tumescent method uses a specific solution. This solution contains a local anesthetic called lidocaine. Lidocaine numbs the area, reducing pain during the procedure. Another important component is epinephrine. Epinephrine constricts blood vessels, which helps reduce bleeding and bruising.

Benefits of Tumescent Method

There are several benefits to using tumescent anesthesia:

  • Minimized Pain: The local anesthetic ensures that patients feel minimal discomfort.
  • Reduced Bleeding: Epinephrine in the solution reduces blood loss.
  • Less Bruising: Blood vessel constriction leads to less post-operative bruising.

Safety Aspects

Tumescent anesthesia is generally safer than general anesthesia for liposuction. Patients remain awake and alert during the procedure. This reduces risks associated with general anesthesia, such as respiratory complications.

Recovery Process

Recovery from tumescent liposuction is often quicker and smoother. Since patients are not under general anesthesia, they can go home sooner after the procedure. There are fewer side effects like nausea or grogginess.

Step-by-Step Guide to the Procedure

Injecting Solution

The first step involves injecting a tumescent solution into the legs. This solution contains saline, lidocaine, and epinephrine. The saline helps to swell the tissues, making fat removal easier. Lidocaine acts as a local anesthetic to numb the area. Epinephrine constricts blood vessels, reducing bleeding and bruising.

A small amount of this solution is injected into each targeted area. The solution prepares the stubborn fat for removal by breaking it down.

Making Incisions

After the tumescent solution has taken effect, small incisions are made in the skin. These incisions are usually less than half an inch long. They allow access for the cannula, a thin tube used for suctioning out fat.

Precision is crucial during this step. Surgeons carefully place incisions to minimize scarring and ensure even results.

Suctioning Fat

Next, the surgeon inserts a cannula through the incisions. The cannula is attached to a vacuum device that suctions out fat cells from beneath the skin.

This process requires skill and accuracy. The surgeon moves the cannula back and forth to break up and remove fat evenly. This technique helps contour the legs effectively.

Closing Incisions

Once all targeted fat has been removed, the incisions are closed with sutures or surgical tape. These closures help prevent infection and promote healing.

It’s important that these incisions are small to reduce recovery time and scarring.

Compression Garments

After closing the incisions, compression garments are applied to the legs. These garments provide support and help reduce swelling and bruising.

Patients typically wear these garments for several days post-procedure. They aid in shaping the legs as they heal.

Patient Selection and Counseling

Ideal Candidates

Many patients consider tumescent liposuction for their legs. Ideal candidates are in good health. They should have a stable body weight. This procedure is not for weight loss but for contouring.

People with elastic skin see better results. Good lymphatic function is also important. Poor lymphatic function can lead to complications. Patients must have realistic expectations about the outcomes.

Comprehensive Counseling

Counseling is crucial before the procedure. Doctors must explain the process clearly. This includes describing aspiration and insertion sites. Patients should know where the small incisions will be made.

Discuss potential outcomes and risks in detail. Explain that while satisfaction rates are high, there are no guarantees. Patients should understand that results vary based on individual factors.

Psychological Preparation

Psychological readiness is key to a successful surgery experience. Setting realistic goals helps manage expectations. Tumescent liposuction can improve body shape but has limitations.

Patients should understand that this surgery won’t drastically change their lives or solve personal issues. Understanding these limitations reduces post-surgery disappointment.

Post-Procedure Care and Dressing

Immediate Care

After tumescent liposuction of the legs, managing the effects of the local anesthetic is crucial. Patients might experience numbness for several hours. Dermatologic surgeons recommend resting immediately after the procedure to minimize discomfort. Elevating the legs can help reduce oedema.

Changing dressings regularly is important. The initial dressing should be kept on for at least 24 hours. Surgeons advise using sterile gauze to prevent infections.

Pain Management

Once the anesthetic wears off, patients may feel pain or soreness. Over-the-counter pain relievers like ibuprofen or acetaminophen are often recommended. These medications help manage inflammation and pain effectively.

Patients should avoid strenuous activities during this period. Resting helps in faster recovery and reduces complications.

Compression Garments

Compression garments play a significant role in post-procedure care. They help control swelling and support tissue healing. Wearing these garments as directed by your surgeon is essential.

These garments also aid in shaping the treated areas, preventing loose skin from developing. Typically, they should be worn continuously for at least two weeks.

Monitoring Oedema

Oedema or swelling is common after tumescent liposuction. It usually peaks within 48 hours post-surgery and gradually decreases over time. Keeping an eye on swelling levels is important.

Elevating the legs while resting can help reduce oedema faster. Drinking plenty of water also aids in reducing fluid retention in the body.

Reducing Blood Loss

Minimizing blood loss post-operation is vital for a smooth recovery. Following your surgeon’s instructions on activity restrictions can significantly help with this.

Avoiding alcohol and smoking during recovery is crucial as they can increase blood pressure and hinder healing processes.

Recovery Expectations and Timeline

Initial Phase

Expect the initial recovery time to span about one to two weeks. During this period, you may experience swelling and bruising. These symptoms are normal and should gradually decrease.

Light walking is encouraged early on. This helps improve circulation and reduces the risk of blood clots.

Swelling Reduction

Swelling can persist for several weeks. It typically peaks within the first few days after surgery. You might notice a significant reduction in swelling by the third week.

Compression garments play a crucial role here. They help reduce swelling and support your legs as they heal.

Resuming Activities

You can usually return to light activities within a week or two. However, avoid strenuous exercise for at least four to six weeks.

Listen to your body. If you feel pain or discomfort, give yourself more time to rest.

Final Results

Final results appear gradually over several months. Most patients see noticeable changes in three months, but full results can take up to six months.

Patience is key during this phase. Your body needs time to adjust and heal fully.

Tips for Enhancing Recovery

Follow these tips to enhance your recovery:

  • Engage in light walking: Start with short walks as soon as you feel comfortable.
  • Adhere to post-procedure instructions: Follow all guidelines provided by your surgeon.
  • Stay hydrated: Drink plenty of water to help flush out toxins.
  • Avoid smoking: Smoking can impair healing and increase complications.
  • Eat a balanced diet: Proper nutrition supports recovery and overall health.

Safety and Risks of Tumescent Liposuction

Safety advantages

Tumescent liposuction is safer than traditional methods. It involves injecting a large amount of diluted local anesthesia into the fat tissue. This technique reduces blood loss significantly. Patients lose less blood compared to traditional liposuction.

Using local anesthesia lowers the risks associated with general anesthesia. Patients remain awake during the procedure, which minimizes complications like nausea or breathing problems. Local anesthesia is safer for those with underlying health issues.

Common side effects

Side effects are usually mild and temporary. Swelling and bruising are common but subside within a few weeks. Some patients experience numbness in the treated area. This typically resolves on its own.

Infections can occur but are rare when proper hygiene is maintained. Antibiotics may be prescribed as a precautionary measure. Fluid accumulation under the skin, called seroma, might happen but can be drained easily.

Potential complications

Though rare, there are potential complications. Skin irregularities or contour deformities can occur if too much fat is removed unevenly. Ensuring a skilled surgeon performs the procedure reduces this risk.

Blood clots or deep vein thrombosis (DVT) are serious but uncommon risks. Early mobilization post-surgery helps reduce this risk. Allergic reactions to medications used during the procedure can also happen but are generally manageable with prompt medical attention.

Qualified surgeon

Choosing a qualified surgeon is crucial for minimizing risks. Look for board-certified plastic surgeons with extensive experience in tumescent liposuction. Check their credentials and patient reviews.

A reputable facility ensures better outcomes too. Accredited clinics follow strict safety protocols, reducing infection risks and ensuring proper patient care standards.

Alternative Techniques and Innovations

Laser-Assisted Liposuction

Laser-assisted liposuction is a newer technique. It uses laser energy to liquefy fat before removal. This method can be less invasive. It often results in quicker recovery times.

The laser energy also promotes skin tightening. This can lead to smoother results. However, it requires expertise to perform safely. There is a risk of burns if not done correctly.

Ultrasound-Assisted Liposuction

Ultrasound-assisted liposuction (UAL) employs sound waves. These waves break down fat cells for easier removal. UAL can be effective for dense areas of fat.

This technique may cause less trauma to surrounding tissues. Recovery time can be shorter compared to traditional methods. However, there are risks of burns and nerve injury.

Power-Assisted Liposuction

Power-assisted liposuction (PAL) uses a vibrating cannula. The vibration helps break up fat cells quickly. PAL is efficient for large amounts of fat removal.

It reduces the physical strain on surgeons. This can result in more precise work and optimal results. Patients might experience less bruising and swelling with PAL.

Comparing Effectiveness

Each technique has its pros and cons. Tumescent liposuction is known for safety and effectiveness. Alternatives like laser-assisted or UAL offer faster recovery but come with unique risks.

Tumescent liposuction involves injecting a solution into the area first. This numbs the area and reduces bleeding. Other techniques might not provide the same level of local anesthesia.

Safety Considerations

Safety varies among techniques. Tumescent liposuction is considered very safe due to minimal blood loss and local anesthesia use.

Laser-assisted and ultrasound-assisted methods carry risks like burns or nerve damage if not performed properly by an expert surgeon.

Recovery Times

Recovery differs across techniques too. Tumescent liposuction usually has moderate recovery time owing to swelling from the injected solution.

Laser-assisted methods might allow patients to return to normal activities sooner due to less tissue trauma, while ultrasound-assisted methods could vary based on individual factors.

Future Advancements

Research continues in the field of liposuction technology. Scientists are looking at ways to make procedures even safer and more effective.

Newer innovations include non-invasive fat reduction techniques using cold or heat therapy, which show promising results without surgery.

Summary

You’ve now got the lowdown on tumescent liposuction for legs. From prepping for the procedure to recovery tips, you’re all set. This method is a game-changer, offering precision and safety. You deserve the best results with minimal risks.

Ready to take the next step? Consult with your healthcare provider to see if tumescent liposuction is right for you. Your journey to smoother, more contoured legs starts now. Dive in and make an informed decision today!

Frequently Asked Questions

What is tumescent liposuction for legs?

Tumescent liposuction is a technique to remove fat from the legs. It involves injecting a large amount of diluted local anesthesia to numb the area and reduce bleeding.

How do I prepare for tumescent liposuction on my legs?

Follow your surgeon’s instructions. This may include avoiding certain medications, fasting, and arranging post-procedure transport.

What can I expect during the recovery period?

Expect some swelling and bruising. Wear compression garments as advised. Recovery usually takes a few weeks, but you can resume light activities sooner.

Are there any risks associated with tumescent liposuction?

Yes, like any surgery, it has risks such as infection, bleeding, or uneven results. Choosing an experienced surgeon minimizes these risks.

Who is an ideal candidate for tumescent liposuction on legs?

Ideal candidates are healthy individuals with stubborn leg fat that doesn’t respond to diet or exercise. A consultation will determine suitability.

How does tumescent anesthesia work in this procedure?

Tumescent anesthesia involves injecting a saline solution mixed with lidocaine and epinephrine into the targeted area. It numbs the area and reduces blood loss.

Are there alternative techniques to tumescent liposuction for legs?

Yes, alternatives include laser-assisted liposuction and ultrasound-assisted liposuction. Consult your surgeon to determine the best option for you.