Buttocks Contouring Procedure: Overview, Risks, and Recovery

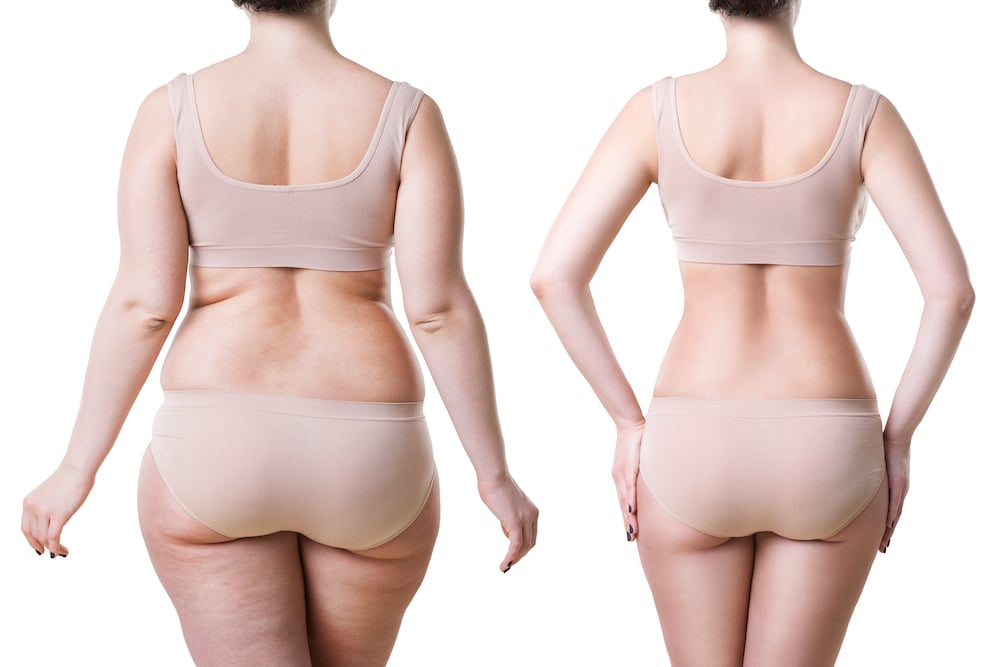
Ever wondered how to achieve that perfectly sculpted look? The buttocks contouring procedure is your answer. This transformative buttocks surgery enhances the shape and fullness of your behind, giving you a confidence boost through body improvement. Whether you’re looking to correct asymmetry or simply want a more defined silhouette, cosmetic surgeons and skin reconstruction have got you covered.

Stick around to learn how this popular cosmetic treatment, including fat graft, can help you achieve your aesthetic goals safely and effectively. Ready to transform your look?

Understanding Buttocks Contouring

Definition

Buttocks contouring is a surgical procedure. It aims to improve the shape and appearance of the buttocks, as performed by a cosmetic surgeon. Surgeons use various techniques to achieve the desired look. These techniques include liposuction, implants, and fat grafting.

Common Reasons

Many individuals seek buttocks contouring for different reasons. Sagging is one common reason. This can occur due to aging or weight loss. Lack of volume is another reason. Some people are dissatisfied with their natural shape. They want a fuller, more rounded appearance.

Weight Fluctuations

Weight fluctuations impact the decision to undergo contouring. Significant weight loss can lead to excess skin. This causes sagging in the buttock area. Weight gain can also affect the shape. It may create an uneven or disproportionate look.

Aging Factors

Aging plays a significant role in buttocks contouring decisions. As people age, skin loses elasticity. This results in sagging and wrinkles. The muscles in the buttocks may also weaken over time, according to a cosmetic surgeon. These changes make many people consider a cosmetic surgeon for surgery to restore a youthful appearance.

Genetic Influence

Genetic factors influence buttocks shape and size. Some individuals have naturally flat or small buttocks. Others may have an asymmetrical shape. Genetics determine how fat is distributed in the body. This affects overall appearance and satisfaction.

Benefits and Advantages

Enhanced Shape

Buttocks contouring can enhance the shape of the buttocks. This procedure helps in sculpting a more defined appearance. Many people experience an increase in volume and a better overall shape, according to a cosmetic surgeon. The enhancement is noticeable immediately after the procedure.

Patients often report feeling more confident. They appreciate the improved look and feel of their bodies. The results are usually long-lasting, making it a popular choice for many.

Proportionate Silhouette

Achieving a more proportionate body silhouette is another benefit. Buttocks contouring helps balance the body’s proportions. It can make the waist appear smaller and hips more rounded.

This change can have a significant impact on one’s overall appearance. People often find that their clothes fit better. The procedure can also help align body proportions, leading to a more harmonious look.

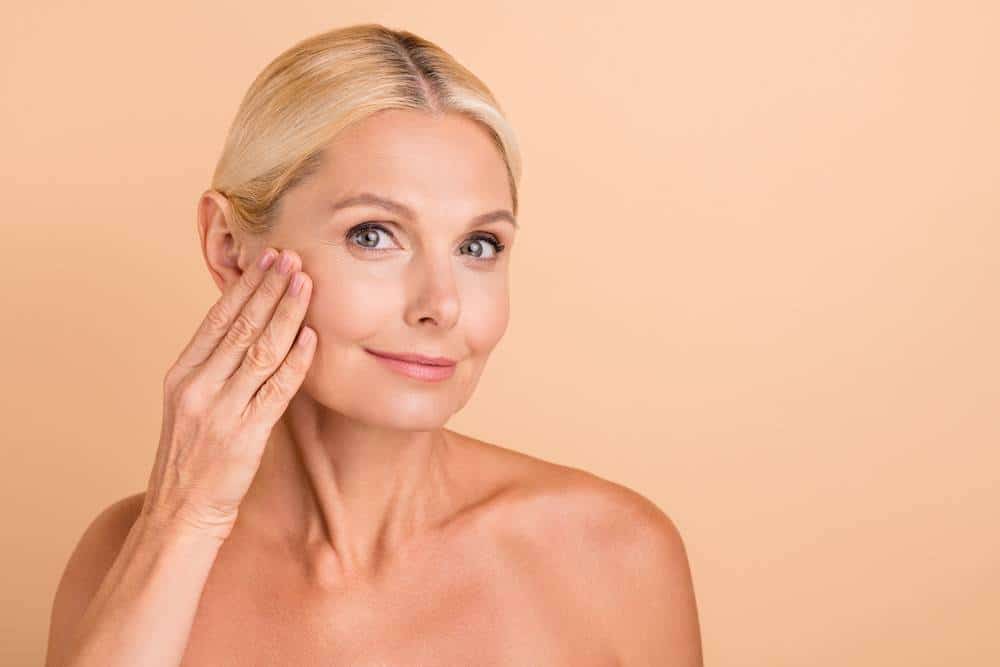
Psychological Benefits

Improved body image leads to psychological benefits. Many individuals report increased self-esteem post-procedure. Feeling better about one’s body can significantly affect mental health.

People may feel more comfortable in social situations. They might also engage in activities they previously avoided. The boost in confidence can be life-changing for many.

Fat Reduction

Buttocks contouring often involves fat reduction. Excess fat is removed from areas where it’s unwanted. This can lead to a loss of several pounds, contributing to weight management goals.

Patients might see a reduction in extra skin as well. The procedure tightens the skin around the treated area, enhancing the overall result. Fat reduction makes the buttocks appear firmer and more toned.

Quick Procedure

The contouring process is relatively quick. Most procedures take about 60 to 90 minutes to complete. This makes it convenient for those with busy schedules.

Recovery time is also short compared to other surgeries. Patients can often return to normal activities within a few days. The minimal downtime is a significant advantage for many people.

Long-Lasting Results

Results from buttocks contouring are typically long-lasting. Maintenance requires a healthy lifestyle but no frequent touch-ups are needed.

Patients enjoy their enhanced appearance for years. The durability of results makes this procedure appealing to many seeking lasting changes.

Butt Lift vs Contouring

Objectives

A butt lift aims to remove sagging skin and tighten the area. This procedure is ideal for those with significant skin laxity. It does not add volume but improves the shape by eliminating excess skin.

In contrast, buttocks contouring focuses on reshaping and adding volume. This can involve fat transfer or implants. The goal is to create a fuller, more rounded appearance.

Techniques

Buttock lift surgery involves making incisions to remove excess skin. The surgeon then lifts and tightens the remaining skin. This technique is effective for those who have lost a lot of weight or have aging skin.

Buttocks contouring may use fat transfer, where fat from another part of the body is injected into the buttocks. Another method is using implants to add volume. These techniques enhance the natural shape and size of the buttocks.

Addressing Issues

A butt lift primarily addresses sagging and loose skin. It does not significantly change the volume of the buttocks. This makes it suitable for individuals with skin laxity due to aging or weight loss.

Contouring procedures can address multiple issues like cellulite and limited body fat in specific areas. By adding volume, these procedures can create a more youthful and balanced look.

Suitability

A butt lift is best for individuals with loose, sagging skin. Those who have undergone significant weight loss often benefit from this procedure. It helps tighten and smooth out the area.

Buttocks contouring suits people looking to enhance their buttock’s shape and size. Individuals with flat or asymmetrical buttocks often choose this option. It is also suitable for those with enough body fat for a fat transfer.

Aesthetic Goals

For someone aiming to improve overall body contours without adding bulk, a butt lift is ideal. It provides a lifted, firmer appearance without increasing size.

On the other hand, contouring procedures are perfect for those wanting a more pronounced enhancement. Adding volume through fat transfer or implants achieves a fuller look.

Real-Life Examples

Consider a person who has lost 100 pounds through diet and exercise but has sagging skin around their buttocks. A butt lift would be an appropriate choice for them as it removes excess skin and tightens the area.

Another example is someone with naturally flat buttocks who desires a fuller look. Buttocks contouring with a dermal fat flap or implants would help achieve their aesthetic goals.

Preparing for Surgery

Medical Evaluations

Before undergoing buttocks contouring surgery, patients must complete several medical evaluations. These assessments ensure that individuals are fit for the procedure. A cosmetic surgeon will likely request a full medical history. Blood tests and imaging studies may also be necessary.

Patients should disclose any medications they are taking. Allergies or previous surgeries should be mentioned as well. This information helps the surgeon plan the surgery safely.

Lifestyle Adjustments

Lifestyle changes play a crucial role in preparing for cosmetic surgery procedures. Patients should aim to quit smoking at least six weeks before surgery. Smoking can impair healing and increase surgical risks.

Maintaining a healthy diet is also important. Proper nutrition supports the body’s ability to recover post-surgery. Regular exercise can improve overall health and stamina, making recovery smoother.

Discussing Expectations

It’s essential to have a detailed discussion with the cosmetic surgeon about expectations and potential outcomes. Patients should express their desired results clearly. Surgeons can provide realistic insights into what can be achieved.

Understanding the limitations and risks of aesthetic plastic surgery is vital. Surgeons will explain possible complications and how they plan to address them. This conversation builds trust and sets realistic expectations.

Arranging Post-Surgery Support

Post-surgery support is crucial for a smooth recovery. Patients should arrange for someone to drive them home after the procedure. Having someone stay with them for at least 24 hours post-surgery is advisable.

Planning for time off work is also necessary. Recovery from surgical treatment like buttocks contouring usually requires at least two weeks off work. More extensive procedures might need longer recovery times.

Preparing Your Home

Preparing the home environment can make recovery more comfortable. Stock up on essential supplies such as medications, bandages, and comfortable clothing. Arrange a resting area with pillows to support the body properly.

Ensure that frequently used items are easily accessible. This setup minimizes movement during the initial recovery phase, reducing discomfort and promoting healing.

Final Steps

By following these steps, patients can prepare effectively for their buttocks contouring surgery:

  1. Complete all required medical evaluations.
  2. Make necessary lifestyle adjustments.
  3. Discuss expectations and outcomes with the surgeon.
  4. Arrange post-surgery support.
  5. Prepare your home for a comfortable recovery.

Proper preparation enhances safety and improves overall outcomes in cosmetic procedures.

The Procedure Steps

Anesthesia

The first step is administering anesthesia. Most patients receive general anesthesia. This ensures they are asleep and pain-free during the cosmetic procedure. Some may opt for local anesthesia with sedation. The choice depends on the patient’s health and preferences.
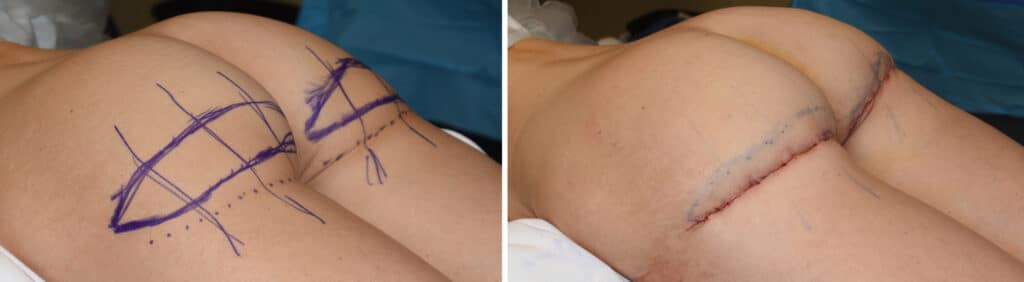
Incision Placement

Surgeons make incisions in specific areas. For fat transfer, small incisions are made for liposuction. If implants are used, incisions are larger. The location of these cuts varies based on the technique and patient’s body type. Surgeons plan incision sites to minimize visible scars.

Liposuction

Liposuction removes excess fat from targeted areas. Surgeons use a thin tube called a cannula. They insert it through small incisions. The cannula breaks up and suctions out unwanted fat cells. This step shapes the body and provides fat for transfer if needed.

Fat Transfer

In fat transfer procedures, surgeons purify the removed fat. They then inject it into the buttocks. This adds volume and enhances shape. The amount of fat transferred depends on the desired results. Surgeons carefully distribute the fat to ensure even contouring.

Implant Placement

Implant placement involves inserting silicone implants into the buttocks. Surgeons create pockets within muscle or above it. They place the implants into these pockets. This method is chosen when patients lack enough body fat for transfer. Implants come in various sizes to match patient goals.

Closing Incisions

After shaping the buttocks, surgeons close the incisions. They use sutures or surgical glue. Proper closure is crucial to reduce scarring and promote healing. Surgeons may place drainage tubes to prevent fluid buildup.

Customized Approach

Each procedure is tailored to the patient’s needs. Surgeons consider factors like body type and aesthetic goals. For example, a person seeking subtle enhancement might prefer fat transfer over implants. Those wanting significant change might choose implants or a combination approach.

Recovery Process

Post-surgery care is vital for recovery. Patients often wear compression garments to reduce swelling. Resting and following aftercare instructions speeds up healing. Most can resume normal activities within a few weeks.

Risks and Complications

Common Risks

Buttocks contouring carries several risks. Infection is a primary concern. It can occur if the surgical site isn’t kept clean. Symptoms include redness and fever. Antibiotics often treat infections, but severe cases may need further surgery.

Asymmetry is another risk. This means one buttock looks different from the other. It might happen if fat or implants are unevenly distributed. Corrective surgery can fix asymmetry, but it’s an additional procedure.

Anesthesia complications can also arise. These include allergic reactions or breathing problems. An anesthesiologist monitors the patient to reduce these risks.

Skin Issues

Skin issues are common after buttocks contouring. Superficial irregularities can appear. These are small lumps or bumps on the skin’s surface. They often result from uneven fat distribution or poor healing.

Wrinkles and many wrinkles can also form. This happens if the skin lacks elasticity. Older patients or those with damaged skin are more prone to this problem.

Poor tissue elasticity is a significant factor in skin issues. The skin may not bounce back well after surgery. This leads to sagging or wrinkled skin.

Iatrogenic Deformities

Iatrogenic deformities are deformities caused by medical treatment itself. In buttocks contouring, this could mean unintended changes in shape due to surgical errors. These deformities might need corrective procedures.

Importance of Qualified Surgeons

Choosing a qualified surgeon is crucial to minimize risks. A skilled surgeon has proper training and experience. They follow safety protocols to reduce complications.

Look for board-certified surgeons. Certification shows they meet high standards in their field. Check reviews and ask for before-and-after photos of previous patients.

A good surgeon will discuss all potential risks with you. They will explain how they plan to minimize those risks during the procedure.

Pre-Surgery Assessment

A thorough pre-surgery assessment is essential. This helps identify any potential health concerns that could complicate surgery.

Doctors will review your medical history. They will check for conditions like diabetes or heart disease that increase surgical risks.

You may need blood tests and imaging studies. These tests ensure you’re healthy enough for surgery.

Aftercare and Recovery

Initial Rest

Patients need to rest for the first few days. This period is crucial for healing. Swelling and bruising are common. Pain management is also important during this time.

Activity Restrictions

Avoid strenuous activities for at least two weeks. Light walking can help with blood circulation. Do not sit directly on the buttocks for long periods.

Wound Care

Keep the surgical site clean and dry. Change dressings as instructed by the surgeon. Watch for signs of infection, such as redness or discharge.

Follow-Up Visits

Attend all scheduled follow-up visits. Surgeons monitor healing progress during these appointments. They may adjust care instructions based on recovery status.

Adhering to Instructions

Follow all post-operative care guidelines carefully. Proper care ensures optimal results. Ignoring instructions can lead to complications.

Expected Results and Satisfaction

Gradual Results

Patients can expect gradual results from buttocks contouring. Initial swelling might hide the final look. Typically, swelling subsides over several weeks. As it reduces, the new shape becomes more visible. This process can sometimes take up to six months.

Skin sensation might change temporarily. Some patients report numbness or tingling in the treated area. These sensations usually resolve as healing progresses.

Satisfaction Rates

Satisfaction rates for buttocks contouring are generally high. Many patients feel more confident and pleased with their appearance. However, satisfaction varies based on individual expectations and outcomes.

Touch-up procedures may be necessary for some individuals. These adjustments ensure symmetry and desired results. It’s important to discuss potential touch-ups with your surgeon during initial consultations.

Long-term Maintenance

Long-term maintenance of buttocks contouring results is crucial. Lifestyle choices play a significant role in preserving the new shape. Regular exercise helps maintain muscle tone and skin elasticity.

Healthy eating habits support overall body health. Avoid significant weight fluctuations, which can affect the contouring results. Consistent weight management helps keep the buttocks looking firm and shapely.

Methods Impact

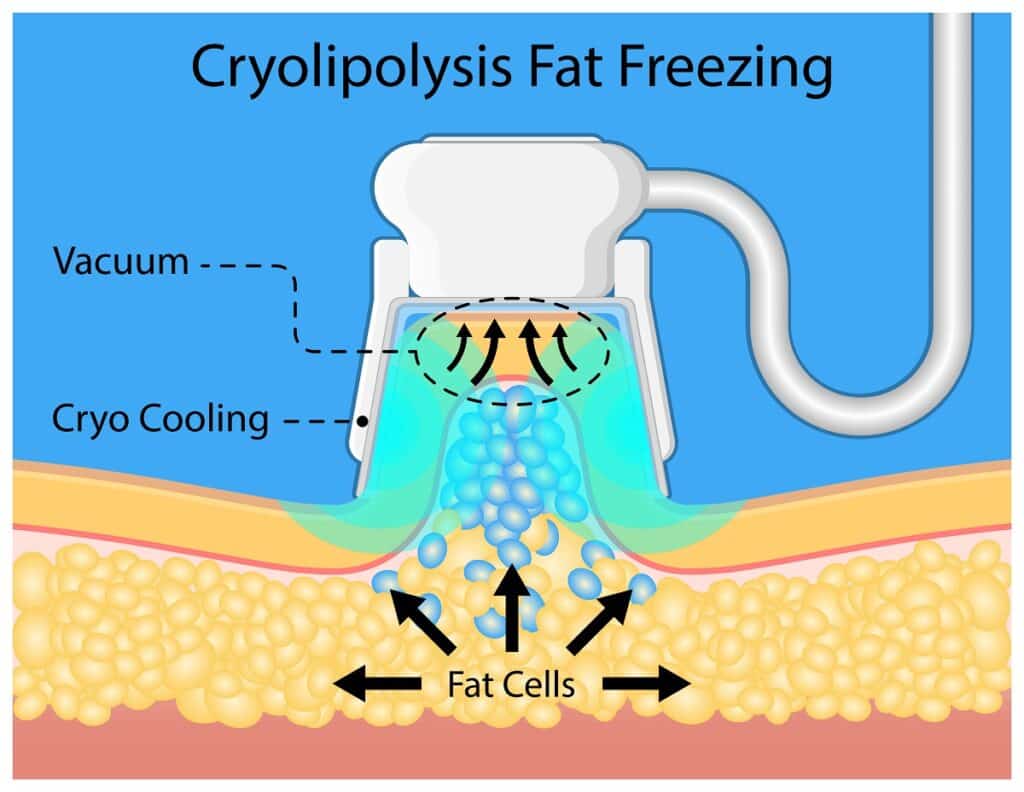
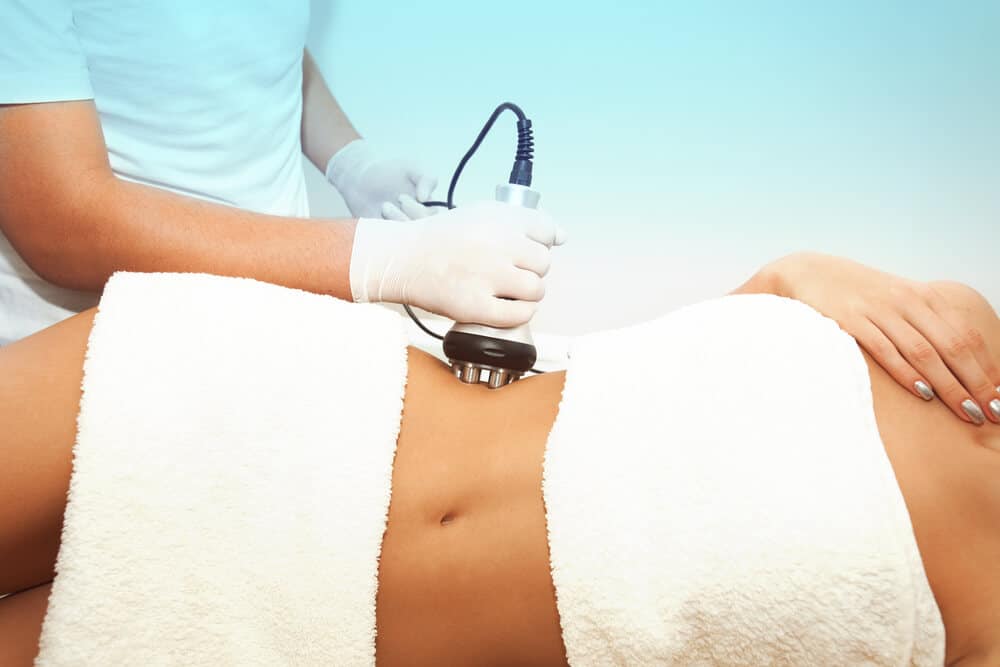
Different contouring methods impact results and satisfaction levels. Surgical options like Brazilian Butt Lift (BBL) use fat transfer techniques. This method often provides natural-looking results but requires careful aftercare.

Non-surgical methods involve fillers or radiofrequency treatments. These offer less dramatic changes but require fewer recovery times. Patients should choose the method that aligns with their goals and lifestyle.

Who Should Consider Contouring

Ideal Candidate

People seeking buttocks contouring often want to improve shape, volume, or symmetry. They may feel self-conscious about their appearance. Ideal candidates are those in good health with a stable weight. They should have realistic expectations about the results.

Individuals who have lost significant weight might notice sagging skin. This procedure can help tighten and lift the area. People with uneven buttocks can also benefit from contouring. It aims to create a balanced look.

Health Considerations

Certain health conditions make this procedure risky. Those with heart problems or blood clotting disorders should avoid it. Diabetes patients need careful assessment due to healing issues.

People with infections or skin conditions in the buttocks area should not proceed until fully healed. Consulting a doctor is crucial for anyone considering this surgery.

Unrealistic Expectations

e individuals might expect too much from the procedure. It’s important to understand that contouring will enhance but not perfect the body. Unrealistic goals lead to disappointment.

Surgeons stress the importance of having a clear, achievable vision. Communication with a plastic surgeon helps set these expectations.

Consultation Importance

A certified plastic surgeon evaluates if you are a suitable candidate. During consultation, they will discuss goals and health status. They will examine skin texture and overall physical condition.

The surgeon will explain the procedure details and potential risks. This helps in making an informed decision. They will also provide pre- and post-operative care instructions for optimal results.

Summary

Buttocks contouring can transform your confidence and appearance. From understanding the procedure to knowing the benefits, you’re now equipped with essential knowledge. The detailed steps and aftercare tips ensure you’re prepared for the journey ahead.

Ready to enhance your silhouette? Consult with a certified surgeon to discuss your goals. Your dream look is within reach—embrace this opportunity for a more confident you. Explore our recommended specialists today!

Frequently Asked Questions

What is buttocks contouring?

Buttocks contouring is a cosmetic procedure to enhance the shape and size of the buttocks. It involves fat transfer or implants.

What are the benefits of buttocks contouring?

The benefits include improved body proportions, enhanced curves, and boosted self-confidence.

How does butt lift differ from buttocks contouring?

A butt lift removes excess skin and tightens tissues, while contouring focuses on reshaping using fat transfer or implants.

How should I prepare for a buttocks contouring procedure?

Preparation includes medical evaluations, avoiding certain medications, and stopping smoking. Follow your surgeon’s instructions closely.

What are the steps involved in the procedure?

The procedure involves anesthesia, making incisions, fat grafting or implant placement, and closing incisions. It typically lasts 2-3 hours.

What are the risks of buttocks contouring?

Risks include infection, scarring, asymmetry, and anesthesia complications. Consult with a board-certified surgeon to minimize risks.

What is the recovery process like?

Recovery involves rest, wearing compression garments, avoiding strenuous activities, and following post-op care instructions. Full recovery takes a few weeks.

Radiofrequency-Assisted Liposuction Before & After: Stunning Results

Radiofrequency-assisted liposuction is changing how we think about body contouring, a plastic surgery technique. This innovative technique combines radiofrequency energy with traditional liposuction to enhance top results in the area. Patients are seeing significant improvements in skin tightening and fat reduction in the area, according to top liposuction surgeons, without actual lipo surgery. The procedure is gaining popularity for its effectiveness and minimal downtime in the lipo area day by day. Before and after photos reveal dramatic transformations from lipo, making it a sought-after option day and night.

This blog post will dive into what you can expect from radiofrequency-assisted liposuction before and after the procedure. We’ll cover how lipo works, the benefits, and real-life success stories. Whether you’re considering lipo treatment or just curious, you’ll find valuable insights here.

Understanding the Procedure

Noninvasive Technology

Radiofrequency-assisted liposuction uses advanced technology. It breaks down fat using radiofrequency energy. This energy heats the fat cells. The heat causes the cells to break apart. The body then removes these broken cells naturally.

This method is less invasive than traditional liposuction. It means fewer scars and quicker recovery times. Patients experience minimal complications with this technique.

Dr. Dayan’s Approach

Dr. Dayan combines his extensive education and experience with this advanced lipo technique. He ensures each patient gets personalized care. His approach includes thorough initial consultations.

During these consultations, he assesses the patient’s needs. He explains the procedure in detail. Dr. Dayan sets realistic expectations for the results.

He uses a combination of radiofrequency technology, lipo, and other plastic surgery techniques. This combination provides optimal results for his patients.

Importance of Consultations

Consultations are crucial for planning the procedure. They help in setting realistic expectations. During the consultation, Dr. Dayan evaluates the patient’s health and lipo goals.

Patients discuss their concerns and desired outcomes. Dr. Dayan creates a personalized lipo treatment plan based on this information.

Regular consultations ensure continuous care before and after the lipo procedure. These meetings help monitor progress and address any issues promptly.

Personalized Procedure Plans

Each patient receives a unique treatment plan. This plan considers their specific needs and goals. Dr. Dayan tailors the radiofrequency-assisted liposuction to achieve the best results.

The personalized plan includes details about pre-surgery care, the lipo procedure itself, and post-surgery care. This comprehensive approach ensures professionalism and high-quality results.

Before and After Gallery

Preoperative View

Patients often feel nervous before surgery. Viewing the preoperative view can help ease anxiety. It shows what others looked like before their procedures.

Previous Patients

Previous patients of Dr. Dayan have shared their experiences. They have undergone various procedures, including breast augmentation and liposuction. Many have praised the natural results they achieved.

Mommy Makeover

A popular choice is the mommy makeover. This combines multiple procedures, including lipo, to restore a mother’s body post-pregnancy. Patients often see dramatic changes in their bodies after this transformative lipo journey.

Natural Results

Dr. Dayan’s expertise ensures natural-looking outcomes. Many patients comment on how their results exceeded expectations. They appreciate looking enhanced but not artificial.

Patient Testimonials

Several patients have shared testimonials about their experience.

  • One patient mentioned feeling more confident after her breast augmentation and lipo.
  • Another highlighted the positive change in her demeanor post-liposuction.
  • A mother expressed joy over her rejuvenated body after a mommy makeover with lipo.

Surgical Gowns

The gallery also includes images of patients in surgical gowns and lipo. These photos provide a realistic view of the lipo process from start to finish.

Zenith Cosmetic Clinic

Zenith Cosmetic Clinic is known for its high standards. The clinic uses advanced techniques to ensure patient satisfaction. Dr. Dayan’s work at this clinic, particularly in lipo, has been praised for its quality and care.

Time and Transformation

Transformation takes time, but the results are worth it. The gallery showcases how patients’ bodies change over time post-lipo surgery.

Treatment Benefits

Noninvasive Procedure

Radiofrequency-assisted liposuction is less invasive. This means quicker recovery times compared to traditional liposuction. Patients often return to daily activities faster.

The procedure uses radiofrequency energy to melt fat. This minimizes trauma to surrounding tissues. Patients experience less bruising and swelling.

Dual Benefits

This lipo treatment not only removes fat but also tightens the skin. The radiofrequency energy stimulates collagen production. This results in firmer and smoother skin post-surgery.

Many patients notice significant improvement in skin texture. They see both fat reduction and enhanced skin elasticity.

Personalized Care

Dr. Dayan and his team provide personalized care. Each patient receives a tailored treatment plan. This ensures optimal results and addresses individual concerns.

Follow-up support is crucial for proper healing. Dr. Dayan’s team monitors patients closely after surgery. They provide guidance to ensure a smooth recovery process.

Postoperative Support

Proper postoperative care is essential for the best outcome. Patients receive detailed instructions for home care. This includes managing pain and caring for the treated lipo area.

Regular follow-ups help track progress. Any concerns are addressed promptly by Dr. Dayan’s team.

Patient Satisfaction

Satisfied patients often share their experiences. Many report high levels of postoperative satisfaction. They appreciate the dual benefits of fat removal and skin tightening with lipo.

Patient testimonials highlight the positive outcomes of this treatment. Trust in an accredited outpatient clinic like Dr. Dayan’s lipo clinic is common among patients.

Quick Recovery

Recovery time is shorter with this lipo procedure compared to traditional methods. Most patients resume normal activities within a few days.

Proper care during recovery is vital. Following Dr. Dayan’s guidelines ensures faster healing and better results.

Effective Areas

Abdomen

The abdomen is a common target for radiofrequency-assisted liposuction. Many patients struggle with stubborn belly fat. This area often resists diet and exercise. The procedure helps achieve beautiful results by tightening the skin. Patients notice a flatter and more toned stomach.

Thighs

Thighs are another popular area for treatment. Fat accumulates here, especially in women. Radiofrequency-assisted liposuction can contour both inner and outer thighs. It reduces fat and smoothens the skin. This creates a more proportionate look.

Arms

Arms benefit significantly from this procedure. Upper arms can develop sagging skin and fat deposits. The treatment tightens the skin and reduces fat. This results in sleeker and firmer arms. Patients feel more confident wearing sleeveless clothes.

Versatility

This procedure is highly versatile. It works on both large and small areas of the body.

  • Large areas like the abdomen and thighs see significant fat removal.
  • Smaller areas such as the neck or underarms get precise contouring.

Each treatment plan is customized to address specific concerns. The versatility ensures that patients achieve their desired outcomes.

Stubborn Fat

Radiofrequency-assisted liposuction is effective against stubborn fat. Some fat deposits do not respond to traditional weight loss methods. Patients report frustration with these areas.

The procedure targets these resistant fat pockets effectively. It combines heat and suction to break down fat cells. This makes it easier to remove them permanently.

Patient Feedback

Patient feedback highlights the success of the treatment. Many patients have tried various diets and exercises without success. They find relief in this procedure’s abilities to deliver final results they desire.

Patients appreciate:

  • The quick recovery time
  • Minimal discomfort during the process
  • Noticeable improvements soon after the treatment

Ideal Candidates

Noninvasive Option

Prospective patients seeking a noninvasive option for fat removal and skin tightening may find radiofrequency-assisted liposuction appealing. This procedure uses radiofrequency energy to melt fat and tighten the skin. It is less invasive than traditional liposuction.

Real patients have reported positive outcomes with minimal downtime. The procedure suits those who prefer avoiding major surgery.

Realistic Expectations

Having realistic expectations is crucial for successful results. Radiofrequency-assisted liposuction can provide significant improvements but not dramatic weight loss.

Patients must understand the limits of the procedure. A knowledgeable plastic surgeon will discuss achievable outcomes during consultations.

Pre and Post-Procedure Guidelines

Following pre and post-procedure guidelines is essential. Surgeons may advise avoiding certain medications or foods before the procedure. Post-procedure care often includes wearing compression garments and avoiding strenuous activities.

Adhering to these guidelines helps ensure optimal results. Patients must be committed to following their surgeon’s advice.

Consultation with Dr. Dayan

A consultation with Dr. Dayan is important to determine candidacy. During this appointment, Dr. Dayan assesses individual health, goals, and lifestyle. He reviews medical history and discusses patient expectations.

This step ensures that the procedure aligns with the patient’s needs. It also provides an opportunity to ask questions about the process and recovery.

Qualified Practitioners

Choosing a qualified practitioner is vital for safety and effectiveness. Look for cosmetic surgeons with experience in radiofrequency-assisted liposuction. A certified specialist will have the necessary skills and knowledge.

A good surgeon should be able to show before-and-after photos of real patients. This helps prospective patients gauge potential results.

Team Support

The support of a skilled team enhances the overall experience. From initial consultations to follow-up appointments, a dedicated team ensures smooth processes.

Patients should feel comfortable asking questions and expressing concerns. The staff’s professionalism plays a significant role in patient satisfaction.

Summary

Radiofrequency-assisted liposuction offers a transformative way to sculpt your body. From understanding the procedure to seeing real before-and-after results, you now have a clear picture of what to expect. The benefits are numerous, and the treatment areas are versatile, making it a top choice for many.

If you’re an ideal candidate, this could be your ticket to achieving your body goals. Don’t wait—take the first step toward a new you. Contact us today to schedule your consultation and start your journey.

Frequently Asked Questions

What is radiofrequency-assisted liposuction?

Radiofrequency-assisted liposuction (RFAL) uses radiofrequency energy to liquefy fat cells before removal. This technique minimizes tissue damage and promotes skin tightening.

What should I expect before the procedure?

Before RFAL, you’ll have a consultation to discuss goals and medical history. Pre-procedure instructions may include avoiding certain medications and fasting.

How soon can I see results after RFAL?

You can see initial results immediately. Full results typically appear within 3-6 months as swelling subsides and skin tightens.

What are the primary benefits of RFAL?

RFAL offers multiple benefits: effective fat removal, minimal downtime, and enhanced skin tightening. It’s less invasive than traditional liposuction.

Which areas can be treated with RFAL?

Common areas include the abdomen, thighs, arms, and neck. RFAL is versatile and can target various body parts for contouring.

Who is an ideal candidate for RFAL?

Ideal candidates are healthy individuals with localized fat deposits resistant to diet and exercise. They should have realistic expectations about the outcome.

Is there any downtime after the procedure?

Downtime is minimal. Most patients return to normal activities within a few days. Swelling and bruising may persist for a couple of weeks.

Laser Fractional Resurfacing Treatments: Benefits & Risks

Did you know that over 50% of people seeking skin rejuvenation opt for laser fractional resurfacing treatments using nonablative lasers for facial wrinkles? This cutting-edge technology, including laser systems and fractional laser technologies, offers impressive results with minimal downtime using nonablative lasers. By targeting specific skin areas with fractional laser, it effectively reduces wrinkles, scars, pigmentation issues, and acne. The precision of laser fractional resurfacing technology ensures a quicker recovery for facial skin and facial wrinkles compared to traditional methods using nonablative lasers.

Whether you’re dealing with acne scars or looking to refresh your skin’s appearance, treatments like ablative fractional resurfacing, nonablative lasers, and CO2 laser resurfacing can be a game-changer for your face. With expert guidance and advanced technologies like ablative fractional resurfacing and nonablative lasers, achieving smoother, younger-looking skin and treating acne is within reach. Discover why more individuals are turning to this innovative solution for their skincare needs, including acne and technologies like nonablative lasers and CO2 laser resurfacing.

Why Choose Laser Resurfacing

Precision Targeting

Laser resurfacing is precise. It targets specific skin concerns like fine lines, age spots, uneven skin tone, and acne using nonablative lasers for a tissue effect. Fractional resurfacing uses nonablative lasers and laser light technologies to treat tiny areas of the skin and tissue affected by acne. This method leaves surrounding tissue untouched. This precision reduces recovery time.

Collagen Production

Laser treatments stimulate collagen production. Collagen helps firm the skin. This results in a more youthful appearance. Non-ablative lasers heat deeper layers of the skin tissue without damaging the surface, offering an effect beneficial for acne and other technologies. Over time, this boosts natural collagen growth.

Versatility

There are different types of laser resurfacing options. Ablative lasers, such as CO2 lasers, remove the top layer of skin tissue and can have an effect on acne. This technique is effective for deep wrinkles, acne, and scars but requires longer tissue recovery with ablative fractional methods. Non-ablative techniques, like those using YAG lasers, work below the surface tissue and have shorter downtime, effectively treating acne.

Suitable for Various Skin Types

Different laser systems cater to various skin types. A cosmetic surgeon can recommend the appropriate laser based on individual needs, such as acne or tissue concerns. For example, fractional laser treatments can be adjusted for sensitive or darker skin tones, acne, or tissue.

Technological Advances

Modern technology has improved laser systems significantly. Today’s lasers are safer and more effective than older models. They offer customizable settings to match each patient’s unique skin condition and goals.

Preparing for Your Treatment

Consult a Dermatologist

Consulting with a dermatologist is crucial. They can determine the best type of laser treatment for your skin condition and type. Different skin types react differently to laser treatments. A professional will assess your facial skin and recommend the most effective approach. This step ensures you get safe and personalized care.

Avoid Sun Exposure

Avoiding sun exposure is essential before your treatment. UV rays can damage your skin, making it more sensitive to the laser. Stay indoors or use strong sun protection if you need to go outside. Wearing hats and applying sunscreen with high SPF can help protect your skin from harmful rays.

Use Gentle Skincare Products

Switch to gentle skincare products before your procedure. Harsh chemicals can irritate your skin, affecting the healing process. Avoid products with retinoids or acids at least two weeks before the treatment. Stick to mild cleansers and moisturizers to keep your skin calm and hydrated.

Plan for Recovery

Planning for a recovery period is important. Laser resurfacing may require some downtime. The treated skin may appear red and swollen for a few days. Taking time off work might be necessary, especially if you have a public-facing job. Arrange for someone to assist you at home if needed.

Local Anesthetic

Ask about local anesthetic options during your consultation. Some laser treatments can be uncomfortable. A local anesthetic helps numb the area, reducing pain during the procedure. Discuss this with your doctor to ensure a comfortable experience.

Understanding Risks and Benefits

Potential Risks

Laser fractional resurfacing treatments come with some risks. Redness and swelling are common side effects. These usually subside within a few days to a week.

In rare cases, scarring can occur. This is more likely if the skin is not properly cared for post-treatment. Infection is another risk but can be minimized with proper hygiene.

Sun exposure can also increase the risk of complications. It is crucial to avoid direct sunlight before and after the procedure. Using sunscreen helps protect the treated area.

Expected Benefits

The benefits of laser fractional resurfacing are significant. Improved skin texture is one of the primary advantages. Many people notice smoother skin after just one treatment.

Reduced appearance of scars is another benefit. This includes acne scars, surgical scars, and other types of blemishes. The treatment promotes collagen production, which aids in healing.

Long-lasting results make this treatment appealing. With proper care, the effects can last for years. Regular maintenance sessions can prolong these benefits even further.

Professional Expertise

Choosing a qualified professional is essential. An experienced dermatologist or cosmetic surgeon can minimize risks. They have the expertise to handle complications if they arise.

Check credentials before scheduling your appointment. Look for board certification and positive reviews from previous patients. A skilled provider will conduct a thorough consultation beforehand.

Discuss your medical history during this consultation. Certain conditions may affect your eligibility for the treatment. Your provider will tailor the procedure to suit your needs.

Steps Before the Procedure

Skin Assessment

A thorough skin assessment is essential. The practitioner examines your skin type and condition. They look for any issues that might affect the treatment. This helps customize the treatment plan.

Disclose Medications

Inform the practitioner about all current medications. Some drugs can cause adverse reactions during the procedure. Blood thinners and acne medications are examples. Disclosing these details ensures safety.

Mention Skin Conditions

Report any existing skin conditions. Conditions like eczema or rosacea can complicate the procedure. The practitioner needs this information to adjust the treatment accordingly.

Pre-Treatment Instructions

Follow specific pre-treatment instructions. Stop using certain skincare products a few days before the procedure. These may include:

  • Retinoids
  • Exfoliants
  • Acid-based products

Avoid sun exposure as well. Sunburned skin is more sensitive and prone to complications.

Avoid Certain Medications

Stop taking certain medications before the procedure. Non-steroidal anti-inflammatory drugs (NSAIDs) should be avoided. These can increase bleeding risk during the treatment.

During the Treatment

Anesthesia Use

Patients receive local anesthesia or numbing cream before the procedure. This minimizes discomfort. The numbing cream is applied to the treatment area and left for about 30 minutes. This ensures that the skin becomes less sensitive.

Laser Process

The laser passes over the skin during the treatment. It removes damaged skin layers. The laser targets the epidermis and dermis layers. This stimulates collagen production. Collagen improves skin texture and elasticity.

Treatment Duration

The duration varies based on the area treated. Smaller areas take less time, around 30 minutes. Larger areas can take up to two hours. The type of laser also affects the duration.

Side Effects

Common side effects include redness and swelling. Some patients may experience cold sores if prone to them. It’s important to avoid sun exposure after the treatment.

Recovery Time

Recovery time varies from person to person. Most patients experience some downtime. Typically, this lasts about a week. The skin may appear red and feel tight.

Results and Maintenance

Results can be seen within a few weeks. Full benefits are visible after several months. Maintenance treatments may be needed for lasting results.

Post-Procedure Care

Importance

Proper care after laser fractional resurfacing is crucial. It ensures healing and optimal results. Following instructions from your healthcare provider helps prevent complications.

Skincare Products

Use gentle skincare products. Avoid harsh chemicals and exfoliants. Opt for mild cleansers and moisturizers. These products protect the new skin layers.

Sun Protection

Sun protection is essential. New skin is sensitive to UV rays. Apply broad-spectrum sunscreen daily. Wear hats and protective clothing when outside.

Signs of Complications

Watch for signs of complications. Redness, swelling, and discomfort are normal initially. However, severe pain or excessive swelling may indicate an issue. Contact your healthcare provider if these symptoms occur.

Scarring Awareness

Be aware of related scarring risks. Proper care reduces the risk of scars forming. Follow all post-care guidelines strictly.

Hydration

Keep the skin hydrated. Drink plenty of water daily. Use a humidifier in dry environments. Moisturized skin heals faster.

Avoid Picking

Do not pick at peeling skin or scabs. This can cause infections or scarring. Allow the skin to heal naturally.

Follow-Up Appointments

Attend all follow-up appointments. Your provider will monitor your progress. They can address any concerns you have.

Expected Results

Gradual Improvement

Patients will notice gradual improvement in their skin texture and appearance. The healing process starts as soon as the procedure ends. Over the next few days, the skin begins to peel and flake. This reveals new, healthier skin underneath.

Collagen production increases during this time. This helps to smooth out fine lines and wrinkles. Full results can take several weeks to become visible.

Multiple Sessions

For deeper scars or wrinkles, one session might not be enough. Patients often need multiple sessions to achieve their desired results. Each session builds on the previous one, further improving the skin’s surface.

The number of sessions depends on the depth of the resurfacing. Some patients may see significant improvement after just one treatment. Others may require three or more sessions.

Recovery Time

Recovery time varies based on the depth of the resurfacing. Light treatments may heal within a few days. More intensive treatments can take several weeks.

During recovery, it’s common to experience redness and swelling. These side effects usually subside within a week or two. Following post-procedure care instructions is crucial for optimal healing.

Side Effects

Common side effects include redness, swelling, and peeling. These are temporary and part of the natural healing process. In rare cases, patients might experience infection or changes in skin tone.

Proper care minimizes these risks. Using recommended products and avoiding sun exposure helps protect the new skin.

Patient Satisfaction

Most patients report high satisfaction with their results. They see a noticeable improvement in their skin’s appearance and texture. Fine lines, wrinkles, and scars become less visible.

Costs and Considerations

Price Range

Laser fractional resurfacing treatments can vary in cost. The price depends on several factors.

  1. Type of laser: Different lasers have different costs. Ablative lasers are usually more expensive than non-ablative ones.
  2. Treatment area size: Larger areas require more time and resources, increasing the cost.
  3. Geographic location: Prices differ from city to city. Urban areas often have higher costs.

On average, the price ranges from $500 to $5,000 per session.

Insurance Coverage

Insurance usually does not cover laser resurfacing treatments. These procedures are often considered cosmetic.

Patients should check with their insurance providers. Some may offer partial coverage for medical reasons like scars or skin conditions.

Cost vs Benefits

Weighing the costs against the benefits is essential. Laser resurfacing can provide long-term savings.

  • Reduced need for other treatments: Fewer facials, peels, and creams might be needed.
  • Long-lasting results: The effects can last for years, reducing ongoing expenses.

Closing Thoughts

Laser fractional resurfacing offers a powerful way to rejuvenate your skin and boost your confidence. By understanding the preparation, risks, and aftercare, you’re better equipped to make an informed decision. The benefits can be transformative, enhancing not just your appearance but also your self-esteem.

Ready to take the next step? Consult with a certified professional to discuss your goals and get personalized advice. Your journey to radiant skin starts now. Don’t wait—embrace the change and invest in yourself today.

Frequently Asked Questions

What is laser fractional resurfacing?

Laser fractional resurfacing is a cosmetic procedure that uses lasers to treat skin imperfections. It targets specific skin areas, promoting collagen production and improving texture.

How should I prepare for my laser resurfacing treatment?

Avoid sun exposure and discontinue any retinoid or glycolic acid products at least one week before the treatment. Consult your dermatologist for personalized instructions.

What are the risks of laser fractional resurfacing?

Common risks include redness, swelling, and mild discomfort. Rare complications can include infection or scarring. Always consult a qualified professional to minimize risks.

What happens during the laser resurfacing procedure?

The dermatologist will cleanse your skin and apply a numbing cream. The laser device is then used to target specific skin areas, promoting healing and rejuvenation.

How long is the recovery period after laser resurfacing?

Recovery time varies but generally ranges from a few days to a week. Follow post-procedure care guidelines to ensure optimal healing and results.

What results can I expect from laser fractional resurfacing?

Expect smoother, more even-toned skin with reduced appearance of wrinkles, scars, and pigmentation issues. Full results typically appear within a few weeks.

How much does laser fractional resurfacing cost?

Costs vary based on location, provider expertise, and treatment area size. On average, prices range from $500 to $3,000 per session. Always consult with your provider for an accurate estimate.

Love Handle Liposuction Scars: Skin Issues & Post-Op Care Tips

Ever wondered about the aftermath of love handle liposuction scars from a fat removal procedure involving minimal scarring and lipolysis in fat areas? This quick read dives into what you can expect post-surgery, including stunning liposuction results. We’ll cover how these scars look after liposuction surgery, how they heal, and tips for minimizing their appearance in men. Liposuction is a popular choice for those stubborn areas like love handles, but understanding the scar process is crucial for men.

Knowing what happens after the love handles liposuction procedure helps set realistic expectations. It also empowers you with knowledge to care for your body better, including love handles liposuction. Whether you’re considering this surgery or just curious, this guide will provide clear insights on love handles liposuction. Stick around to learn more about love handle liposuction scars and how to manage them effectively.

Understanding Liposuction Techniques

Minimally Invasive

Love handle liposuction is minimally invasive. Surgeons use small tools to remove fat. This reduces trauma to the body.

Small incisions mean less scarring. These incisions are about 3-4 millimeters wide. They heal quickly and leave tiny scars.

Tiny Incisions

Surgeons make tiny incisions in natural body folds. This hides the scars well. Common places are the belly button or hip crease.

These spots reduce visible scars. The skin’s natural folds help conceal them. Patients feel more confident with fewer visible marks.

Traditional vs Modern Methods

Traditional liposuction had larger incisions. It used bigger tools to remove fat. This caused more bruising and longer recovery times.

Modern liposuction techniques are different. They use smaller, more precise instruments. This means less damage to surrounding tissues.

Lipo techniques today often use tumescent fluid. This numbs the area and shrinks blood vessels. As a result, there’s less bleeding and swelling.

Another advancement is laser-assisted liposuction. The laser helps melt fat before removal. This makes it easier to extract love handles liposuction and can tighten the skin.

Preparing for the Procedure

Consultation

Patients must first schedule a consultation. The surgeon will conduct a thorough assessment of the love handles. This helps determine if they are good candidates for liposuction.

During the consultation, discuss medical history and any medications. The surgeon will explain the procedure and answer questions.

Healthy Lifestyle

Maintaining a healthy lifestyle is crucial before surgery. Eat a balanced diet and exercise regularly. This keeps the body strong and ready for recovery.

Avoid smoking at least two weeks before surgery. Smoking can affect blood vessels and healing. It’s also important to stay hydrated.

Pre-Surgery Instructions

Follow specific instructions given by the surgeon. These may include dietary restrictions and medication adjustments.

  • Avoid certain foods that may cause inflammation.
  • Stop taking blood thinners as advised.
  • Ensure you have someone to drive you home after the love handles liposuction procedure.

Pack comfortable clothing for the day of surgery. Loose-fitting clothes are best to avoid pressure on the treatment site after love handles liposuction.

Surgery Day Preparation

Arrive early on the surgery date. This allows time for any last-minute preparations or questions.

The surgeon will mark the treatment site with a pen. This ensures precision during the procedure. Local anesthetic is commonly used to numb the area.

A small cannula is inserted through tiny incisions to remove fat. The technique minimizes damage to surrounding tissues, reducing scarring.

Realistic Expectations

Understand that results vary. Some patients may see immediate changes, while others take longer to notice improvements.

Scarring is minimal but possible. Small incisions mean smaller scars. Follow post-surgery care instructions to aid healing and reduce scar visibility.

The Liposuction Process

Surgical Technique

Love handle liposuction involves removing fat from the sides of the waist. Surgeons use different techniques based on the patient’s needs. Traditional liposuction uses a cannula, a thin tube, to break up and suction out fat.

The surgeon makes small incisions in the skin. These liposuction incisions are typically less than half an inch long. They insert the cannula through these cuts to reach the fat deposits.

Tools Used

Surgeons use various tools for different liposuction procedures. Laser liposuction uses laser energy to liquefy fat before removal. This method can be less invasive and cause less bruising.

Ultrasonic liposuction uses sound waves to break down fat cells. It is useful for dense fat deposits that are harder to remove with traditional methods.

Immediate Reduction

Patients notice an immediate reduction in love handle size after surgery. The swelling might hide some results at first. Most swelling goes down within a few weeks.

Final results become visible after three to six months. During this time, the body continues to heal, and the skin tightens around the new contours.

Permanence of Fat Removal

Liposuction permanently removes fat cells from the treated area. However, it does not prevent weight gain in other parts of the body. Maintaining a healthy lifestyle is crucial for lasting results.

Patients should follow a balanced diet and exercise regularly. This helps keep their new shape and prevents new fat deposits from forming elsewhere.

Recovery and Healing

Initial Phase

The first few days after love handle liposuction are crucial. Patients usually experience swelling and bruising. Rest is essential during this time. Most patients need to take at least a week off work.

Swelling Management

Swelling is common and can last for several weeks. Wearing a compression garment helps reduce it. Elevating the hips while resting also aids in decreasing swelling.

Resuming Activities

Light activities can usually be resumed after one week. However, strenuous exercises should be avoided for at least four to six weeks. Following the surgeon’s advice ensures a smooth recovery.

Post-Operative Care

Proper care is vital for healing. Keeping the treated area clean prevents infections. Drains might be used to remove excess fluids, which should be monitored closely.

Importance of Follow-Up

Regular follow-up appointments are necessary. They allow the surgeon to monitor patient healing and address any concerns promptly. These visits are crucial for achieving a healthy look.

Nutrition and Hydration

A balanced diet supports recovery. Staying hydrated helps flush out toxins from the body. Proper nutrition accelerates the healing process.

Emotional Well-being

Recovering from surgery can be emotionally challenging. Support from family and friends boosts confidence and morale. Patients should focus on their transformation journey.

Long-Term Care

Long-term care includes maintaining a healthy physique through diet and exercise. Regular consultations with the surgeon ensure ongoing improvement and safety.

Scars and Skin Concerns

Scarring

Scarring is a common concern after love handle liposuction. The visibility of scars depends on several factors. These include the patient’s skin type, age, and healing process. Nubody Concepts Cosmetic Surgery states that scars from this procedure are usually small.

The incisions made during liposuction are tiny. They are often less than half an inch long. Surgeons place them in discreet areas to minimize visible scarring. Patients can expect some redness and swelling initially. However, these symptoms typically fade over time.

Skin Tightening

Skin tightening is another important aspect of post-liposuction care. After removing fat from the flanks, the skin needs to contract to fit the new contours. Younger patients generally experience better skin tightening due to higher elasticity.

Older patients or those with significant weight loss might have looser skin. In such cases, additional procedures might be recommended. These can include laser treatments or other cosmetic surgeries to achieve the desired look.

Strategic Incisions

Surgeons use strategic incision placement to reduce noticeable scars. They often make incisions in natural creases or hidden areas. For example, incisions might be placed near the hip bone or in the lower back.

This approach helps conceal scars when wearing clothes or swimwear. Patients should discuss incision placement with their surgeon during consultation. Understanding where scars will be can help set realistic expectations.

Minimal Scars

Most love handle liposuction scars are minimal and concealable. The small size of the incisions contributes to this. Modern surgical techniques focus on minimizing tissue damage.

Patients can also use scar treatment products to enhance healing. Silicone sheets or gels are popular options. These products can reduce scar appearance over time.

Common Questions

Patients often have questions about scarring and recovery. It’s crucial to address these concerns before surgery. Some common questions include:

  • How long will it take for scars to fade?
  • Are there ways to speed up healing?
  • What can be done if scars become more noticeable?

Surgeons provide detailed aftercare instructions to help manage these concerns. Following these guidelines is essential for optimal healing.

Minimizing Scarring Post-Procedure

Scar Care

Taking care of scars is crucial after love handle liposuction. Cosmetic surgeons often recommend silicone sheets or gels. These products help in minimizing scarring. Apply them as directed by your surgeon. They create a protective barrier over the incision, promoting healing.

Sun Protection

Sun protection is essential for scar management. UV rays can darken scars, making them more noticeable. Use sunscreen with high SPF on the treated area. Wear clothing that covers the scars when outdoors. This helps in preventing permanent discoloration.

Patience and Time

Scars need time to mature and fade. The process can take several months to a year. Be patient during this period. Follow your surgeon’s advice on post-operative care. Regular check-ups ensure proper healing and significant reduction in scar visibility.

Incision Techniques

Surgeons use advanced techniques to minimize scarring. Small incisions are strategically placed in less visible areas. This approach aims for a better cosmetic outcome. Discuss these options with your doctor before the procedure.

Healthy Lifestyle

A healthy lifestyle supports better healing. Eat a balanced diet rich in vitamins and minerals. Stay hydrated and avoid smoking, which can impair wound healing. Exercise moderately to improve blood circulation, aiding recovery.

Addressing Excess Skin

Non-Surgical Options

Non-surgical treatments can help manage excess skin after liposuction. These methods include radiofrequency, ultrasound therapy, and laser treatments. They work by stimulating collagen production, which helps tighten the skin.

Radiofrequency uses heat to penetrate deep into the skin. This process encourages collagen growth. Ultrasound therapy also uses heat but targets specific layers of skin. Laser treatments use light energy to improve skin texture and elasticity.

Surgical Procedures

etimes, non-surgical options are not enough. In such cases, additional surgical procedures might be necessary. A tummy tuck is one common option. This surgery removes excess skin and tightens the abdominal muscles.

Another option is a body lift. This procedure focuses on removing unwanted fat and loose skin from multiple areas of the body. Both surgeries require a longer recovery time than non-surgical treatments.

Consulting a Surgeon

Consult with a surgeon to determine the best approach for managing excess skin. Each person’s body responds differently to liposuction. A qualified surgeon can assess your unique situation and recommend the most effective treatment.

Surgeons consider several factors before making a recommendation. These include the amount of subcutaneous fat removed, your age, and your skin’s natural elasticity. Discussing these factors with a professional ensures you make an informed decision.

Skin Retraction Over Time

Skin retraction refers to the skin’s ability to shrink back after fat removal. This process can take several months to complete. Factors like age, genetics, and lifestyle play a role in how well your skin retracts.

Younger individuals usually have better skin elasticity. This means their skin can bounce back more effectively after liposuction. Older individuals might experience less skin retraction due to decreased collagen production.

Influencing Factors

Several factors influence how well your skin adjusts post-liposuction:

  • Age: Younger people generally have more elastic skin.
  • Genetics: Some people naturally have better skin elasticity.
  • Lifestyle: Healthy habits like regular exercise and a balanced diet can improve skin quality.
  • Weight Stability: Maintaining a stable weight helps prevent additional stretching of the skin.

Side Effects and Solutions

Common Side Effects

Love handle liposuction often leads to swelling, bruising, and discomfort. Swelling usually peaks 2-3 days post-surgery. Bruising may last for up to two weeks. Discomfort is common but manageable.

Managing Swelling

Medications like ibuprofen can help reduce swelling. Compression garments are essential. They minimize fluid buildup and support healing. Elevating the affected area also helps.

Addressing Bruising

Bruising can be managed with arnica supplements. Cold compresses applied in the first 48 hours can reduce bruising. Keeping the area elevated aids in reducing discoloration.

Reducing Discomfort

Pain medications prescribed by your doctor should be taken as directed. Over-the-counter pain relievers like acetaminophen can also help. Avoid strenuous activities to prevent exacerbating discomfort.

Importance of Communication

Always communicate any unusual symptoms to your surgical team. This includes excessive swelling or prolonged pain. Regular follow-ups ensure proper recovery and address concerns promptly.

Final Remarks

You’ve got the lowdown on love handle liposuction and how to tackle scars. From understanding techniques to minimizing scarring, you’re now armed with the essentials. Liposuction can be a game-changer if you follow the right steps and care tips.

Ready to take the next step? Consult a qualified surgeon to discuss your options. Your journey to a smoother, more confident you starts now. Don’t wait—start planning today!

Frequently Asked Questions

What is love handle liposuction?

Love handle liposuction is a cosmetic procedure that removes excess fat from the sides of the waist. It aims to create a slimmer, more contoured appearance.

How visible are the scars from love handle liposuction?

Scars from love handle liposuction are typically small and fade over time. They are often hidden in natural body creases.

How can I minimize scarring after love handle liposuction?

To minimize scarring, follow your surgeon’s post-op care instructions. Use recommended scar creams and avoid sun exposure on the treated area.

Will I have excess skin after love handle liposuction?

Excess skin can occur if there is significant fat removal. Consult with your surgeon about skin tightening options if needed.

What are common side effects of love handle liposuction?

Common side effects include swelling, bruising, and temporary numbness. These usually resolve within a few weeks.

How long does it take to recover from love handle liposuction?

Recovery typically takes about 1-2 weeks for most daily activities. Full recovery may take several months, depending on individual healing rates.

Is love handle liposuction safe?

Yes, when performed by a qualified surgeon, love handle liposuction is generally safe. Always choose a board-certified professional for the best results.

Mommy Makeover Recovery Day by Day: A Quick Guide

Did you know that over 90% of women report feeling more confident after a mommy makeover, which often includes breast lift, tummy tuck, and breast augmentation? If you’re considering this transformative procedure, understanding the recovery process for mommy makeover procedures is crucial. This blog post breaks down mommy makeover recovery day by day, helping the patient know what to expect after the procedure, including breast care at each point. We’ll cover essential tips and insights to make your mommy makeover recovery process smoother.

Whether it’s managing pain or getting back to daily activities, we’ve got you covered with expert advice on mommy makeover recovery tips and mommy makeover recovery time. Follow along to ensure a successful and stress-free recovery, mom, and we urge you to take care of your breast health. By the end, you’ll feel prepared and empowered for each stage of your breast mommy makeover recovery, and we urge you to follow all guidelines.

Understanding Recovery

Setting Expectations

Setting realistic expectations is crucial. Recovery times vary for each person. Most people see significant improvement within the first two weeks, urging them to continue, especially moms who are breastfeeding. However, full recovery might take several months.

Milestones are different for everyone. Some may feel better in days, while others need more time, urge their mom. It’s essential to have patience and not rush the process, despite the urge, mom.

Post-Operative Instructions

Following post-operative instructions is vital. Doctors urge specific guidelines to ensure a smooth recovery process, mom. These instructions often include:

  • Taking prescribed medications
  • Keeping the surgical area clean
  • Avoiding strenuous activities

These steps help prevent complications and promote healing. Neglecting these instructions can lead to setbacks.

Individual Variability

Recovery experiences differ based on individual health. Factors like age, fitness level, and overall health play a role. The specifics of the mommy makeover also impact recovery.

e people may experience more discomfort than others. It’s important to listen to your body, urge, and communicate with your doctor and mom.

Early Days

The first few days are often the hardest. Pain and swelling are common. Rest is crucial during this period. Using a recovery space that is comfortable can make a big difference, mom, I urge you to consider it.

Ice packs can help reduce swelling. Ensuring you have support from family or friends is also beneficial; urge them to be involved.

First Week

By the end of the first week, many start feeling the urge to feel better. Swelling begins to decrease. Light activities might be possible, but we urge you not to overdo it.

Follow-up appointments with your doctor are important during this time. They will check your progress and address any concerns.

Second Week

The second week often brings more improvement. Many people return to normal activities gradually. However, heavy lifting and intense exercise should still be avoided.

It’s normal to feel some tightness or discomfort during this phase. Continue following your doctor’s advice for the best results.

Long-Term Recovery

Full recovery can take several months. Scars will fade over time, but they won’t disappear completely. Maintaining a healthy lifestyle helps in long-term recovery.

Regular check-ups with your doctor ensure everything is healing as expected. Patience and self-care are key during this period.

Preparing for Recovery

Full-time Help

Arrange full-time help during the initial recovery phase. Childcare and housework can be overwhelming. A mommy makeover involves multiple procedures, which means a longer recovery time. Having someone to assist with daily tasks ensures you can focus on healing.

Consider hiring a professional caregiver or asking family members for support. This will allow you to rest and rejuvenate without stress. The first few days are crucial for a healthy recovery.

Comfortable Recovery Area

Prepare a comfortable recovery area at home. Gather necessary supplies within easy reach. This includes:

  • Extra pillows for support
  • Ice packs for swelling
  • Medications as prescribed
  • Healthy snacks and water

Set up this space in a quiet part of your home. Ensure it is free from disturbances. A well-prepared area helps in speeding up the healing process.

Follow-up Appointments

Schedule follow-up appointments with your plastic surgeon before the surgery date. These appointments ensure continuity of care. Discuss any concerns about the recovery process during these visits.

Your surgeon will monitor your progress and provide vital recovery tips. Regular check-ups are essential for a successful recovery. They help detect any complications early.

Plan Ahead

Planning ahead is key to a smooth mommy makeover recovery. Stock up on groceries and household essentials before surgery. Arrange for someone to drive you to and from medical appointments.

Notify your employer about your recovery period if you work outside the home. Take enough time off to ensure complete healing.

Rest and Rejuvenation

Rest is critical during the initial recovery stages. Avoid strenuous activities and heavy lifting. Overexertion can delay the healing process.

Spend time doing light activities like reading or watching TV. Listen to your body’s signals and take naps when needed.

First Week Post-Op

Trusted Adult

A trusted adult should drive the patient home after the mommy makeover surgery. They should also assist during the first few days. This support is crucial because patients will be groggy from anesthesia.

Patients may need help with simple tasks. Having someone reliable ensures safety and comfort.

Activity Restrictions

Certain activities are strictly off-limits. Patients must avoid lifting anything over 5 pounds to prevent strain on healing incisions. This includes children, heavy grocery bags, or even pets.

Straining the body can cause complications. Resting and following the surgeon’s instructions is vital for a smooth recovery.

Physical Sensations

Discomfort and swelling are common in the first week. Patients might feel tightness around the surgical areas. Pain medication prescribed by the surgeon can help manage these sensations.

Swelling peaks around day three or four. Applying cold compresses can reduce it. Always follow post-op instructions given by the plastic surgeon.

Managing Discomfort

Patients should take pain medications as directed. Over-the-counter options like acetaminophen can be used if approved by the surgeon. Avoiding anti-inflammatory drugs like ibuprofen is essential, as they can increase bleeding.

Wearing compression garments helps reduce swelling and supports healing tissues. These garments should be worn continuously as instructed by the surgeon.

Home Care Tips

Keeping the surgical area clean is critical to avoid infections. Follow the cleaning instructions provided by your plastic surgeon carefully. Change dressings as recommended and monitor for any signs of infection, such as redness or unusual discharge.

Stay hydrated and eat a balanced diet to aid recovery. Proper nutrition supports the body’s healing process.

Follow-Up Visits

Patients usually have their first follow-up visit within a week after surgery. Surgeons check the progress of healing and address any concerns during this visit. It’s an opportunity to ask questions about ongoing care and activity restrictions.

Regular follow-up appointments ensure that recovery stays on track and any issues are promptly addressed.

Continuing Care in Week 2

Gradual Strength

By the second week, many start to feel stronger. The body begins to heal more noticeably. Energy levels may increase, but it’s crucial to balance activity with rest. Overdoing it can set back recovery.

For self-care, light tasks become manageable. Simple activities like gentle walking are beneficial. They promote circulation and prevent stiffness. However, avoid strenuous exercises or heavy lifting.

Ongoing Restrictions

Despite feeling better, certain restrictions remain. Avoid lifting anything heavier than a gallon of milk. This includes childcare tasks that require lifting young children. It’s important to ask for help when needed.

Driving is generally still off-limits unless cleared by your doctor. Sudden movements can strain healing tissues. Continue to avoid bending over frequently or reaching high shelves.

Signs of Improvement

Look for specific signs that indicate proper recovery. Swelling should start to decrease significantly. Bruising will fade and incisions begin to look less red and more pinkish.

Comfort levels improve day by day. Pain should be minimal and manageable with over-the-counter pain relief if necessary. Any severe pain or unusual symptoms should be reported to your doctor immediately.

Emotional Well-Being

Recovery isn’t just physical; emotional well-being matters too. Some might feel frustrated by ongoing limitations. It’s normal but temporary.

Engage in activities that uplift your mood. Reading, watching favorite shows, or light hobbies can help pass the time positively. Support from family and friends is essential during this period.

Monitoring Progress

Regular check-ins with your surgeon are vital. They assess how well you’re healing and adjust care plans if needed. Follow all medical advice closely.

Keep incisions clean and dry to prevent infections. Use recommended creams or ointments as directed to aid scar healing.

Weeks 3 to 6 Recovery

Return to Work

Most patients can return to work during weeks 3 to 6. This is especially true for jobs that do not require physical exertion. Experts recommend waiting until you feel comfortable and can manage your daily tasks without pain. Driving is usually permissible during this period, but only if you are no longer taking prescription pain medications.

Avoid Heavy Lifting

It is crucial to avoid heavy lifting during weeks 3 to 6. Lifting heavy objects can strain the healing tissues. This can cause complications and delay recovery. Doctors advise against lifting anything heavier than a few pounds. Following these guidelines protects your body as it heals.

Light Activities

Engage in light activities to promote circulation and speed up healing. Walking is highly recommended. It helps improve blood flow without overexerting yourself. Light housework or gentle stretching are also good options. Always listen to your body and stop if you feel any discomfort.

Healing Progress

The mommy makeover healing period continues through weeks 3 to 6. Swelling and bruising should decrease significantly by now. You may still have some tenderness, but it should be manageable. Mommy makeover scars will start to fade, although they may still be visible.

Follow-Up Appointments

Attend all scheduled follow-up appointments with your surgeon. These visits are important for monitoring your recovery timeline. Your doctor will check the progress of your healing and address any concerns you may have. They may also provide additional advice tailored to your needs.

Emotional Well-Being

Recovery is not just physical; it’s emotional too. Feeling frustrated or impatient is normal during this time. Staying positive and focusing on the progress you’ve made can help. Surround yourself with supportive family and friends who can offer encouragement.

Beyond Week 6

Resuming Exercise

By week six, many women can start light exercises. Walking is a good start. Gradually increase the intensity. Begin with low-impact activities like yoga or swimming. Avoid high-intensity workouts initially.

Listen to your body. If you feel pain, stop and rest. Consult your doctor before starting any new exercise routine.

Normal Activities

Around this time, you can resume normal activities. Light household chores are usually safe. Avoid lifting heavy objects until cleared by your doctor.

Heavier tasks such as vacuuming or carrying groceries should wait. Ease back into these activities slowly to avoid injury.

Lifting Heavier Objects

Many women wonder when they can lift heavier objects again. Generally, it’s safe after eight weeks. Start with lighter weights and gradually increase.

Always use proper form to protect your stomach and waist areas. Avoid sudden movements that could strain your muscles.

Signs of Readiness

Certain signs indicate readiness for all normal activities:

  • No more pain or swelling
  • Incisions fully healed
  • Doctor’s approval

Feeling strong and energetic also signals readiness. Always follow post-surgery instructions from your healthcare provider.

Monitoring Progress

Keep track of your progress weekly. Note any discomfort or pain during activities. Adjust your routine based on how you feel.

Regular check-ups with your doctor are crucial. They can provide personalized advice based on your recovery process.

Tips for Faster Healing

Early Walking

Walking soon after surgery is essential. It helps promote circulation and reduces the risk of blood clots. Most doctors advise starting with short walks within a day or two post-surgery. Gradually increase the distance as you feel more comfortable.

Taking small steps can make a big difference in your recovery process. Staying active also helps reduce swelling and improves overall healing.

Balanced Diet

A balanced diet is crucial for recovery. Focus on foods rich in vitamins and minerals. Protein helps repair tissues, while vitamin C supports collagen formation.

Include leafy greens, lean meats, and fruits in your meals. Hydration is also key. Drink plenty of water to keep your body functioning well.

Monitoring Incisions

Carefully monitor your incisions daily. Look for signs of infection like redness, swelling, or unusual discharge. Follow all post-operative care instructions given by your surgeon.

Use prescribed ointments and keep the area clean and dry. Healing incisions properly ensures faster recovery and minimizes scarring.

Following Instructions

Adhere strictly to your doctor’s advice. This includes taking medications as prescribed and attending follow-up appointments. Avoid strenuous activities that could strain your body.

Rest when needed but maintain light activities to aid circulation. Proper compliance speeds up the mommy makeover healing process.

Pain Management

Pain management is a vital part of recovery. Take prescribed painkillers on schedule to stay ahead of discomfort. Ice packs can help reduce swelling and numb the area.

Avoid over-the-counter medications unless approved by your doctor. Effective pain management allows you to move more comfortably, aiding in quicker healing.

Support System

Having a support system is beneficial. Family or friends can assist with daily tasks, allowing you to rest more effectively. Emotional support also plays a role in overall well-being.

Communicate openly about your needs and progress. Recovery is smoother when you’re not handling everything alone.

Avoiding Complications

Prevent complications by avoiding smoking and alcohol during recovery. Both can impair healing and increase risks of infections or other issues.

Follow any additional guidelines provided by your healthcare team to ensure a smooth recovery journey.

Managing Side Effects

Swelling and Bruising

Swelling and bruising are common after a mommy makeover. These effects typically peak within the first few days. Applying ice packs can help reduce swelling. Keep the area elevated to minimize fluid buildup. Bruising will gradually fade over two to three weeks.

Pain and Discomfort

Pain and discomfort are expected during recovery. Medications prescribed by your doctor can alleviate pain. Follow the dosage instructions carefully. Over-the-counter pain relievers may also be recommended. Avoid strenuous activities to prevent increasing discomfort.

Emotional Ups and Downs

Recovery can bring emotional challenges. Some may feel anxious or depressed due to changes in their body or limitations on activity. It’s important to talk about these feelings with supportive friends or family members. Keeping a journal can also help process emotions.

Scar Management

Scarring is inevitable but can be managed effectively. Use silicone sheets or topical treatments as recommended by your surgeon. These products can help minimize scar visibility over time. Keep scars out of direct sunlight to prevent darkening.

Itching and Tightness

As incisions heal, itching and tightness might occur. This is part of the natural healing process. Moisturizing lotions can provide relief from itching. Gentle stretching exercises, approved by your doctor, can alleviate tightness.

Infection Prevention

Preventing infection is crucial for a smooth recovery. Keep incisions clean and dry. Follow your surgeon’s instructions for wound care diligently. Report any signs of infection, such as redness, warmth, or unusual discharge, to your healthcare provider immediately.

Appetite Changes

e people experience changes in appetite post-surgery. This can be due to medications or the body’s response to healing. Eating small, nutritious meals can help maintain energy levels without overwhelming the digestive system.

Final Remarks

Understanding your recovery journey after a mommy makeover is crucial for a smooth, successful healing process. By following these guidelines and tips, you can ensure a comfortable and effective recovery. Remember, every step you take towards self-care brings you closer to your desired results.

Stay patient and listen to your body. If you have any concerns, consult your surgeon immediately. Share your experiences and join support groups for encouragement. Take control of your recovery, and soon enough, you’ll be enjoying the benefits of your transformation. Ready to start this exciting journey? Let’s get moving!

Frequently Asked Questions

What should I expect during the first week post-op?

Expect swelling, bruising, and discomfort. Rest is crucial. Follow your surgeon’s instructions for medications and wound care.

How can I prepare for my mommy makeover recovery?

Stock up on essential supplies, arrange help for daily tasks, and set up a comfortable recovery area at home.

When will I be able to resume normal activities?

Light activities can usually resume after 2 weeks. Full recovery and return to strenuous activities typically take 6-8 weeks.

Are there any tips for faster healing?

Stay hydrated, eat nutritious foods, follow post-op care instructions, avoid smoking, and get plenty of rest.

What side effects should I expect?

Common side effects include swelling, bruising, soreness, and temporary numbness. These usually subside within a few weeks.

How long does swelling last after a mommy makeover?

Swelling peaks in the first week but gradually decreases over 6-8 weeks. Final results can be seen after several months.

Is it normal to feel emotional during recovery?

Yes, it’s normal to experience emotional ups and downs due to physical changes and recovery stress. Seek support if needed.

Ablative Laser Resurfacing Cost: What to Expect

Did you know that ablative laser resurfacing, a cosmetic procedure performed by plastic surgeons, can reduce wrinkles, acne scars, and improve skin tightening by up to 45%? This powerful treatment is a game-changer for those seeking smoother, younger-looking skin, addressing acne scars, age spots, and utilizing laser energy as a cosmetic procedure. But what about the cost? Many people hesitate because they fear it might break the bank and risk side effects.

In this post, we’ll dive into the real costs of ablative laser resurfacing for face skin conditions with a surgeon. We’ll cover what influences the price, the risk involved, and whether it’s worth the investment. By the end, you’ll have a clear picture of what to expect financially and if this laser skin resurfacing treatment fits your budget.

Exploring Treatment Variations

Types of Lasers

There are different types of laser treatments for skin resurfacing. Ablative lasers remove the top layer of skin. Non-ablative lasers heat the underlying skin without damaging the surface. Common ablative lasers include CO2 and Erbium lasers.

CO2 lasers are effective for deep wrinkles and scars. Erbium lasers work well for superficial lines and moderate wrinkles. Each type has its own benefits and drawbacks.

Cost Factors

The price of laser treatments varies based on several factors. The type of laser used is a major factor. Ablative lasers generally cost more than non-ablative ones.

Treatment area size also affects cost. Larger areas like the face or neck will be more expensive for laser skin resurfacing. The number of sessions required for laser skin resurfacing can add to the overall cost.

Patient Considerations

Patients need to consider their skin type when choosing a treatment. Darker skin tones may have higher risks with certain lasers. Consultation with a dermatologist is crucial.

Desired results play a role in selecting the right laser skin treatment. Some patients want dramatic changes, while others prefer subtle improvements. This choice impacts both cost and treatment experience.

Outcome Variations

Different lasers yield different results. Ablative treatments offer more noticeable improvements but require longer recovery times. Non-ablative options have quicker recovery but less dramatic results.

Texture and tone improvements vary by laser type. CO2 lasers excel at smoothing deep wrinkles and scars. Erbium lasers are better for fine lines and mild discoloration.

Importance of Consultation

A proper consultation is essential before undergoing any laser surgery. A dermatologist can evaluate skin type and recommend the best option. They will discuss potential risks and expected outcomes.

Consultations help patients understand what to expect. Knowing the pros and cons of each treatment aids in making informed decisions.

Ablative vs Non-Ablative Costs

Ablative Laser

Ablative laser treatments are generally more expensive. These treatments remove the outer layers of skin. This process reveals fresher, younger-looking skin underneath.

The average cost for ablative laser resurfacing ranges from $2,000 to $4,000 per session. The price can vary based on the area treated and the clinic’s location. However, fewer sessions are usually needed to achieve desired results.

Non-Ablative Laser

Non-ablative laser treatments are less invasive. They heat the underlying skin tissue without damaging the surface. This stimulates collagen production and improves skin texture over time.

The cost for non-ablative laser treatments is typically lower, ranging from $500 to $1,500 per session. Although the initial expense is less, multiple sessions may be required to see similar results as ablative treatments.

Session Frequency

Ablative laser treatments often require fewer sessions. One or two sessions might be enough for noticeable improvements. This can make them a cost-effective option in the long run despite the higher upfront costs.

Non-ablative treatments usually need more sessions. Patients might need five to six sessions spaced out over several months. This increases the overall cost and time commitment.

Recovery Time

Recovery time also differs between these two types of lasers. Ablative treatments have longer downtime. Patients may need a week or more to heal fully. This can add indirect costs like taking days off work.

Non-ablative lasers require minimal recovery time. Most patients resume normal activities within a day or two. This makes it easier to fit into busy schedules without major disruptions.

Long-Term Results

Ablative laser treatments offer longer-lasting results. The effects can last for years with proper skincare maintenance. This reduces the need for frequent touch-ups and additional expenses.

Non-ablative treatments provide gradual improvements over time. Maintenance sessions may be needed every six months to a year to sustain results. This adds to the overall cost in the long term.

Factors Affecting Costs

Several factors influence the costs of both types of laser treatments:

  • Clinic location
  • Experience of the dermatologist
  • Size of the treatment area
  • Type of laser equipment used

Insurance and Financing Options

Insurance Coverage

Most health insurance plans do not cover cosmetic procedures. Ablative laser resurfacing falls under this category. Insurance companies consider it an elective treatment. Therefore, patients need to pay out-of-pocket for these services. However, if the procedure is medically necessary, some insurance policies might cover part of the cost. Always check with your insurance provider for details.

Financing Options

Many clinics offer financing options to help manage the cost. These options can make paying for ablative laser resurfacing more manageable. Some clinics partner with financing companies to provide monthly payment plans. This allows patients to spread out the expense over time.

Medical Credit Cards

Medical credit cards are another way to finance cosmetic procedures. These cards work like regular credit cards but are specifically for medical expenses. They often offer promotional periods with low or no interest rates. CareCredit is a well-known example of such a card.

Savings Plans

Setting up a savings plan can also be a practical approach. Patients can allocate funds regularly into a dedicated account for their cosmetic procedures. This method avoids interest charges and debt accumulation.

Clinic Payment Plans

e clinics offer in-house payment plans. These plans may have lower interest rates compared to external financing options. Discussing these plans with the clinic’s financial office can provide more specific information.

Procedure Steps Overview

Preparation

Patients must prepare before undergoing ablative laser resurfacing. Doctors often recommend avoiding sun exposure for at least four weeks. They may also prescribe antiviral medications to prevent infections. Patients should stop smoking two weeks before and after the procedure to aid healing.

During the Procedure

The procedure typically begins with cleaning the skin. A local anesthetic or sedative is then applied to minimize discomfort. The dermatologist uses a laser handpiece to direct short, concentrated pulsating beams of light at irregular skin. This removes damaged outer layers of skin, layer by layer. Each laser pass targets specific skin issues like wrinkles or scars.

Post-Procedure Care

Immediate care after the procedure is crucial. The treated area is usually covered with a protective ointment and bandage. Patients might experience redness, swelling, and itching. Pain can be managed with prescribed medications. Keeping the skin moist and clean helps prevent infection.

Follow-Up Visits

Follow-up visits are essential for monitoring progress. Dermatologists check how well the skin is healing and address any complications. They may suggest additional treatments if necessary.

Home Care Instructions

Adhering to home care instructions ensures better results. Patients should avoid sun exposure and use sunscreen regularly. Moisturizers help keep the skin hydrated. Avoid picking or scratching the treated area to prevent scarring.

Downtime and Recovery

Expected Downtime

Ablative laser resurfacing usually requires significant downtime. The skin needs time to heal after the procedure. Most people experience redness and swelling for several days. It can take up to two weeks for the skin to recover fully.

Non-ablative treatments often have shorter recovery times. Redness and swelling are less severe. People can usually return to work within a few days. However, multiple sessions might be needed for the best results.

Managing Recovery

Rest is crucial during recovery. Avoid strenuous activities for at least a week. This helps reduce swelling and speeds up healing.

Proper skin care is essential. Use gentle cleansers and moisturizers. Avoid harsh products that can irritate the skin. Applying sunscreen is important to protect the healing skin from UV rays.

Healing Process

The healing process varies from person to person. Age, skin type, and overall health can affect recovery time. Young people may heal faster than older adults.

Patience is key during this period. Results may not be visible immediately. It can take several months for the full effects to become apparent.

Potential Risks and Side Effects

Common Side Effects

Redness is a frequent side effect of ablative laser resurfacing. The skin often appears red for several weeks. Swelling also occurs, especially in the treated areas. This usually subsides within a few days to a week.

Discomfort is another common issue. Patients may feel like they have a severe sunburn. Over-the-counter pain relievers can help manage this discomfort.

Infection Risks

Infections are a serious concern with any skin treatment. Ablative laser resurfacing can leave the skin vulnerable. Bacteria can enter through tiny openings created by the laser.

Signs of infection include increased redness, swelling, and pus. If any of these symptoms occur, it’s crucial to seek medical attention immediately.

Changes in Skin Pigmentation

Changes in skin pigmentation are another risk. The treated area might become darker or lighter than the surrounding skin. These changes can be temporary or permanent.

People with darker skin tones are at higher risk for pigmentation issues. It’s important to discuss this with your doctor before treatment.

Sun Sensitivity

Post-treatment, the skin becomes highly sensitive to the sun. Exposure can lead to severe burns or pigmentation changes. It’s essential to avoid direct sunlight and use broad-spectrum sunscreen.

Protective clothing and hats can also help shield the treated areas from harmful UV rays.

When to Seek Medical Attention

Seek medical help if you experience severe side effects. Persistent swelling beyond a week is concerning. Extreme redness that doesn’t fade may indicate an infection.

Unusual pain that doesn’t improve with medication needs attention too. Any signs of pus or unusual discharge should not be ignored as well.

Cleansing and Protection Tips

Gentle Cleansing

After ablative laser resurfacing, cleanse the skin gently. Use a mild, non-abrasive cleanser. Avoid scrubbing or using harsh products. Pat the skin dry with a soft towel.

Skin concerns like redness and swelling are common. Keeping the skin clean helps prevent infection. Cleanse twice daily to remove impurities.

Sun Protection

Protecting the skin from sun exposure is crucial. The outer layer of the skin is more vulnerable after treatment. Sun damage can cause pigmentation issues and slow healing.

Use a broad-spectrum sunscreen with at least SPF 30. Apply it every morning, even on cloudy days. Wear protective clothing, such as hats and long sleeves.

Moisturizing Routine

Hydrate the skin regularly to aid recovery. Choose a gentle moisturizer free from fragrances and dyes. Moisturizing helps maintain the skin’s barrier function and prevents dryness.

Look for products containing hyaluronic acid or ceramides. These ingredients support collagen production and enhance healing.

Avoiding Irritants

Steer clear of products that may irritate the skin. This includes alcohol-based toners, exfoliants, and retinoids. Such products can cause further irritation and delay healing.

Stick to simple skincare routines until the skin fully recovers. Consult your dermatologist before introducing new products.

Monitoring Healing

Monitor your skin’s progress closely. Watch for signs of infection, like increased redness or pus. Contact your doctor if you notice any unusual changes.

Regular follow-up appointments help track recovery. Your doctor can provide personalized advice based on your individual needs.

Dietary Considerations

A healthy diet supports skin healing from within. Eat foods rich in vitamins A, C, and E. These nutrients promote cell repair and reduce inflammation.

Stay hydrated by drinking plenty of water daily. Proper hydration aids in maintaining skin tone and elasticity.

Emotional Support

Recovery can be emotionally challenging. Seek support from friends or family members. Share your experience to ease stress and anxiety.

Join online forums or support groups for individuals undergoing similar treatments. Connecting with others can provide comfort and valuable insights.

Anticipating Treatment Results

Realistic Expectations

Ablative laser resurfacing can significantly improve skin appearance. However, individual results vary. Some people may see dramatic changes, while others might notice subtle improvements. The treatment can reduce wrinkles, scars, and pigmentation issues. But it won’t make the skin perfect.

It’s important to understand that not everyone gets the same outcome. Age, skin type, and the severity of skin issues play a role. Consulting with a dermatologist helps set realistic expectations.

Visible Improvements Timeline

Visible improvements take time after ablative laser resurfacing. Initially, the skin will be red and swollen. This is part of the healing process. Most people start seeing changes within a few weeks.

New collagen production begins around two to three months post-treatment. This collagen helps smooth out wrinkles and improve texture. Maximum results are typically visible six months after the procedure.

Multiple Sessions Needed

Multiple sessions might be necessary for optimal results. One session can provide noticeable improvement, but deeper or more severe skin issues often require additional treatments.

Doctors usually recommend spacing these sessions several months apart. This allows the skin to heal completely between treatments. Following this schedule maximizes the benefits of each session.

Factors Affecting Results

Several factors affect the final result of ablative laser resurfacing:

  • Skin Type: Different skin types respond differently to the treatment.
  • Age: Younger skin tends to heal faster and show quicker results.
  • Severity of Skin Issues: More severe issues may require more sessions.
  • Post-Treatment Care: Proper care is crucial for good results.

Following your doctor’s advice on post-treatment care ensures better outcomes.

Emotional Impact

Undergoing ablative laser resurfacing can be an emotional journey. Seeing gradual improvements can boost self-esteem and confidence. However, patience is key as changes occur over time.

e people may feel anxious about the healing process. It’s normal to have concerns about redness, swelling, and peeling. Knowing these are temporary can help manage expectations.

Choosing the Right Dermatologist

Experience Matters

Selecting a dermatologist with experience in laser treatments is crucial. Experienced professionals know how to handle various skin conditions. They can also tailor treatments to individual needs.

Before committing, ensure the dermatologist has performed many laser skin resurfacing procedures. This ensures they are familiar with different skin types and possible complications.

Key Questions

During your consultation, ask specific questions to assess their expertise:

  • How many years have you been performing ablative laser resurfacing?
  • What types of lasers do you use for different skin conditions?
  • Can you explain the potential risks and side effects?

These questions help determine if the dermatologist is knowledgeable and transparent about the procedure.

Review Before-and-After Photos

Ask to see before-and-after photos of previous patients. This provides a realistic idea of potential results. Look for patients with similar skin texture or issues like acne scars and hyperpigmentation.

Examine these photos closely. Consistent improvement in skin appearance indicates the dermatologist’s skill. Be wary if there are no photos or if results seem inconsistent.

Credentials and Certifications

Verify the dermatologist’s credentials. Ensure they are board-certified in dermatology or cosmetic surgery. Board certification means they have met rigorous standards and continue their education.

Check if they belong to professional organizations. Memberships in groups like the American Academy of Dermatology show commitment to staying updated on advancements in laser treatments.

Patient Reviews

Read patient reviews online. Look for feedback on their experience with the doctor, staff, and overall satisfaction with the procedure. Positive reviews often mention clear communication, comfort during treatment, and satisfactory results.

Negative reviews might highlight issues like poor bedside manner or unsatisfactory outcomes. Pay attention to common themes in reviews to get an accurate picture of what to expect.

Facility Standards

Ensure the facility where the procedure will be performed is clean and well-equipped. The clinic should follow strict hygiene protocols. This reduces the risk of infections and other complications.

Ask about the type of anesthesia used during the procedure. Some dermatologists use local anesthesia while others may prefer sedation. Understanding this helps prepare mentally and physically for the treatment day.

Closing Thoughts

Ablative laser resurfacing can dramatically improve your skin’s appearance, but understanding the costs and preparation is crucial. From comparing treatment types to knowing what to expect during recovery, you now have a comprehensive guide to make an informed decision.

Ready to take the next step? Consult with a qualified dermatologist to explore your options. Your journey to rejuvenated skin starts with expert advice and proper care. Don’t wait—embrace the potential for transformation today!

Frequently Asked Questions

What is the typical cost of ablative laser resurfacing?

The cost ranges from $1,500 to $3,000 per session. Prices vary based on location and provider expertise.

How does the cost of ablative laser resurfacing compare to non-ablative treatments?

Ablative treatments are generally more expensive, costing around $1,500 to $3,000 per session, while non-ablative treatments range from $500 to $1,500.

Will insurance cover ablative laser resurfacing?

Most insurance plans do not cover cosmetic procedures like ablative laser resurfacing. Check with your provider for specific details.

What financing options are available for these treatments?

Many clinics offer payment plans or work with third-party financing companies. CareCredit is a popular option.

How long is the recovery period after ablative laser resurfacing?

Recovery typically takes 1 to 2 weeks. Downtime varies based on treatment depth and individual healing rates.

What are the potential risks and side effects of ablative laser resurfacing?

Common risks include redness, swelling, and infection. Less common are scarring and changes in skin pigmentation.

How can I protect my skin after the procedure?

Use gentle cleansers and apply sunscreen daily. Follow your dermatologist’s post-care instructions closely for optimal results.

Skin Resurfacing Stretch Marks: Top Effective Treatments

Did you know that over 80% of people experience stretch marks, wrinkles, milia, and consider cosmetic surgery or scar removal at some point? Skin resurfacing with laser treatments is a game-changer in reducing these stubborn marks. This laser treatment technique can rejuvenate your skin, making it smoother and more even-toned. Forget about expensive creams that don’t work.

Skin resurfacing for stretch marks offers real results by targeting the deeper layers of your skin. Whether you’re dealing with post-pregnancy marks or growth spurts, this skin resurfacing treatment can help. It’s time to discover how this treatment, including laser stretch mark reduction and laser stretch mark removal, can transform your skin and boost your confidence.

Understanding Stretch Marks

Definition

Stretch marks are lines or streaks on the skin. They develop when the skin stretches rapidly. This can happen due to growth spurts, pregnancy, or weight gain, often leading to laser stretch mark reduction or laser stretch mark removal. The skin’s middle layer, called the dermis, tears under sudden stretching.

Causes

Skin elasticity is crucial for preventing stretch marks. Rapid growth or weight changes can exceed the skin’s elastic limit, making laser stretch mark removal necessary. This causes visible stretch marks. Hormonal changes during puberty or pregnancy also contribute.

Common Areas

Stretch marks often appear on the abdomen, thighs, and breasts. These areas experience significant stretching. For example, pregnant women frequently get stretch marks on their bellies. Adolescents might see them on their thighs during growth spurts, prompting thoughts of stretch mark removal.

Emotional Impact

Stretch marks can affect self-esteem. Many people feel embarrassed by these skin scars. They may avoid wearing certain clothes, like swimsuits, to hide their marks. This can lead to emotional distress and a negative body image, prompting some to consider stretch mark removal.

Cosmetic Concerns

Cosmetic concerns drive many to seek stretch mark reduction methods. Creams and lotions claim to reduce their appearance of stretch mark removal but offer limited results. Laser treatments and microdermabrasion are more effective but costly.

Treatment Options

There are several potential stretch mark treatments:

  • Topical creams with retinoids
  • Laser therapy targeting the dermis
  • Microdermabrasion to remove outer skin layers
  • Chemical peels for deeper exfoliation

Each method has pros and cons. Consulting a dermatologist is advisable before choosing a treatment.

Prevention Tips

Preventing stretch marks involves maintaining healthy skin elasticity. Staying hydrated and using moisturizers helps. Gradual weight changes also reduce the risk of developing new stretch marks.

Overview of Skin Resurfacing Techniques

Laser Therapy

Laser skin resurfacing uses light beams to remove layers of stretch mark skin. This treatment can improve skin texture and elasticity. Stretch marks become less visible after several sessions. There are two main types: ablative and non-ablative lasers for stretch mark treatment.

Ablative lasers remove the top layer. Non-ablative lasers target deeper layers without removing the surface, addressing stretch mark concerns. Both types stimulate collagen production, which helps in reducing stretch marks.

Dermabrasion

Dermabrasion involves exfoliating the skin’s top layer, including stretch marks, using a rotating instrument. It removes damaged skin cells, promoting new skin growth. This method is effective for less severe stretch marks.

The procedure may cause redness and swelling. Recovery time varies, but it usually takes about 1-2 weeks for a stretch mark. Dermabrasion suits individuals with lighter skin tones as it may cause pigmentation changes in darker skin and stretch mark.

Microneedling

Microneedling uses tiny needles to create micro-injuries on the skin’s surface, helping with stretch mark treatment. This triggers the body’s healing process, boosting collagen and elastin production, reducing stretch marks. The technique is suitable for all skin types and tones, including those with stretch marks.

Multiple sessions are required for noticeable results. Each session lasts about 30 minutes to an hour. Microneedling has minimal downtime, making it a popular choice for those with busy schedules and stretch mark concerns.

Choosing the Right Procedure

Selecting the appropriate skin resurfacing treatment for stretch mark depends on several factors

  • Skin type: Some treatments work better on certain skin tones and stretch mark.
  • Stretch mark severity: Deeper or older stretch marks may need more intensive treatments.
  • Recovery time: Consider how much downtime you can manage.

Consulting a dermatologist is essential before deciding on a treatment for a stretch mark. They can assess your skin and recommend the best option for stretch mark treatment.

Effectiveness Comparison

Laser therapy often provides quicker results for stretch mark but may require more recovery time. Dermabrasion is effective for minor stretch marks but may not suit darker skin tones. Microneedling offers a balance between effectiveness and minimal downtime.

Each method has its pros and cons:

  • Laser Therapy: Quick results, higher cost, longer recovery
  • Dermabrasion: Good for minor marks, risk of pigmentation changes
  • Microneedling: Suitable for all skins, minimal downtime

Exploring Laser Therapy

Targeting Stretch Marks

Laser therapy targets stretch marks by removing layers of skin. This process stimulates collagen production. Collagen is a protein that helps keep the skin firm, smooth, and reduces stretch marks. The laser light penetrates the skin, causing controlled damage. This triggers the body’s natural healing process.

Types of Lasers

Different types of lasers are used for stretch mark treatment. Fractional lasers are popular. They treat small areas of skin at a time. This makes them less invasive and reduces recovery time. Ablative lasers remove the outer layer of skin completely. Non-ablative lasers heat up the underlying skin tissue without damaging the surface.

Fractional Lasers

Fractional lasers create tiny wounds in the skin. These wounds promote new collagen growth. They improve the texture and appearance of stretch marks. Patients often see results after a few sessions.

Ablative Lasers

Ablative lasers are more intense. They remove the top layer of skin entirely. This can lead to more significant improvement in severe stretch marks. However, they require a longer recovery period.

Immediate Skin Changes

After laser therapy, the treated area may appear red and swollen. Some patients experience mild discomfort. The skin might also feel warm to the touch.

Recovery Timeline

The recovery time varies depending on the type of laser used. For fractional lasers, it usually takes about one week for initial healing. Full recovery can take a few weeks.

For ablative lasers, recovery may take longer. Patients might need several weeks to heal completely.

Aftercare Tips

Proper aftercare is crucial for optimal results. Patients should avoid sun exposure and apply sunscreen regularly. Keeping the treated area moisturized helps with healing.

Dive into Dermabrasion

Dermabrasion Process

Dermabrasion involves scraping away the top layers of skin. Cosmetic dermatologists use a specialized tool for this procedure. The tool has an abrasive surface that removes damaged skin. This process reveals smoother, new skin underneath.

The procedure is often done in a cosmetic skin surgery center. It can take about 30 minutes to an hour, depending on the area treated. New collagen materializes as the skin heals, improving the appearance of stretch marks.

Healing Timeline

After dermabrasion, the skin needs time to heal. Redness and swelling are common right after the procedure. These symptoms usually subside within a week.

Skin recovery can take several weeks. During this time, it’s crucial to follow post-procedure care instructions. Use gentle cleansers and avoid sun exposure. Moisturizers like cocoa butter can help keep the skin hydrated.

Results may start to appear within a few weeks. Full results are typically visible after three months. The healing process allows new collagen to form, which helps reduce the appearance of stretch marks.

Suitability for Skin Types

Dermabrasion is suitable for various skin types. However, individuals with darker skin tones may experience discoloration or hyperpigmentation. It’s essential to consult a dermatologist to determine if dermabrasion is right for you.

This procedure works well for fresh stretch marks that are still red or purple. Older, white stretch marks might not respond as effectively. Cosmetic dermatologists can assess your condition and suggest the best treatment plan.

Post-Procedure Care

Proper care after dermabrasion is vital for optimal results. Here are some key steps:

  • Keep the treated area clean.
  • Apply prescribed ointments to prevent infection.
  • Avoid picking at scabs or peeling skin.
  • Use sunscreen to protect healing skin from UV rays.

Following these steps helps ensure smooth recovery and better outcomes.

Microneedling Benefits

How it Works

Microneedling creates tiny punctures in the skin. These micro-injuries trigger the body’s healing process. Collagen and elastin production increases. This helps to repair and rejuvenate the skin.

Collagen is a protein that keeps skin firm. Elastin provides elasticity, allowing skin to stretch and return to its original shape. By boosting these proteins, microneedling can improve skin texture and reduce stretch marks.

Cumulative Effect

Multiple treatments are necessary for optimal results. Each session builds on the previous one. Typically, three to six sessions are recommended. Treatments are spaced four to six weeks apart.

Improvement starts to show after the first few sessions. Full results may take several months. Patience is key as the body needs time to produce new collagen and elastin.

Minimal Downtime

Microneedling has minimal downtime compared to other resurfacing techniques. The procedure involves tiny needles, so recovery is quick. Most people experience redness and minor swelling for a few days.

Unlike more invasive methods, microneedling does not require extensive healing time. Normal activities can usually be resumed within 24 hours. This makes it a convenient option for busy individuals.

Side Effects

Side effects of microneedling are generally mild. Common issues include:

  • Redness
  • Swelling
  • Slight bruising
  • Dryness

These effects typically resolve within a few days. Proper aftercare can minimize discomfort. It’s important to follow post-treatment instructions provided by your healthcare provider.

Retinol and Topical Treatments

Retinol Creams

Retinol is a popular non-invasive treatment for stretch marks. Derived from vitamin A, retinol creams work by promoting skin renewal. They stimulate the production of new collagen, which helps improve skin texture and elasticity.

Retinol creams encourage cell turnover. This process helps fade the appearance of stretch marks over time. Regular use can lead to noticeable improvements in skin tone and texture.

Application Timeline

Consistency is key when using retinol for stretch marks. Most people see results after 6 to 12 weeks of regular application. Applying the cream daily ensures the best outcomes.

It’s important to be patient. Stretch marks will not disappear overnight. Continued use is essential for long-term benefits.

Side Effects

Retinol can cause side effects. Common issues include skin irritation and dryness. These may occur during the initial weeks of use.

Sensitivity to sunlight is another concern. Using sunscreen daily is crucial to protect the skin. Avoiding direct sun exposure can help prevent further damage.

Other Topical Treatments

There are other topical treatments available for stretch marks. These include products containing hyaluronic acid and peptides. Such ingredients also promote collagen production and improve skin hydration.

e cosmetic treatments combine retinol with other active ingredients. This enhances the overall effectiveness of the treatment.

Addressing Pigmentation Issues

Stretch marks can cause hyperpigmentation or hypopigmentation. Retinoid creams help even out skin tone by reducing discoloration.

Topical treatments containing vitamin C can also be beneficial. They brighten the skin and reduce pigmentation issues associated with stretch marks.

Combining Treatments

For better results, some people combine retinol with other cosmetic treatments like microneedling. Microneedling creates tiny punctures in the skin, enhancing the absorption of topical products.

Combining treatments can accelerate the healing process. It’s important to consult a dermatologist before starting any combined regimen.

Home Remedies Insight

Aloe Vera

Aloe vera is a popular home remedy. It helps with skin healing and reduces stretch marks. Applying fresh aloe vera gel directly to the skin can improve its appearance.

People often use it daily for better results. The gel should be left on the skin for at least 20 minutes before washing off.

Coconut Oil

Coconut oil is another effective remedy. It moisturizes the skin deeply. This helps to make stretch marks less noticeable.

Applying coconut oil twice a day can show improvements over time. It also has anti-inflammatory properties, which benefit the skin.

Vitamin E

Vitamin E is known for its skin benefits. It promotes cell regeneration and improves skin texture.

Using vitamin E oil or capsules on stretch marks can help. Massage the oil into the skin regularly for better results.

Cocoa Butter

Cocoa butter is widely used for treating stretch marks. It hydrates and nourishes the skin.

Applying cocoa butter daily can reduce the visibility of stretch marks. Many people find it effective due to its moisturizing properties.

Combining Remedies

Combining these home remedies with professional treatments can enhance results. For example, using aloe vera alongside laser therapy can improve outcomes.

Professional treatments may offer quicker results. However, home remedies provide additional support and care for the skin.

Hydration

Staying hydrated is crucial for preventing stretch marks. Drinking plenty of water keeps the skin elastic and healthy.

Proper hydration helps maintain skin moisture levels. This reduces the risk of developing new stretch marks.

Diet

A balanced diet also plays a role in skin health. Eating foods rich in vitamins A, C, and E supports skin repair and regeneration.

Including fruits, vegetables, and nuts in your diet can help prevent stretch marks. These foods provide essential nutrients for healthy skin.

Exercise

Regular exercise improves blood circulation. This benefits overall skin health and can reduce stretch mark formation.

Exercises like yoga and strength training are beneficial. They keep the skin firm and elastic, reducing the chances of stretch marks.

Pre and Post Treatment Care

Pre-Treatment

Preparing the skin for resurfacing is crucial. Follow your provider’s instructions closely. Avoid sun exposure for at least two weeks before the procedure. Sunburned skin can complicate the treatment.

Cleanse your skin thoroughly on the day of the procedure. Do not apply any makeup or lotions. Some providers may recommend stopping certain medications. Discuss all medications with your provider to avoid complications.

Post-Treatment

Post-treatment care is vital for healing. Keep the skin hydrated by using a gentle moisturizer. Avoid direct sunlight as much as possible. Use sunscreen with SPF 30 or higher when going outside.

Refrain from strenuous activities that cause sweating. This helps prevent irritation and infection. Do not pick at scabs or peel the skin. Let it heal naturally to avoid scarring.

Follow-Up Appointments

Follow-up appointments are essential. They help monitor progress and address any complications early. Your provider will check for signs of infection or adverse reactions. Adjustments in care may be made based on your healing process.

Attend all scheduled follow-ups to ensure optimal results. Missing these appointments can delay recovery and affect complete results.

Home Care Tips

Continue proper skin care at home after treatments. Use mild, non-abrasive cleansers to clean your face gently. Apply a thick layer of moisturizer several times a day to keep the skin soft.

Avoid using harsh skincare products like retinoids or exfoliants until fully healed. Stick to products recommended by your provider. Hydration remains key, so drink plenty of water daily.

Emotional Support

Skin resurfacing can be emotionally challenging. Seeing immediate results might take time, and patience is necessary. Share your experience with close friends or family for emotional support.

Joining online forums or support groups can also help. Many people go through similar procedures and can offer advice and encouragement.

Final Remarks

You’ve now got a solid grip on stretch marks and the many ways to tackle them. Whether it’s laser therapy, microneedling, or even home remedies, there’s a method out there that fits your needs. Understanding your options helps you make informed decisions about your skin care journey.

Don’t wait. Start exploring these treatments today and reclaim your confidence. Your skin deserves the best, and so do you. Ready to take the next step? Dive deeper into our resources and find the perfect solution for your stretch marks.

Frequently Asked Questions

What causes stretch marks?

Stretch marks occur due to rapid skin stretching. Common causes include pregnancy, weight gain, and growth spurts.

How does laser therapy help with stretch marks?

Laser therapy stimulates collagen production. This reduces the appearance of stretch marks and improves skin texture.

Is microneedling effective for stretch marks?

Yes, microneedling promotes collagen and elastin production. It helps improve the texture and color of stretch marks.

What are the benefits of using retinol for stretch marks?

Retinol boosts cell turnover and collagen production. This helps fade stretch marks over time.

Can dermabrasion remove stretch marks completely?

Dermabrasion can significantly reduce their appearance but may not remove them entirely. It exfoliates the top skin layer, promoting new skin growth.

Are home remedies effective for treating stretch marks?

Home remedies like aloe vera and coconut oil can moisturize and improve skin elasticity. However, they may not be as effective as professional treatments.

What should I do before and after skin resurfacing treatments?

Before treatment, avoid sun exposure and follow your dermatologist’s advice. After treatment, keep the area clean, moisturized, and protected from the sun.

CoolSculpting Treatment Areas: Top Spots You Should Know

Understanding CoolSculpting

Science of Cryolipolysis

Cryolipolysis is the science behind CoolSculpting. It targets and freezes fat cells. The process involves using a device that cools fat deposits to a temperature that triggers cell death, as part of coolsculpting treatments. These dead cells, including surface fat and fat deposit, are then naturally eliminated by the body over time after coolsculpting treatments.

Body Contouring

CoolSculpting is not a weight-loss solution. It is designed for body contouring. This treatment focuses on areas with stubborn fat that resist diet and exercise, such as the arm, using coolsculpting treatments by dedicated coolsculpting specialists. Patients should be near their ideal weight before considering coolsculpting treatments for specific body areas.

Non-Surgical Nature

CoolSculpting is non-surgical. This makes it a popular alternative to liposuction. There are no incisions, anesthesia, or recovery time needed. Patients can return to normal activities immediately after coolsculpting treatments on specific body areas.

Treatment Areas

Common CoolSculpting treatment areas include:

  • Abdomen
  • Flanks (love handles)
  • Thighs
  • Upper arms
  • Double chin

Dedicated CoolSculpting specialists help determine the best areas for treatment based on individual needs.

Fat Loss Process

The fat loss process takes several weeks to months. After the fat cells are frozen, the body gradually removes them. Most patients see results within two to three months. Some may require multiple sessions for optimal results.

Safety and Effectiveness

CoolSculpting is FDA-approved. It has been proven safe and effective in clinical studies for men and specific body areas. Side effects are typically mild and temporary, such as redness, swelling, or numbness in the treated area.

Emotional Impact

Many patients feel more confident after undergoing CoolSculpting treatments. Reducing stubborn fat can improve self-esteem and body image in men. This emotional impact is significant for many individuals.

Eligible Body Parts

Abdomen

The abdomen is a common area for CoolSculpting. Many people struggle with stubborn belly fat. This area often resists diet and exercise. CoolSculpting targets fat cells in this region effectively. The procedure can help achieve a flatter stomach.

Thighs

CoolSculpting treats both the inner and outer thighs. Inner thighs in men can develop fat pockets that are hard to lose. Outer thigh areas, often called “saddlebags,” also benefit from treatment. Fatty tissue in these areas responds well to CoolSculpting. The result is slimmer thighs.

Upper Arms

Upper arms are another popular treatment area. Many men have arm flab that doesn’t go away easily. CoolSculpting targets these specific body areas. It helps reduce the appearance of arm flab in men, making arms look toned.

Chin and Jawline

CoolSculpting also works on smaller areas like under the chin for men. This area can develop a double chin, which many men find bothersome. Treatment here can define the jawline better. It gives a more sculpted facial appearance.

Back and Bra Fat

Back fat and bra bulge can be challenging to eliminate. These areas often store excess fatty tissue. CoolSculpting can target these spots effectively. Reducing fat in these regions results in a smoother back profile for men.

Buttocks

The buttocks are another eligible area for treatment. Some men have excess fat in this region that they want to reduce. CoolSculpting can help contour the buttocks for men, providing a more defined shape.

Flanks

Flanks, or love handles, are also treatable with CoolSculpting. These areas store fat that is hard for men to shed through diet alone. Treating the flanks helps achieve a more streamlined waistline.

Upper Thighs

Upper thighs in men can accumulate fat that is difficult to lose. CoolSculpting targets this fat tissue effectively. The result is a smoother, more contoured upper thigh area for men.

Breast (for Men)

Men sometimes develop excess breast tissue, known as gynecomastia. CoolSculpting can treat this condition in men by targeting fat cells in the chest area. This helps reduce the size of male breasts, providing a flatter chest.

Importance of Consultation

Consulting with a CoolSculpting specialist is crucial. They evaluate individual eligibility based on several factors:

  • Fat distribution
  • Personal goals
  • Specific body areas needing treatment

A specialist will create a tailored plan for each person.

FDA-Cleared Areas

Abdomen

The abdomen is a primary target for CoolSculpting. This area often stores stubborn fat that resists diet and exercise. The FDA cleared CoolSculpting for the abdomen in 2010. This ensures the treatment is safe and effective.

Flanks

Flanks, also known as love handles, are another common area treated with CoolSculpting. This area received FDA clearance in 2010. Many people struggle to lose fat in this region. CoolSculpting offers a non-invasive solution.

Submandibular Area

The submandibular area below the jawline is a newer addition. The FDA cleared it for treatment in 2017. This expansion shows the growing capabilities of CoolSculpting. People can now reduce fat under their chin safely.

Thighs

Thighs are also targeted by CoolSculpting. Both inner and outer thighs received FDA clearance in 2015. Many find it difficult to tone this area through exercise alone. CoolSculpting helps achieve a slimmer look.

Upper Arms

Upper arms gained FDA clearance for CoolSculpting in 2016. Fat in this area can cause self-consciousness. Reducing it can boost confidence.

Back

Back fat, including bra fat, is another concern for many. The FDA approved CoolSculpting for this area in 2014. It allows for targeted fat reduction without surgery.

Significance of FDA Clearance

FDA clearance is crucial for any medical treatment. It means the procedure meets safety standards. It also proves the treatment’s effectiveness. For CoolSculpting, this means patients can trust the results.

By choosing an FDA-cleared treatment, individuals ensure they are using a proven method. Dermatology associates often recommend these treatments due to their reliability.

Expanding Capabilities

CoolSculpting continues to evolve. The addition of the submandibular area highlights this growth. More areas may receive clearance in the future.

Patients benefit from these advancements. They have more options for non-invasive fat reduction.

Treatment Expectations

Multiple Sessions

Results from CoolSculpting vary. Most people need multiple sessions for the best outcome. Each session targets specific areas. Fat reduction treatment works gradually. One treatment might not be enough.

Timeline for Results

Changes can start as early as three weeks post-treatment. The most noticeable results appear after two months. Some people see continued improvement up to six months.

Sensation During Treatment

Expect an initial cold feeling during the procedure. This sensation lasts a few minutes. Then, the treated area becomes numb. This helps reduce discomfort.

Post-Treatment Experience

After the appointment, there may be some redness and swelling. These effects are temporary. Bruising or tenderness might also occur but usually fade within a week.

Realistic Results

CoolSculpting is not a weight loss treatment. It’s designed to improve appearance by targeting stubborn fat areas. Results are subtle and natural-looking.

Success Stories

Thigh Gap

Many women dream of achieving a thigh gap. One patient, Emma, struggled with stubborn fat in her inner thighs despite a strict diet and exercise plan. After two CoolSculpting sessions, she noticed a significant reduction in thigh fat. Her confidence soared when she saw the before-and-after photos. The treatment helped her feel more comfortable in her clothes.

Double Chin

John had always been self-conscious about his double chin. He felt it made him look heavier than he was. After consulting with a CoolSculpting team, he decided to try the treatment. Within a few months, John saw a noticeable improvement. His double chin was reduced, giving him a more defined jawline. This change boosted his self-esteem and made him feel more confident in social settings.

Banana Roll

Sarah dealt with banana rolls under her buttocks for years. These small pockets of fat were resistant to exercise and diet changes. CoolSculpting provided a solution. After just one session, Sarah saw a visible reduction in the banana roll area. She felt more comfortable wearing tight clothing and swimsuits. The treatment gave her the results she had long desired.

Back Fat

Back fat can be particularly stubborn for both men and women. Mark experienced this firsthand. Despite regular workouts, he couldn’t shed the extra weight on his back. CoolSculpting targeted these specific areas effectively. Post-treatment, Mark observed a significant decrease in back fat. He felt more confident at the gym and during outdoor activities.

Stubborn Fat

CoolSculpting is ideal for those struggling with stubborn fat that doesn’t respond to traditional weight loss methods. Jessica, who had battled with weight fluctuations, found success with CoolSculpting. The treatment helped her target specific areas like her abdomen and flanks. After several sessions, she achieved a slimmer silhouette and felt more satisfied with her body image.

Men’s Experience

CoolSculpting isn’t just for women; many men have also benefited from it. Tom, a busy professional, had difficulty losing belly fat due to his hectic schedule. CoolSculpting offered him an effective solution without downtime. After completing his treatment plan, Tom saw a marked reduction in abdominal fat. He felt healthier and more confident.

Session Insights

Session Duration

CoolSculpting sessions usually last between 35 to 60 minutes. The duration depends on the treatment area and the number of areas being treated. Clients can read, watch videos, or even take a nap during the session.

Applicator Positioning

The technician selects the applicator based on the treatment area. For example, a larger applicator is used for the abdomen, while smaller ones are used for under the chin. The applicator is then positioned to contour the targeted area effectively.

Cooling Sensation

Clients initially feel intense cold at the start of the process. This sensation subsides after about 10 minutes as the area becomes numb. Most clients find the procedure well-tolerated and experience minimal discomfort.

Post-Treatment Activities

After the session, clients can resume normal activities immediately. There is no downtime required. Some may experience mild redness or swelling, but these effects are temporary.

Post-Treatment Care

Minimal Downtime

CoolSculpting requires minimal downtime. Most individuals can return to their daily activities immediately after the session. This includes going back to work, exercising, or running errands. The non-invasive nature of CoolSculpting makes it convenient for busy schedules.

Managing Side Effects

e people may experience temporary side effects. These can include mild redness, swelling, or discomfort in the treated area. To manage these:

  • Apply a cold compress to reduce swelling.
  • Take over-the-counter pain relief if necessary.
  • Wear loose clothing to avoid irritation.

These side effects usually resolve within a few days.

Healthy Lifestyle

Maintaining a healthy lifestyle is crucial post-treatment. This helps enhance and prolong the results of CoolSculpting. Focus on:

  • Eating a balanced diet rich in fruits and vegetables.
  • Staying hydrated by drinking plenty of water.
  • Exercising regularly to keep your body active.

A healthy lifestyle supports the body’s natural processes and improves overall well-being.

Cost and Loyalty Benefits

Factors Influencing Cost

The cost of CoolSculpting varies. The size of the treatment area plays a significant role. Larger areas like the abdomen or thighs will cost more than smaller areas like the chin or arms.

Another factor is the number of sessions needed. Some individuals may require multiple sessions for optimal results. Each session adds to the total cost.

Financing Options

Many clinics offer financing options. These plans make CoolSculpting more accessible by spreading the cost over several months.

e popular financing options include:

  • CareCredit: A healthcare credit card that allows monthly payments.
  • Prosper Healthcare Lending: Offers loans specifically for medical treatments.
  • Clinic-specific plans: Many clinics provide their own payment plans.

Loyalty Programs

Clinics often have loyalty programs for returning clients. These programs offer discounts on future treatments.

For example, some clinics provide a discount after a certain number of sessions. Others might offer package deals that reduce the overall cost.

Encouraging Long-Term Engagement

Loyalty programs encourage long-term engagement with CoolSculpting services. Returning clients benefit from lower costs, which makes maintaining their desired look easier.

These programs also build trust between clients and clinics. Clients feel valued and are more likely to return for additional services.

Summary

CoolSculpting offers a non-invasive way to target stubborn fat in various FDA-cleared areas of your body. With proper post-treatment care and realistic expectations, you can achieve noticeable results and join the ranks of satisfied clients. The treatment is safe, effective, and supported by numerous success stories.

Ready to take the next step? Explore CoolSculpting to transform your body and boost your confidence. Contact a certified provider today to schedule your consultation and learn more about cost and loyalty benefits. Your journey to a better you starts now!

Frequently Asked Questions

What is CoolSculpting?

CoolSculpting is a non-invasive fat reduction treatment. It uses controlled cooling to freeze and eliminate stubborn fat cells.

Which body parts are eligible for CoolSculpting?

Eligible body parts include the abdomen, thighs, flanks, bra fat, back fat, underneath the buttocks, and upper arms.

Are all areas FDA-cleared for CoolSculpting?

Yes, CoolSculpting is FDA-cleared for multiple areas including the abdomen, flanks, thighs, bra fat, back fat, under the buttocks, and upper arms.

What should I expect during a CoolSculpting session?

Expect a brief consultation followed by a 35-60 minute treatment where you may feel intense cold and tugging. Results appear gradually over weeks.

How successful are CoolSculpting treatments?

Many patients see noticeable fat reduction in treated areas within 1-3 months. Individual results vary.

What post-treatment care is needed after CoolSculpting?

Minimal care is required. You can resume normal activities immediately. Some may experience temporary redness or swelling.

How much does CoolSculpting cost and are there any loyalty benefits?

Costs vary based on treatment area and number of sessions. Many providers offer loyalty programs or package deals for multiple treatments.

Tattoo Removal Laser Cost: Factors & Options Explained

Thinking about getting rid of that old tattoo? Tattoo removal can be a game-changer for unwanted tattoos, but it comes with questions about cost and effectiveness of laser skin treatments. Laser tattoo removal is the most popular method due to its precision and minimal scarring. However, the price of tattoo removal services can vary based on factors like size, color, and number of sessions needed for the laser skin treatments. Understanding the tattoo removal laser cost upfront helps you plan better and avoid surprises. While some might think it’s expensive, the benefits of clear skin, confidence, and a particular tattoo are worth considering. Dive in to learn more about what influences these costs for laser skin treatments and how to make an informed decision.

Understanding Tattoo Removal Costs

Average Cost Range

Tattoo removal costs can vary widely. On average, laser tattoo removal costs between $200 and $500 per session. Multiple sessions are often needed for complete tattoo removal. The total cost can range from $1,000 to $10,000.

Professional Consultation

Consulting with professionals is crucial. They provide accurate estimates based on your specific tattoo. Professionals assess factors like tattoo size and color. They also consider the number of sessions required.

Tattoo Size

The size of the tattoo affects the cost. Larger tattoos require more time and effort to remove. This increases the number of sessions needed. Consequently, larger tattoos result in higher costs.

Tattoo Color

Different colors impact tattoo removal prices. Black ink is easier to remove compared to other colors. Colors like green and blue are more challenging. This means more sessions and higher costs.

Tattoo Location

The location of the tattoo also matters. Tattoos on areas with thinner skin are easier to remove. Areas with thicker skin may require more sessions. This influences the overall cost.

Number of Sessions

The number of sessions directly impacts the cost. Some tattoos need only a few sessions for removal. Others might need ten or more sessions. Each session adds to the total cost.

Additional Factors

Other factors also play a role in determining costs:

  • Skin type: Different skin types react differently to laser treatment.
  • Ink depth: Deeper ink requires more effort to remove.
  • Age of tattoo: Older tattoos may fade faster than newer ones.

Factors Influencing Prices

Tattoo Size

The size of the tattoo greatly affects the removal cost. Larger tattoos require more time and resources to remove. A small tattoo, like a wrist symbol, might take a few sessions. Bigger pieces, such as back or sleeve tattoos, need more sessions. Clinics often charge per square inch. Therefore, a larger tattoo means higher costs.

Ink Colors

Ink colors impact the complexity and cost of removal. Black ink is easiest to remove. Darker inks absorb laser light better, breaking down faster. Lighter colors like yellow and green are harder to remove. These colors reflect more light, making them resistant to lasers.

Number of Sessions

The number of sessions needed influences total costs. Most tattoos need multiple treatments for complete removal. Each session breaks down more ink particles. The average tattoo requires 6 to 10 sessions. Some stubborn tattoos might need up to 20 sessions. Each session adds to the total cost.

Skin Type

Skin type also plays a role in removal costs. Darker skin tones may need special laser settings. This can increase the number of sessions required. Lighter skin usually responds better to standard laser treatments.

Clinic Location

Location of the clinic affects pricing too. Urban areas with high living costs tend to have higher prices. Clinics in smaller towns or rural areas might offer lower rates.

Technology Used

Different types of lasers are used for tattoo removal. Q-switched lasers are common and effective for most inks. PicoSure lasers work faster but are more expensive. The type of technology impacts both effectiveness and price.

Cheaper Removal Options

DIY Creams

DIY tattoo removal creams are popular. They are cheaper than professional treatments. These creams promise to fade tattoos over time. However, their effectiveness is limited. Many users report minimal results.

The cost of these creams ranges from $20 to $100 per bottle. They are easy to buy online or in stores. Still, they often require months of consistent use. This method may not completely remove the tattoo.

Training Centers

Training centers offer another option. Aspiring technicians need practice. These centers look for volunteers as models. Becoming a model can result in free or low-cost removal.

Many schools and training centers have strict supervision. Licensed professionals oversee the process. This ensures safety and effectiveness. It is a good way to save money on tattoo removal.

Affordable Lasers

e clinics offer affordable laser options. These clinics use older laser technology. While less advanced, they can still be effective. The cost is usually lower compared to newer lasers.

Another option is community health centers. Some offer discounted rates for laser removal. These services might be available based on income levels.

Cosmetic Tattoos and Insurance

Insurance Exclusions

Most insurance policies do not cover tattoo removal. Tattoo removal is often seen as a cosmetic procedure. Insurance companies consider it elective, not medically necessary. This classification makes it ineligible for coverage.

Insurance providers focus on essential medical treatments. They prioritize procedures that address health issues. Tattoo removal does not fit this criterion. Therefore, people must pay out-of-pocket for these services.

Medical Exceptions

There are exceptions where insurance might cover cosmetic tattoos. If a tattoo causes medical problems, it may be considered for coverage. For example, an allergic reaction to the tattoo ink can qualify.

Certain medical conditions may also make tattoo removal necessary. Complex tattoos causing skin infections or complications could fall under this category. In such cases, a doctor’s recommendation is crucial.

Reconstructive surgeries sometimes include cosmetic tattoos. Breast cancer patients who undergo mastectomies may have nipple tattoos covered by insurance. This is because these tattoos serve a reconstructive purpose.

Questions to Ask

When considering tattoo removal, ask your insurance provider specific questions. Start by asking if they cover any form of tattoo removal.

Here are some questions to consider:

  • Do you cover tattoo removal for medical reasons?
  • What documentation is required to prove medical necessity?
  • Are there specific types of tattoos or locations that qualify for coverage?
  • Do you cover laser skin treatments for tattoo removal?

Knowing the answers will help you understand your options better. It will also prepare you for any potential costs involved.

Real-Life Example

Consider Jane, who had severe reactions to her old tattoo ink. Her doctor confirmed it was causing chronic skin issues. Because of the medical implications, her insurance covered part of the removal cost.

Another example is Mark, a cancer survivor. He had nipple tattoos after his surgery. His insurance covered these as part of his reconstructive surgery plan.

Finding Best Prices

Multiple Consultations

Getting multiple consultations is crucial. Different clinics offer varied prices and services. This helps in finding the exact cost of tattoo removal. Clinics provide free or low-cost consultations. Use this to understand their pricing structure.

Consultations also give insight into the clinic’s expertise. Ask about the number of sessions required. The total cost often depends on the number of sessions. More sessions mean higher costs.

Specials and Discounts

Look for specials or discounts offered by clinics. Many clinics have seasonal promotions. These can significantly reduce the average cost of tattoo removal.

e clinics offer package deals. These include a set number of sessions at a reduced rate. Always ask about any available discounts during your consultation.

Online Platforms

Use online platforms to find recommendations and reviews. Websites like Yelp and Google Reviews are helpful. They provide information on affordable services and user experiences.

Forums and social media groups also offer valuable insights. People share their experiences with different clinics. This can help in finding clinics with reasonable prices.

Average Costs

The average cost of tattoo removal varies widely. It usually ranges from $200 to $500 per session. Factors affecting the price include:

  • Size of the tattoo
  • Colors used in the tattoo
  • Skin type and location of the tattoo

Smaller tattoos generally cost less to remove. Larger, more colorful tattoos require more sessions, increasing the total cost.

Insurance Considerations

Most insurance plans do not cover cosmetic tattoo removal. However, some exceptions exist for medical reasons. Always check with your insurance provider first.

Payment Plans Explored

Clinic Options

Many clinics offer payment plans for tattoo removal. These plans help make the cost more affordable. Clinics understand that upfront costs can be high. By offering payment plans, they attract more clients.

Payment plans vary by clinic. Some may have no-interest options. Others might spread payments over several months. Always ask about the details before committing.

Benefits of Financing

Financing options provide several benefits. Breaking down the cost into manageable payments is key. It allows clients to budget better. Instead of paying a large sum at once, you pay smaller amounts over time.

This can reduce financial stress. You can get your tattoo removed without straining your finances. Monthly payments are easier to handle for many people.

Interest Rates

Interest rates are an important factor to consider. Some clinics charge interest on their payment plans. This means you could end up paying more over time.

Always check the interest rate before agreeing to a plan. Compare it with other financing options available. High-interest rates can make the total cost significantly higher.

Financial Implications

Choosing a payment plan has financial implications. While it makes payments manageable, it can also lead to debt if not handled carefully. Missing payments can result in additional fees and charges.

Ensure you understand all terms and conditions. Read the fine print carefully. Know what happens if you miss a payment or need to adjust the plan.

Free Removal Services

Programs for Specific Groups

e programs offer free removal services for specific groups. Former gang members often qualify. These programs aim to help them start fresh. Trafficking victims can also benefit from these services. Removing tattoos helps them reclaim their identity.

Eligibility Criteria

Eligibility criteria vary by program. Most require proof of gang affiliation or trafficking victim status. Some may ask for a referral from a social worker or community leader. Age and location can also affect eligibility. Many programs prioritize those with visible tattoos that hinder job opportunities.

Nonprofit Organizations

Many nonprofit organizations provide tattoo removal assistance. Homeboy Industries in Los Angeles is one such group. They focus on helping former gang members. Another example is Jails to Jobs, which offers free removal to ex-offenders.

Community Projects

Community projects also play a role in free tattoo removal. Some clinics partner with local governments to offer these services. Others collaborate with schools and churches. These partnerships ensure that the most vulnerable individuals get the help they need.

Removal Clinics

e clinics specialize in tattoo removal. They often participate in free removal projects. These clinics use advanced laser technology. The process involves multiple sessions, usually spaced weeks apart.

Art Removal Process

The art removal process can be lengthy. Each session targets different layers of ink. The total removal time depends on the tattoo’s size, color, and location. Darker inks like black are easier to remove than lighter colors like yellow or green.

Making Your Decision

Factors to Consider

Tattoo removal involves several factors. Cost, pain, and time commitment are essential considerations. Laser removal is often expensive. Prices can range from $200 to $500 per session. Multiple sessions are usually required.

Pain is another factor. Laser treatments can be painful. Some compare the sensation to being snapped with a rubber band. Numbing creams can help but may not eliminate discomfort entirely.

Time commitment is significant. Complete removal can take months or even years. Sessions are typically spaced six to eight weeks apart.

Emotional Reasons

Emotional and psychological reasons play a role in tattoo removal decisions. Some people regret their tattoos due to changes in personal beliefs or life circumstances.

Others feel social or professional pressure to remove them. Weighing these emotional reasons against the financial cost is crucial. Removing a tattoo might bring peace of mind but at a high price.

Financial Cost

Financial cost is a major consideration. Tattoo removal is not cheap. Each session can cost hundreds of dollars, and multiple sessions are often needed.

Insurance usually does not cover tattoo removal unless it is medically necessary. Budgeting for the entire process is vital.

Research and Consultation

Conduct thorough research before deciding on tattoo removal. Look into different laser technologies and their effectiveness. Consultations with professionals are essential.

They can provide personalized advice based on your skin type and tattoo characteristics. Free consultation services may be available at some clinics, which can help you gather information without initial costs.

Professional Advice

Seek professional advice before proceeding with tattoo removal. Dermatologists and certified laser technicians have the expertise needed for safe and effective treatment.

They can explain potential risks and side effects, such as scarring or skin discoloration. A professional opinion ensures that you make an informed decision.

Alternatives

Consider alternatives to laser removal if cost or pain is prohibitive. Some people opt for tattoo cover-ups instead of removal.

Cover-ups involve getting a new tattoo over the old one, which can be less expensive and less painful. However, this option might not suit everyone.

Summary

Tattoo removal costs can vary widely, influenced by multiple factors like the size of the tattoo and the type of laser used. Exploring cheaper options, considering cosmetic tattoos, and understanding insurance coverage are all crucial steps. Payment plans and even free removal services might be available to you.

Ready to take action? Evaluate your options carefully and make an informed decision. Whether you’re looking for the best prices or exploring payment plans, there’s a solution out there for you. Don’t wait—start your journey towards tattoo removal today!

Frequently Asked Questions

How much does tattoo removal cost?

Tattoo removal costs vary. On average, sessions range from $200 to $500. Prices depend on factors like size, color, and location of the tattoo.

What factors influence tattoo removal prices?

Prices are influenced by tattoo size, color complexity, skin type, and the number of sessions required. Larger and more colorful tattoos generally cost more to remove.

Are there cheaper options for tattoo removal?

Yes, some clinics offer discounts or package deals. DIY methods exist but are less effective and riskier. Always consult a professional.

Does insurance cover cosmetic tattoo removal?

Typically, insurance does not cover cosmetic tattoo removal as it’s considered elective. However, some policies might cover medical-related removals.

How can I find the best prices for tattoo removal?

Research local clinics, read reviews, and compare prices. Look for promotions or package deals that offer discounts for multiple sessions.

Are payment plans available for tattoo removal services?

Many clinics offer payment plans to make the process affordable. Ask your provider about financing options and installment plans.

Can I get free tattoo removal services?

e non-profits and community programs offer free or reduced-cost removal services. These are often available to former gang members or individuals with hate-related tattoos.

VenaSeal Treatment for Varicose Veins – Comprehensive Guide

Ever wondered how to get rid of varicose veins without surgery or venous reflux needs treatment? Venaseal treatment offers a minimally invasive solution. This innovative vascular surgery procedure uses a medical adhesive to close off problematic veins caused by venous insufficiency, providing relief with less pain and burning downtime. Unlike traditional methods like vein stripping, Venaseal doesn’t require anesthesia or compression stockings post-treatment, according to vein specialists.

Imagine walking out of the clinic after groundbreaking vein treatment for varicose veins and getting back to your routine almost immediately. The benefits of vein treatment are clear: quick recovery, minimal discomfort, and effective results. If you’re tired of dealing with unsightly veins due to venous insufficiency and want a straightforward fix, Venaseal might be the answer you’ve been searching for.

Understanding Varicose Veins

Definition

Varicose veins are swollen, twisted veins. They usually appear blue or dark purple. These veins often bulge out from the skin.

Symptoms include aching legs, swelling, and itching. Some people experience cramps or a heavy feeling in their legs due to varicose vein and venous insufficiency.

Causes

Venous reflux is a primary cause of varicose veins. This happens when vein valves do not function properly. Blood flows backward, causing veins to swell.

Other causes include:

  • Aging
  • Pregnancy
  • Obesity
  • Standing for long periods

Genetics also play a role. If family members have varicose veins or venous insufficiency, you are more likely to develop them too and might consider the venaseal treatment procedure.

Diagnosis

Accurate diagnosis is important for effective treatment. Duplex ultrasound is a common method. It uses sound waves to visualize blood flow in the veins during the venaseal treatment procedure.

Doctors can identify affected veins and assess their severity. This helps in planning the best varicose vein treatments.

Symptoms

Common symptoms involve visible, bulging veins. Legs may feel heavy or achy. Swelling around the ankles is frequent.

Skin over the varicose vein might itch or burn. In severe cases, ulcers can form near the ankles.

Impact on Health

Varicose veins can lead to chronic vein issues. They may cause pain and discomfort. In some cases, they result in serious health problems like blood clots, varicose veins, or ulcers.

Early treatment can prevent complications. It improves both appearance and health.

Treatment Options

Various varicose vein treatment options exist:

  1. Compression stockings – help improve blood flow.
  2. Sclerotherapy – involves injecting a solution into the vein.
  3. Laser treatments – use light energy to close off veins.
  4. Vein surgery – removes or ties off problematic veins.

Each treatment has its benefits and risks. A doctor will recommend the best option for varicose vein based on individual needs.

How VenaSeal Works

Mechanism of Action

VenaSeal works by closing the great saphenous vein (GSV) through endovascular embolization. This process involves inserting a catheter into the affected vein. The doctor then uses the catheter to deliver a special medical adhesive called venaseal vein glue. This glue seals the vein shut.

The closed vein stops blood from pooling and causing varicose veins. Blood is rerouted to healthier veins. This reduces symptoms and improves appearance.

Medical Adhesive

The unique aspect of VenaSeal is its use of a medical adhesive for vein closure. Traditional treatments often use heat or chemicals. VenaSeal uses a specialized cyanoacrylate-based glue. This glue is safe and effective for sealing veins.

Once injected, the adhesive bonds the walls of the vein together. This bond is strong and permanent. It prevents blood from flowing through the treated vein.

Coaptation Process

Coaptation is a key part of VenaSeal’s application. It refers to the joining of two surfaces. In this context, it means bringing the walls of the vein together.

During the procedure, doctors apply pressure to ensure proper coaptation of the varicose vein. This helps the glue stick better and ensures a successful closure of the vein.

Advantages of VenaSeal

Minimally Invasive

VenaSeal is a minimally invasive treatment for varicose veins. Unlike traditional surgical options for varicose vein, it does not require large incisions. Patients experience less pain and discomfort during the procedure.

The process involves a small catheter inserted into the vein. A medical adhesive is then delivered to seal the vein. This method reduces the risk of complications.

Quick Recovery

One of the main benefits of VenaSeal for varicose vein treatment is the quick recovery time. Patients can return to normal activities almost immediately. Traditional surgeries often require weeks of downtime.

Most people can walk right after the procedure. There is no need for general anesthesia for varicose vein treatment, which speeds up recovery even more.

Fewer Treatments Needed

VenaSeal often requires fewer treatments compared to other methods. Some traditional treatments for varicose veins might need multiple sessions over several months. With VenaSeal, a single session is usually sufficient.

This makes it a convenient option for those with busy schedules. It also reduces the overall cost of treatment.

Cost-Effective Solution

Since fewer treatments are needed, VenaSeal becomes a cost-effective solution. Patients save money on repeated doctor visits and procedures. Insurance companies may also cover this treatment, reducing out-of-pocket expenses.

The long-term benefits include fewer complications and follow-up appointments. This adds to its cost-effectiveness.

Less Post-Procedure Care

With VenaSeal, there is minimal post-procedure care required. Traditional treatments often need compression stockings or bandages for weeks. VenaSeal patients typically avoid these additional steps.

This makes life easier for patients who want to get back to their routines quickly. There is also less risk of skin irritation or infections from bandages.

High Success Rate

VenaSeal has a high success rate in treating varicose veins. Studies show that it effectively seals veins in most cases. Patients report high satisfaction with their results.

The procedure minimizes symptoms like pain, swelling, and heaviness in the legs. It also improves the appearance of varicose veins, boosting patient confidence.

VenaSeal Procedure Steps

Patient Evaluation

Doctors first evaluate the patient. They check medical history and symptoms. Ultrasound imaging helps map veins. This step ensures accurate treatment.

Vein Mapping

Ultrasound maps the veins. It shows the vein’s size and location. This helps in planning the procedure. Doctors use this information to guide the catheter.

Administering VenaSeal

The procedure starts with a small incision. A catheter is inserted into the vein. The doctor uses ultrasound to guide it.

VenaSeal adhesive is then injected through the catheter. It seals the vein shut. Blood flow reroutes to healthy veins.

Post-Procedure Care

After the procedure, patients wear compression garments. These help reduce swelling and improve blood flow.

Moderate activity is encouraged. Walking helps recovery. Patients should avoid heavy lifting for a few days.

Follow-Up Appointments

Follow-up visits ensure proper healing. Ultrasound checks confirm that the vein is sealed. Any complications are addressed early.

Effectiveness of VenaSeal

High Success Rate

Studies show that VenaSeal has a high success rate. In 2015, a clinical trial reported a 97.2% closure rate of the great saphenous vein (GSV). This means most patients had their veins closed successfully. Symptoms like pain and swelling also improved significantly.

Patients often experience relief within weeks. Another study in 2017 confirmed these results. It showed a 96.8% closure rate after one year. This demonstrates the long-term effectiveness of VenaSeal.

Comparison with Other Treatments

VenaSeal is often compared to other treatments like radiofrequency ablation (RFA) and laser therapy. RFA uses heat to close veins, while laser therapy uses light energy. Both are effective but have some drawbacks.

  • RFA has a success rate of about 95%. However, it can cause more discomfort during recovery.
  • Laser therapy also has a high success rate, around 94%. But it may lead to bruising and skin burns.

VenaSeal stands out because it involves less pain and faster recovery. There is no need for tumescent anesthesia, which is required for RFA and laser therapy. Patients can return to normal activities almost immediately.

Long-Term Outcomes

Long-term outcomes of VenaSeal are promising. Studies indicate that the recurrence rate of varicose veins is low. A 2018 study followed patients for two years. It found that only 3% experienced recurrence.

This low recurrence rate is significant. It suggests that VenaSeal provides lasting relief from varicose veins. Patients report continued improvement in symptoms like heaviness and aching.

Safety Guidelines

Contraindications

Patients with hypersensitivity to cyanoacrylates should avoid VenaSeal. This chemical is used in the adhesive for the treatment. Those with acute superficial thrombophlebitis should also not undergo this procedure. These conditions can increase risks during and after the treatment.

Adverse Effects

VenaSeal is generally safe, but some side effects can occur. Patients might experience mild pain or bruising at the injection site. Rare complications like deep vein thrombosis (DVT) can happen. Doctors manage DVT by prescribing anticoagulants. They monitor patients closely to catch any issues early.

Post-Treatment Monitoring

After VenaSeal, patients need to follow specific guidelines. Monitoring for signs of complications is crucial. Watch for swelling, redness, or warmth in the treated area. These could indicate an infection or other issues. Contact a doctor immediately if these symptoms appear.

Activity Restrictions

Patients should avoid strenuous activities for a few days post-treatment. Light walking is encouraged to promote blood flow. Avoid standing or sitting for long periods initially. This helps reduce the risk of complications like DVT.

Follow-Up Appointments

Regular follow-up appointments are important. Doctors use these visits to check the healing process and ensure no complications have developed. Adhering to these appointments helps maintain the effectiveness and safety of the treatment.

Renew Your Legs

Benefits

VenaSeal can improve the appearance and health of your legs. The treatment uses medical glue to close varicose veins. This method is less invasive than traditional surgery.

Patients often report reduced pain and burning sensations. The procedure is quick, usually taking about 30 minutes. Recovery time is short, allowing you to return to normal activities quickly.

Success Stories

Many patients have shared positive experiences with VenaSeal. Sarah, a 45-year-old teacher, struggled with painful varicose veins. After her treatment, she felt immediate relief and returned to work within days.

John, a 60-year-old retiree, had severe leg discomfort. Post-treatment, he noticed a significant improvement in both appearance and comfort. These testimonials highlight the effectiveness of VenaSeal.

Consultation Importance

Consulting with a healthcare provider is crucial. They will use ultrasound to examine your veins. This helps determine if VenaSeal is the right option for you.

Your doctor will explain the procedure in detail. They will discuss potential risks and benefits. This ensures you make an informed decision about your treatment.

Procedure Details

The VenaSeal treatment involves inserting a catheter into the vein. Medical glue is then applied to seal it shut. This causes the vein to collapse and eventually disappear.

No anesthesia is required, making it a comfortable experience. The procedure minimizes discomfort and speeds up recovery time.

Recovery Tips

After the procedure, follow your doctor’s advice for optimal recovery:

  • Walk regularly to promote blood flow.
  • Avoid heavy lifting for a few days.
  • Wear compression stockings if recommended.

Closing Thoughts

VenaSeal offers a cutting-edge solution for varicose veins, combining effectiveness and safety. By understanding its benefits and following the procedure steps, you can achieve healthier legs with minimal downtime. The treatment’s positive outcomes speak for themselves, making it a compelling option for those seeking relief.

Ready to renew your legs? Trust our expertise and take the first step towards a pain-free life with VenaSeal. Don’t let varicose veins hold you back. Book your consultation today and experience the transformation!

Frequently Asked Questions

What are varicose veins?

Varicose veins are swollen, twisted veins that appear just under the skin. They usually occur in the legs.

How does VenaSeal work?

VenaSeal uses a medical adhesive to close varicose veins. This seals the vein and reroutes blood to healthier veins.

What are the advantages of VenaSeal?

VenaSeal is minimally invasive, requires no anesthesia, and has a quick recovery time. It also leaves no scars.

What are the steps involved in the VenaSeal procedure?

The doctor numbs the area, inserts a catheter into the vein, and delivers the adhesive. The vein is then sealed shut.

How effective is VenaSeal?

VenaSeal boasts high success rates. Studies show it effectively treats varicose veins with lasting results.

Is VenaSeal safe?

Yes, VenaSeal is FDA-approved and considered safe. However, always consult with your doctor for personalized advice.

How can VenaSeal help renew my legs?

VenaSeal can reduce pain, improve appearance, and boost confidence by eliminating unsightly varicose veins.

Body Contouring with Cavitation: Unlock the Power of Ultrasound

Body contouring with cavitation is changing the game in non-invasive fat reduction, including ultrasonic lipolysis and ultrasonic liposuction as a cosmetic procedure. Unlike traditional methods, this ultrasonic cavitation treatment uses ultrasound waves to break down fat cells without surgery. It’s quick, painless, and effective. Imagine achieving a sculpted body with fat removal procedure, 3d lipo cavitation, ultra cavitation, and fat reduction treatments without the downtime of surgery. This innovative approach targets stubborn areas that diet and exercise can’t touch, using ultrasonic fat cavitation and 3d lipo cavitation.

Many people are turning to body contouring with cavitation devices for its impressive results. It’s safe, affordable, and offers immediate improvements. Whether you want to slim your waist, thighs, or arms, this method using ultrasonic fat cavitation, 3d lipo cavitation, and ultrasound cavitation device can help you achieve your goals. Discover how body contouring with cavitation device can transform your figure and boost your confidence.

Key Takeaways

  • Understanding Fat Cavitation: Fat cavitation uses an ultrasound device to break down fat cells, making it a non-invasive alternative to traditional liposuction.
  • How Cavitation Reduces Fat: The procedure targets fat cells, liquefies them with a device, and allows the body to naturally eliminate them through the lymphatic system.
  • Safety and Health Impacts: Generally safe with minimal side effects, but always consult a healthcare professional to ensure 3d lipo cavitation or ultrasonic fat cavitation is right for you.
  • Effectiveness in Body Contouring: While results vary, many see noticeable improvements in body shape and reduction in stubborn fat areas after a few sessions of 3D lipo cavitation.
  • Procedure Costs: Costs for 3d lipo cavitation and ultrasonic fat cavitation can vary widely depending on the clinic and the number of sessions needed, so budget accordingly.
  • Convenience of Non-Invasive Treatment: The ultrasonic fat cavitation procedure is quick, painless, and requires no downtime, making it convenient for those with busy schedules seeking 3d lipo cavitation.

Understanding Fat Cavitation

What is Fat Cavitation

Fat cavitation is a non-surgical method. It uses ultrasound waves to break down fat cells. This technique targets troublesome fat areas.

How it Works

Ultrasonic waves penetrate the skin. They create bubbles in the fat cells. These bubbles grow and burst. The 3d lipo cavitation process breaks down the fat cells without harming nearby tissues.

Science Behind It

Fat cavitation relies on sound waves. These waves create pressure on the fat cells. The cells then turn into liquid and are removed by the body’s lymphatic system after 3d lipo cavitation and ultrasonic fat cavitation. Surrounding tissues remain undamaged during this process.

Benefits for Women

Many women choose fat cavitation. It offers a way to reduce stubborn fat. This method requires no surgery or downtime.

Comparison with Traditional Methods

Traditional fat reduction methods include liposuction. Liposuction involves surgery and recovery time. Fat cavitation, however, is non-invasive and painless. Patients can return to normal activities immediately.

How Cavitation Reduces Fat

Ultrasonic Waves

Ultrasonic cavitation uses sound waves. These waves penetrate the skin to reach fat cells. The frequency of these waves is important. They create pressure on the fat cells.

Breaking Fat Cells

The pressure from the ultrasonic waves during 3d lipo cavitation causes the fat cells to break apart. This process is called lipolysis. It turns fat cells into liquid. This liquid contains fatty acids and glycerol.

Lymphatic System

Once the fat cells are broken down through 3d lipo cavitation, the body needs to get rid of them. The lymphatic system plays a crucial role here. It helps in flushing out the fatty acids and glycerol through 3d lipo cavitation. The body naturally eliminates these through urine and sweat.

Targeted Areas

Ultrasound cavitation works best for small, localized areas of fat. This makes it ideal for body contouring. It can target specific problem areas like the abdomen or thighs using 3d lipo cavitation and ultrasonic fat cavitation.

Sessions Required

Multiple sessions are usually needed for optimal results. Each session lasts about 30-60 minutes. The number of sessions depends on individual goals and body types, including 3d lipo cavitation and ultrasonic fat cavitation.

Safety and Health Impacts

Side Effects

Ultrasonic cavitation is generally safe. However, some side effects can occur. These include mild bruising and slight pain. Rarely, patients may experience redness or swelling. These effects are temporary and often resolve quickly.

Most people do not experience severe issues. The procedure’s non-invasive nature, such as 3d lipo cavitation and ultrasonic fat cavitation, reduces the risk of complications. Studies show that these side effects are minimal compared to surgical alternatives like 3d lipo cavitation and ultrasonic fat cavitation.

Safety

Ultrasonic cavitation is considered safe by many experts. It uses low-frequency sound waves and 3d lipo cavitation to target fat cells. These sound waves used in ultrasonic fat cavitation and 3d lipo cavitation do not harm surrounding tissues or organs. This technology, including ultrasonic fat cavitation and 3d lipo cavitation, has been used for years in medical treatments.

Recovery time is minimal. Most patients return to daily activities immediately after treatment. There is no need for anesthesia or incisions with 3d lipo cavitation or ultrasonic fat cavitation, which lowers the risk of infections and other complications.

Loose Skin

Concerns about loose skin are common. Cavitation may not tighten skin as effectively as surgical methods. However, it does not pose the same risks as surgery or 3d lipo cavitation.

Surgical options like liposuction can lead to significant scarring and longer recovery times. Cavitation offers a safer alternative with fewer side effects.

Comparative Risks

Comparing cavitation to surgical methods highlights its benefits. Surgical procedures can cause:

  • Scarring
  • Infections
  • Long recovery periods
  • Anesthesia-related risks

Cavitation avoids these issues. It provides a non-invasive solution with 3d lipo cavitation and fewer health impacts.

Effectiveness in Body Contouring

Non-Invasive Alternative

Ultrasonic cavitation is a non-invasive alternative to traditional liposuction. It uses ultrasound energy to break down fat cells. Unlike surgical liposuction, this method does not require incisions or anesthesia.

The procedure targets fat layers beneath the skin. These fat cells are then naturally eliminated by the lymphatic system after 3D lipo cavitation. This makes the recovery time shorter and less painful compared to surgical options with 3D lipo cavitation.

Permanent Results

Results from ultrasonic cavitation can be permanent. However, maintaining a healthy lifestyle is crucial. Diet and exercise play a significant role in keeping the results of 3d lipo cavitation.

Without proper care, new fat cells can form. This would negate the benefits of the treatment. Thus, patients must commit to long-term lifestyle changes.

Clinical Trials Needed

More clinical trials are needed to fully understand the effectiveness of ultrasonic cavitation. Current studies show promising results. Yet, there is still much to learn about its long-term impact, such as 3d lipo cavitation.

e studies suggest 3d lipo cavitation is effective for small areas of fat reduction. Larger areas may require multiple sessions. Further research will help clarify these findings and provide more comprehensive data on 3D lipo cavitation.

Comparing Options

Ultrasonic cavitation is one of many cosmetic fat reduction procedures. CoolSculpting treatment and traditional liposuction are other popular choices. Each has its own set of benefits and drawbacks.

CoolSculpting freezes fat cells, which are then naturally eliminated by the body, similar to 3d lipo cavitation. Traditional liposuction involves surgically removing fat tissue. Both methods, including 3D lipo cavitation, have their own levels of invasiveness and recovery times.

Skin Irregularities

One concern with ultrasonic cavitation is potential skin irregularities. The procedure can sometimes cause uneven texture or bruising. Proper technique and skilled practitioners can minimize these risks.

Patients should discuss potential side effects with their doctor. Understanding the risks helps in making an informed decision.

Procedure Benefits

Ultrasonic cavitation offers several benefits:

  • Less invasive than surgical options
  • Shorter recovery time
  • Minimal pain during and after treatment
  • No need for anesthesia

These advantages make 3d lipo cavitation an attractive option for many seeking body contouring solutions.

Areas Treated

This fat removal treatment can target various body parts. Common areas include the abdomen, thighs, and arms. Smaller areas like the chin can also be treated effectively with 3d lipo cavitation.

Different body parts may respond differently to the treatment. Multiple sessions might be necessary for optimal results.

Procedure Costs

Average Cost

Ultrasonic cavitation is a popular body contouring procedure. The average cost per 3d lipo cavitation treatment session ranges from $250 to $350. This is more affordable compared to traditional liposuction, which can cost between $2,000 and $4,500 per session.

Most people need multiple sessions for the best results. Typically, 6 to 12 treatments are recommended. Therefore, the overall cost of 3d lipo cavitation can range from $1,500 to $4,200.

Comparison to Other Treatments

Nonsurgical fat removal treatments vary in cost. On average, these procedures cost around $1,400 per session. Ultrasonic cavitation is relatively cheaper. For example, CoolSculpting costs about $750 per area treated.

Cavitation is often considered a cost-effective option. It provides good results with 3d lipo cavitation without the high price tag of other methods.

Insurance Coverage

Insurance does not typically cover the cost of ultrasonic cavitation procedures. These treatments are considered cosmetic. Therefore, they are not deemed medically necessary.

Patients should plan to pay out-of-pocket for these treatments. Some providers offer payment plans or financing options to make it more manageable.

Provider Fees

The provider’s experience can impact the cost. More experienced providers may charge higher fees. However, this can lead to better results and fewer complications.

It’s important to choose a qualified provider. Research and read reviews before making a decision.

Office Visits

Each cavitation session usually takes about 30 to 60 minutes. Many people do it during their lunch break. This makes it convenient for those with busy schedules.

There is no downtime after the procedure. Patients can return to their daily activities immediately.

Pain and Discomfort

Ultrasonic cavitation is generally painless. Some people may feel mild warmth or tingling during the procedure. There is no need for anesthesia or pain medication.

This lack of pain makes cavitation appealing compared to surgical options like liposuction, which require recovery time and can be painful.

Long-Term Costs

The long-term costs of maintaining results should also be considered. A healthy lifestyle is essential for keeping the results of cavitation treatments.

Patients should eat a balanced diet and exercise regularly to prevent new fat deposits from forming.

Convenience of Non-Invasive Treatment

Minimal Recovery Time

Body contouring with cavitation offers a non-invasive alternative to traditional methods. Unlike invasive procedures, which often require long recovery times, cavitation treatments allow patients to resume daily activities almost immediately. This is because the procedure uses ultrasound technology rather than surgical tools or invasive heat treatment.

Ultrasound waves penetrate the skin and target fat cells without damaging surrounding tissues. This results in less bruising and swelling compared to more invasive procedures. Patients can typically return to work or other responsibilities right after their appointment.

Quick Sessions

Cavitation treatments are also convenient due to their short duration. Each session usually lasts between 40 minutes to an hour. This makes it easy for people with busy schedules to fit the procedure into their day.

During the session, a licensed provider uses a handheld ultrasound device to deliver ultrasonic waves to the targeted areas. The ultrasound frequencies break down fat cells, which are then naturally eliminated by the body. Multiple sessions may be required for optimal results, but each one is quick and efficient.

Licensed Providers

Selecting a licensed and experienced provider is crucial for achieving the best results. A qualified professional ensures that the treatment is performed correctly and safely. They can also tailor the procedure to meet individual needs, maximizing its effectiveness.

Patients should research potential providers and check their credentials before scheduling an appointment. Reading reviews and asking for recommendations can help in finding a reputable provider. This step adds another layer of convenience by ensuring that the treatment will be both effective and safe.

Summary of Benefits

The non-invasive nature of body contouring with cavitation provides several advantages:

  • Minimal recovery time
  • Short, manageable sessions
  • Reduced risk of complications
  • Customizable treatment plans

These benefits make it an attractive option for those looking to improve their body shape without undergoing surgery.

Limitations and Realistic Expectations

Best for Contouring

Ultrasonic cavitation is effective for body contouring. It targets small pockets of fat. People should not expect significant weight loss from this treatment. The device uses ultrasound waves to break down fat cells. These cells are then naturally removed by the body.

This method works well on fibrotic areas. These are areas where fat is dense and hard. Examples include the thighs and love handles.

Multiple Sessions Needed

One session is not enough for most people. It usually takes multiple sessions to see results. Each session lasts about 30-60 minutes. The total number of sessions varies based on the individual.

On average, 6-12 sessions are needed for noticeable changes. Results can take a few weeks to appear after the final appointment. This delay happens because the body needs time to process and remove the broken-down fat cells.

No Immediate Results

Immediate results are rare with ultrasonic cavitation. Patience is key. The body requires time to flush out the dead fat cells. Some people may start seeing changes after a few sessions, but full results often take longer.

Participants should understand that this treatment is not a quick fix. Consistency and patience lead to better outcomes.

Not for Everyone

Ultrasonic cavitation may not work for everyone. People with certain medical conditions should avoid it. Always consult a doctor before starting any new treatment.

It’s also less effective for those with a lot of weight to lose. This method is best suited for individuals close to their ideal weight who want to fine-tune specific areas.

Side Effects

Most side effects are mild and temporary. Common ones include:

  • Redness
  • Swelling
  • Bruising

These typically resolve within a few hours or days post-treatment. Serious side effects are rare but possible.

Aftercare and Results Maintenance

Healthy Diet

A healthy diet is crucial after cavitation treatments. Eating balanced meals helps maintain the results. Avoid processed foods and sugary drinks. Focus on fruits, vegetables, lean proteins, and whole grains.

Drinking plenty of water is essential. Hydration aids in flushing out toxins. It also supports skin elasticity and overall health.

Regular Exercise

Regular exercise complements a healthy diet. Physical activity helps maintain the body’s shape. Aim for at least 30 minutes of moderate exercise daily.

Incorporate both cardio and strength training. Cardio exercises like running or cycling burn calories. Strength training builds muscle and improves metabolism.

Follow-up Sessions

Follow-up sessions may be necessary. Each person responds differently to treatments. Consult with your provider to determine the best schedule.

e may need additional sessions to achieve their goals. These sessions can help enhance and sustain results.

Personalized Aftercare

Personalized aftercare advice is vital. Your provider can offer tailored recommendations based on your needs. Follow their guidance for optimal results.

They may suggest specific skincare products or routines. Adhering to these can prolong the effects of cavitation.

Recovery Time

Recovery time varies per individual. Most people resume normal activities immediately. However, some might experience mild redness or swelling.

These symptoms usually subside within a few hours. Always follow your provider’s instructions during recovery.

Visible Results

Visible results depend on several factors. Diet, exercise, and adherence to aftercare play significant roles. Some notice changes after the first session.

For others, it may take a few weeks to see improvements. Patience and consistency are key to achieving desired outcomes.

Avoid Alcohol

Avoiding alcohol is recommended post-treatment. Alcohol can dehydrate the body and hinder recovery. It may also affect the results negatively.

Opt for water or herbal teas instead. Staying hydrated supports better outcomes and overall well-being.

Consult Your Doctor

Always consult your doctor before starting any new regimen. They can provide medical insights tailored to your health status.

If you have any concerns post-treatment, seek medical advice promptly. Ensuring safety and effectiveness should be a priority.

Summary

Fat cavitation is a game-changer in body contouring. It breaks down fat cells, offering a non-invasive way to shape your body. Safe and effective, this treatment fits easily into busy schedules and budgets. You get real results without the downtime.

Ready to transform? Embrace fat cavitation. Book a session today and start your journey toward a more confident you. Your dream body is just an appointment away!

Frequently Asked Questions

What is fat cavitation?

Fat cavitation is a non-invasive procedure that uses ultrasound technology to break down fat cells. It targets stubborn fat areas, making it easier for the body to eliminate them naturally.

How does cavitation reduce fat?

Cavitation reduces fat by using ultrasonic waves to disrupt fat cells. The broken-down cells are then processed and eliminated by the body’s lymphatic system.

Is fat cavitation safe?

Yes, fat cavitation is generally safe. It is a non-surgical procedure with minimal risks and side effects. Always consult with a certified professional before undergoing treatment.

How effective is cavitation for body contouring?

Cavitation is effective for body contouring, especially in targeting localized fat deposits. Results can vary, but many see noticeable improvements after a few sessions.

What are the costs of a cavitation procedure?

The cost of cavitation procedures varies depending on the clinic and treatment area. On average, sessions can range from $100 to $500 each.

What are the benefits of non-invasive treatments like cavitation?

Non-invasive treatments like cavitation offer benefits such as no downtime, minimal discomfort, and quick recovery. They provide an alternative to surgical methods for fat reduction.

Are there any limitations or realistic expectations for cavitation?

Yes, while effective, cavitation has limitations. It is not a weight loss solution but helps in reducing localized fat. Maintaining a healthy lifestyle is essential for lasting results.

Achieving Desired Results: The Role of Buttock Implant Revisions

Buttock implant revision is a game-changer for those unhappy with their initial augmentation results. Whether it’s correcting asymmetry, addressing discomfort, or simply achieving a more natural look, this procedure offers a second chance at perfection through free buttock augmentation revision and buttocks revision. Unlike the primary buttock augmentation, where expectations may not have been met, a revision can provide the tailored outcome you desire. It’s crucial to understand the benefits and risks involved in buttock augmentation procedure to make an informed decision.

In this post, we’ll dive into everything you need to know about buttock implant augmentation revisions. From understanding why people opt for revision buttock implantation surgery to what the procedure entails, we’ve got you covered. Get ready to explore how you can achieve your ideal results with expert advice and insights on revision buttock augmentation.

Key Takeaways

  • Identify Revision Needs Early: Recognize signs like asymmetry, implant displacement, or dissatisfaction after buttock augmentation to determine if a revision is necessary.
  • Understand Common Causes: Familiarize yourself with frequent reasons for buttock implant revisions, such as complications or changes in aesthetic preferences.
  • Explore All Options: Consult with a qualified surgeon to review available revision techniques for buttock augmentation and choose the best approach for your situation.
  • Prepare Thoroughly for Surgery: Follow pre-surgery guidelines to ensure optimal outcomes, including medical evaluations and lifestyle adjustments for revision buttock augmentation.
  • Commit to Recovery: Adhere to aftercare instructions and attend follow-up appointments after revision buttock implantation surgery or revision buttock augmentation to promote healing and monitor progress.
  • Budget Accordingly: Consider the financial aspects of revision surgery, including potential costs and insurance coverage for buttock augmentation.

Understanding Revision Needs

Dissatisfaction with Implants

Many patients seek buttock implant revision due to dissatisfaction. Common issues include asymmetry and volume problems. Asymmetry can occur when one implant shifts or is placed incorrectly, requiring revision buttock augmentation or revision buttock implantation surgery. Volume issues arise when implants are too large or too small for the patient’s preference, often necessitating revision buttock implantation surgery or revision buttock augmentation.

Patients may also feel discomfort if the implants are not positioned well, potentially requiring revision buttock implantation surgery. Poor placement can lead to an unnatural look. Sometimes, the skin around the implant may appear wrinkled or saggy, especially after revision buttock implantation or revision buttock augmentation. These issues can affect confidence and daily comfort.

Body Changes Over Time

Body changes over time impact buttock implants. Weight fluctuations can alter the appearance of implants. Gaining or losing weight can make implants look disproportionate. The skin may stretch or shrink, affecting how the implants sit, necessitating revision buttock implantation or revision buttock augmentation.

Aging also plays a role. As people age, their skin loses elasticity. This can cause implants to shift or sag. Hormonal changes during menopause can affect body fat distribution, impacting the look of revision buttock implantation and revision buttock augmentation.

Personal Goals and Expectations

Personal goals and expectations are crucial for successful revision surgery. Patients must have realistic goals. Discussing these with a surgeon helps align expectations with achievable outcomes for revision buttock implantation.

For example, some may want a more natural look while others prefer a dramatic change, such as revision buttock implantation. Knowing what is possible helps avoid disappointment. Surgeons can provide examples of previous work to illustrate potential results.

Patients should also consider recovery time and possible risks. Revision surgery may involve a longer recovery period than the initial procedure. Understanding this helps in planning and setting realistic timelines.

Common Reasons for Revision

Unsatisfactory Results

Patients often seek buttock implant revision due to unsatisfactory results. This includes asymmetry, where one buttock appears different from the other. Incorrect volume is another issue. Some patients find their implants too large or too small. These issues can impact self-esteem and comfort.

Weight Fluctuations

Significant weight loss or gain can alter the appearance of buttock implants. Weight changes can cause implants to shift or look unnatural. This leads to the need for augmentation revision. Maintaining a stable weight is crucial for long-term success.

Aging Effects

Aging affects the skin and tissues around buttock implants. Skin loses elasticity over time, which can change the appearance of implants. Revision surgery helps address these aging effects. It can restore a youthful look to the buttocks.

Implant Complications

Complications with the implants themselves also lead to revision surgery. These include implant rupture or leakage. Sometimes, scar tissue forms around the implant, causing discomfort or changes in shape. Successful revision surgery corrects these issues.

Infection and Pain

Infections are rare but serious reasons for implant revision surgery. Infections can occur shortly after surgery or years later. Persistent pain is another reason for revision. It may result from nerve damage or improper implant placement.

Desire for Change

e patients simply desire a change in their buttock appearance. Trends in body aesthetics evolve over time. Patients may want to update their look to match current trends or personal preferences.

Exploring Revision Options

Surgical Techniques

Various surgical techniques exist for revision butt enhancement. Fat grafting is one option. This involves transferring fat from another part of the body to the buttocks. It can correct asymmetry or add volume.

Implant exchange is another technique. Surgeons replace old implants with new ones. This can address issues like implant displacement or rupture. Both methods require careful planning and precision.

Non-Surgical Options

Non-surgical options can complement revision surgery. Injectable fillers are one example. They can enhance the shape and contour of the buttocks.

Laser treatments may also be beneficial. These can improve skin texture and elasticity. Non-surgical methods often have shorter recovery times.

Personalized Approach

A personalized approach is crucial in selecting a revision strategy. Each patient has unique needs and goals. A thorough consultation helps determine the best method.

Surgeons assess factors like skin quality, existing implants, and body type. Personalized plans ensure optimal results and patient satisfaction.

Preparing for Surgery

Medical Evaluations

Before undergoing buttock implant revision surgery, patients must complete medical evaluations. These assessments ensure they are fit for the procedure. Doctors typically review the patient’s medical history, including any previous surgeries.

Blood tests and imaging studies may be required. These tests help identify potential risks. Surgeons might also check for infections or complications from the initial buttock augmentation procedure.

Lifestyle Adjustments

Patients should make lifestyle adjustments before surgery. Quitting smoking is crucial. Smoking can hinder healing and increase complications. Alcohol consumption should also be limited.

Maintaining a healthy diet is important. Nutrient-rich foods aid in recovery. Regular exercise can improve overall health but should be moderated close to the surgery date.

Realistic Expectations

Setting realistic expectations is key. Patients must understand what revision surgery can achieve. Consulting with the surgeon helps clarify outcomes.

Surgeons will discuss the limitations and potential results of the revision buttock implantation surgery. This step ensures patients are mentally prepared.

Post-Surgery Support

Arranging post-surgery support is essential for a smooth recovery. Patients often need help with daily tasks initially. Friends or family members can provide valuable assistance.

Hiring professional caregivers is another option. They offer specialized care during the critical recovery period.

Care Tips

Following care tips can enhance recovery. Patients should prepare a comfortable space at home. Stocking up on necessary supplies like medications and bandages is helpful.

Planning meals in advance can reduce stress post-surgery. Easy-to-prepare, nutritious meals are ideal.

Recovery and Aftercare

Initial Rest

Rest is crucial after buttock implant revision. Patients should plan to take at least one to two weeks off work. During this time, avoid sitting directly on the buttocks. This helps reduce pressure on the surgical area.

Use a special cushion or pillow when sitting is unavoidable. Lying on the stomach or sides is recommended to minimize discomfort.

Wound Care

Proper wound care prevents infections. Clean the surgical site as instructed by the surgeon. Use mild soap and water. Pat dry gently with a clean towel.

Change dressings regularly. Keep an eye out for signs of infection like redness, swelling, or unusual discharge. Contact the surgeon immediately if any of these symptoms appear.

Pain Management

Pain management is essential during recovery. Surgeons usually prescribe pain medications. Take them as directed to manage discomfort effectively.

Over-the-counter pain relievers can also help but consult with the doctor before taking any additional medication. Ice packs can reduce swelling and provide relief.

Activity Restrictions

Activity restrictions are necessary for proper healing. Avoid strenuous activities for at least six weeks. This includes heavy lifting and intense exercise.

Gradually reintroduce light activities like walking after two weeks. Follow the surgeon’s advice on when to resume normal activities.

Follow-Up Appointments

Follow-up appointments are vital for monitoring progress. These visits allow the surgeon to check healing and address concerns.

Attend all scheduled appointments without fail. Personalized recovery protocols may be adjusted based on individual progress.

Anticipating Results

Realistic Expectations

Patients must set realistic expectations for the outcome of buttock implant revision. The healing process takes time. Visible improvements may not be immediate. Patience is essential during this period.

Doctors aim for symmetry and natural appearance. However, results vary based on individual factors. These include skin elasticity and initial implant placement.

Visible Improvements

Patients often see visible improvements after surgery. These align with pre-surgery goals. Surgeons use precision to ensure the best possible outcome.

Improved contour and shape are common outcomes. However, final results depend on the body’s healing response.

Stable Weight

Maintaining a stable weight is crucial. Weight fluctuations can affect the appearance of the implants. Stable weight helps preserve the results of the revision surgery.

Healthy lifestyle choices support long-term success. Regular exercise and balanced diet play significant roles.

Healthy Lifestyle

A healthy lifestyle contributes to lasting results. Patients should avoid smoking and excessive alcohol consumption. These habits can hinder the healing process.

Hydration and proper nutrition aid recovery. They also maintain skin elasticity, which is important for the overall appearance.

Cost Considerations

Surgeon Fees

Surgeon’s fees are a major part of the cost. Experienced surgeons charge more. They have higher success rates and fewer complications. Selecting a skilled surgeon can reduce risks and improve results.

Anesthesia Costs

Anesthesia is essential for revision surgery. It ensures patient comfort and safety. Costs vary based on the type used. General anesthesia is more expensive than local anesthesia. Anesthesiologist’s experience also affects the price.

Facility Fees

Facility fees cover the use of the surgical center. Accredited facilities charge more due to high standards. These centers offer better equipment and staff. High-quality facilities can prevent post-surgery complications.

Additional Expenses

Post-operative care supplies add to the total cost. These include bandages, compression garments, and medications. Follow-up visits are necessary for monitoring recovery. Each visit may incur additional charges.

Financing Options

Many surgical practices offer payment plans. These plans help manage large expenses over time. Some practices partner with medical financing companies. Patients should explore these options to find the best fit for their budget.

Closing Thoughts

Buttock implant revision can be a complex journey, but understanding the process makes it manageable. From recognizing the need for revision to preparing for surgery and recovery, you’re now equipped with essential knowledge. This information empowers you to make informed decisions and anticipate results.

Ready to take the next step? Consult with a qualified surgeon to discuss your specific needs. Your confidence and satisfaction are paramount. Don’t hesitate; your enhanced appearance and comfort await. Share your thoughts or experiences in the comments below!

Frequently Asked Questions

What are the common reasons for buttock implant revision?

Common reasons include implant displacement, infection, asymmetry, or dissatisfaction with size or shape. Consulting an experienced surgeon helps address these issues effectively.

How do I prepare for a previous buttocks augmentation revision surgery?

Follow your surgeon’s pre-surgery instructions closely. This may include medical evaluations, stopping certain medications, and arranging post-surgery care.

What should I expect during recovery from a previous buttocks enhancement or augmentation surgery?

Expect some swelling and discomfort. Follow your surgeon’s aftercare instructions to ensure proper healing. Full recovery typically takes several weeks.

Are there different options available for buttock implant revision?

Yes, options include repositioning the implants, replacing them with new ones, or combining with fat grafting for better results. Discuss these with your surgeon.

How much does a buttock implant revision cost?

Costs vary based on the complexity of the procedure and surgeon’s fees. Consult your surgeon for a detailed cost estimate tailored to your specific needs.

Can I anticipate better results after my buttock implant revision, augmentation surgery, and BBL?

Yes, with a skilled surgeon and proper aftercare, you can achieve improved symmetry, shape, and overall satisfaction. Realistic expectations are key.

What are the risks associated with buttock implant augmentation revision surgery?

Risks include infection, scarring, and anesthesia complications. Choosing an experienced surgeon minimizes these risks significantly. Always discuss potential risks with your doctor.